This the multi-page printable view of this section. Click here to print.
Getting Started
- 1: What is DevOps?
- 2: Kubernetes
- 2.1: Recommended Agenda
- 2.2: Introduction to Kubernetes
- 2.3: Deploying Your First Nginx Pod
- 2.4: Deploying Your First Kubernetes Service
- 2.5: Deploying Your First Nginx Deployment
- 2.6: Deploying Your First DaemonSet
- 2.7: Deploying Your First Nginx ReplicaSet
- 2.8: Understand Kubernetes Scheduling
- 2.9: Deploying Your First Ingress Deployment
- 3: Docker
- 3.1: Docker for Beginners
- 3.1.1: Agenda
- 3.1.2: Pre-requisite
- 3.1.3: Getting Started with Docker Image
- 3.1.4: Accessing & Managing Docker Image
- 3.1.5: Getting Started with Dockerfile
- 3.1.6: Creating Private Docker Registry
- 3.1.7: Docker Volumes
- 3.1.8: Docker Networks
- 3.2: Docker for intermediate
- 3.2.1: Advanced Docker networking
- 3.2.2: Docker compose
- 3.2.3: First Look at Docker Application Packages?
- 3.2.4: Introduction to Docker Swarm
- 3.2.5: Multistage build
- 3.2.6: What happens when Containers are Launched?
- 3.3: Using Jenkins
- 3.4: Using Jenkins 2
- 3.5: DockerTools
- 4: Grafana
- 5: Prometheus
- 6: Ansible
- 7: Terraform
- 8: Java
- 8.1: Recommended Agenda
- 8.2: Pre-requisite
- 8.3: Basics of Docker
- 8.4: Building and Running a Docker Container
- 8.5: Multi-Container Application using Docker Compose
- 8.6: Deploy Application using Docker Swarm Mode
- 8.7: Docker & Netbeans
- 8.8: Docker and IntelliJ
- 8.9: Docker & Eclipse
- 9: GoLang
1 - What is DevOps?
What is DevOps?
If you want to build better software faster, DevOps is the answer. DevOps combines development and operations to increase the efficiency, speed, and security of software development and delivery compared to traditional processes.
DevOps is a culture, not a role. The purpose of DevOps is to enable faster delivery of higher quality software. DevOps is not just limited to a set of tools or a paradigm–it is often designated as the intersection between culture, processes, and tools. Through continuous learning and improvement, engineers are able to improve quality and deliver products faster to market, thus increasing user satisfaction and ROI.
Who is DevOps Engineer?
DevOps engineers are a group of influential individuals who encapsulates depth of knowledge and years of hands-on experience around a wide variety of open source technologies and tools. They come with core attributes which involve an ability to code and script, data management skills as well as a strong focus on business outcomes. They are rightly called “Special Forces” who hold core attributes around collaboration, open communication and reaching across functional borders.
DevOps engineer always shows interest and comfort working with frequent, incremental code testing and deployment. With a strong grasp of automation tools, these individuals are expected to move the business quicker and forward, at the same time giving a stronger technology advantage. In nutshell, a DevOps engineer must have a solid interest in scripting and coding, skill in taking care of deployment automation, framework computerization and capacity to deal with the version control system.
Qualities of DevOps Engineer
- Experience in a wide range of open source tools and techniques
- A Broad knowledge on Sysadmin and Ops roles
- Expertise in software coding, testing, and deployment
- Experiences on DevOps Automation tools like Ansible, Puppet, and Chef
- Experience in Continuous Integration, Delivery & Deployment
- Industry-wide experience in implementation of DevOps solutions for team collaborations
- A firm knowledge of the various computer programming languages
- Good awareness in Agile Methodology of Project Management
- A Forward-thinker with an ability to connect the technical and business goals
What exactly DevOps Engineer do?
DevOps is not a way to get developers doing operational tasks so that you can get rid of the operations team and vice versa. Rather it is a way of working that encourages the Development and Operations teams to work together in a highly collaborative way towards the same goal. In nutshell, DevOps integrates developers and operations team to improve collaboration and productivity.
The main goal of DevOps is not only to increase the product’s quality to a greater extent but also to increase the collaboration of Dev and Ops team as well so that the workflow within the organization becomes smoother & efficient at the same time.
10 Golden tips to become a DevOps Engineer:
- Develop Your Personal Brand with Community Involvement
- Get familiar with IaC(Infrastructure-as-Code) - CM
- Understand DevOps Principles & Frameworks
- Demonstrate Curiosity & Empathy
- Get certified on Container Technologies - Docker | Kubernetes| Cloud
- Get Expert in Public | Private | Hybrid Cloud offering
- Become an Operations Expert before you even THINK DevOps
- Get Hands-on with various Linux Distros & Tools
- Arm Yourself with CI-CD, Automation & Monitoring Tools(Github, Jenkins, Puppet, Ansible etc)
- Start with Process Re-Engineering and Cross-collaboration within your teams.
2 - Kubernetes
2.1 - Recommended Agenda
2.2 - Introduction to Kubernetes
What is Kubernetes?
Kubernetes (commonly referred to as K8s) is an orchestration engine for container technologies such as Docker and rkt that is taking over the DevOps scene in the last couple of years. It is already available on Azure and Google Cloud as a managed service.
Kubernetes can speed up the development process by making easy, automated deployments, updates (rolling-update) and by managing our apps and services with almost zero downtime. It also provides self-healing. Kubernetes can detect and restart services when a process crashes inside the container. Kubernetes is originally developed by Google, it is open-sourced since its launch and managed by a large community of contributors.
Any developer can package up applications and deploy them on Kubernetes with basic Docker knowledge.
What is K8s made up of?
Kubectl:
- A CLI tool for Kubernetes.

Master Node:
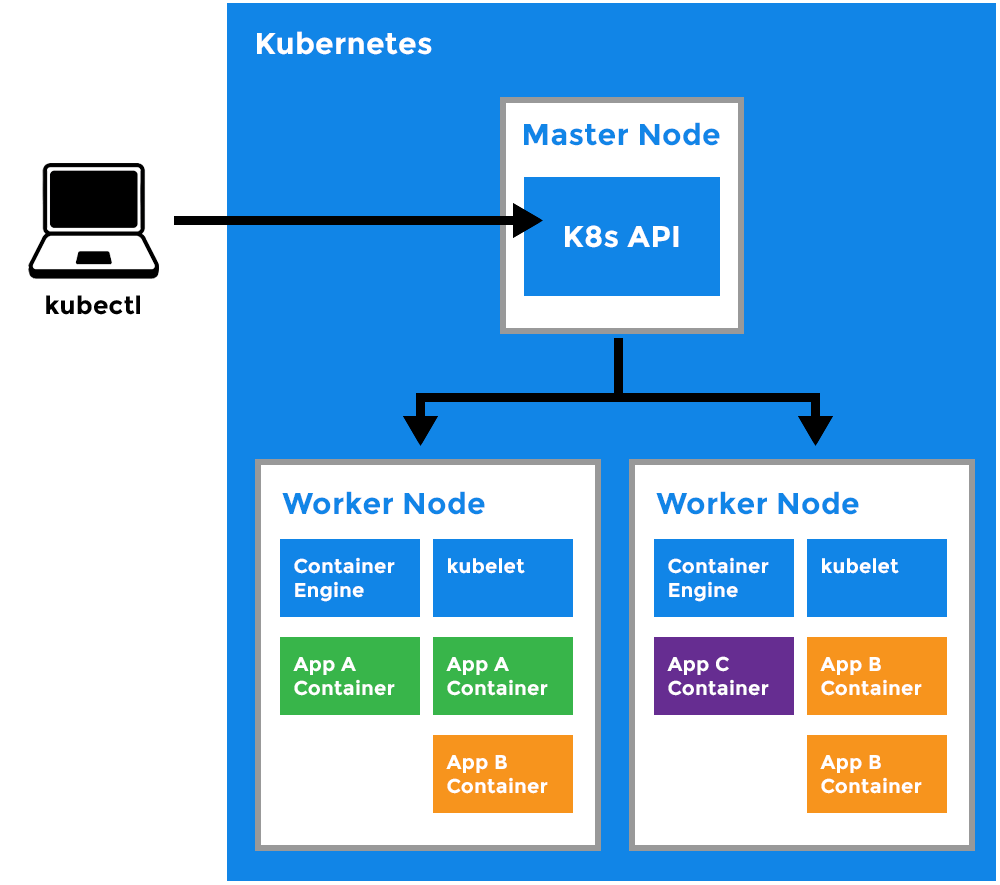
- The main machine that controls the nodes.
- Main entrypoint for all administrative tasks.
- It handles the orchestration of the worker nodes.
Worker Node
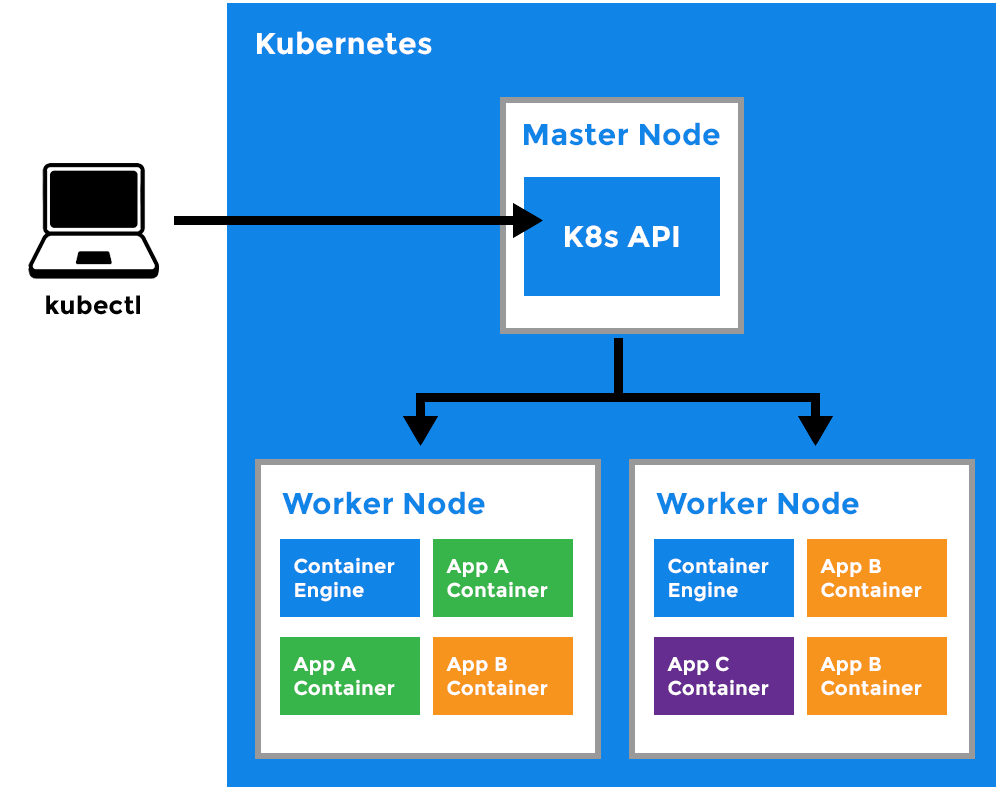
- It is a worker machine in Kubernetes (used to be known as minion).
- This machine performs the requested tasks. Each Node is controlled by the Master Node.
- Runs pods (that have containers inside them).
- This is where the Docker engine runs and takes care of downloading images and starting containers.
Kubelet
- Primary node agent.
- Ensures that containers are running and healthy.
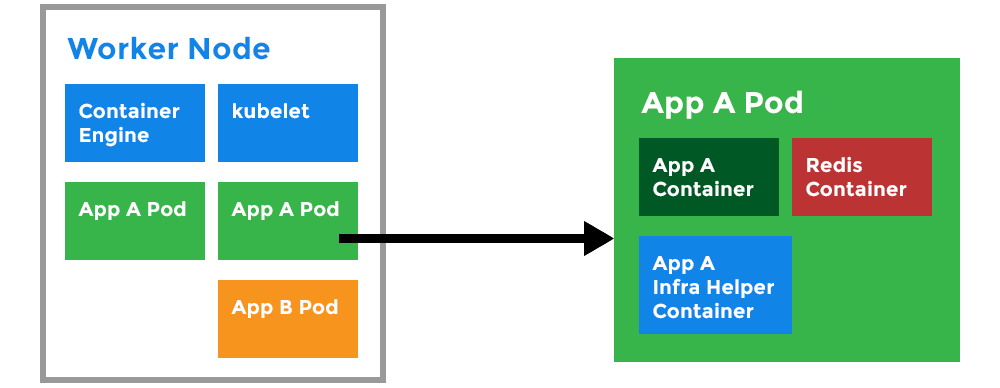
Kubernetes Pod:
- A Pod can host multiple containers and storage volumes.
- Pods are instances of Deployments (see Deployment).
- One Deployment can have multiple pods.
- With Horizontal Pod Autoscaling, Pods of a Deployment can be automatically started and halted based on CPU usage.
- Containers within the same pod have access to shared volumes.
- Each Pod has its unique IP Address within the cluster.
- Pods are up and running until someone (or a controller) destroys them.
- Any data saved inside the Pod will disappear without a persistent storage.
Deployment:
- A deployment is a blueprint for the Pods to be created (see Pod).
- Handles update of its respective Pods.
- A deployment will create a Pod by its spec from the template.
- Their target is to keep the Pods running and update them (with rolling-update) in a more controlled way.
- Pod(s) resource usage can be specified in the deployment.
- Deployment can scale up replicas of Pods.
- kubernetes-deployment.
.png)
Secret:
- A Secret is an object, where we can store sensitive informations like usernames and passwords.
- In the secret files, values are base64 encoded.
- To use a secret, we need to refer to the secret in our Pod.
- Or we can put it inside a volume and mount that to the container.
- Secrets are not encrypted by default. For encryption we need to create an EncryptionConfig.
- You can read more about encryption here
Service:
- A service is responsible for making our Pods discoverable inside the network or exposing them to the internet.
- A Service identifies Pods by its LabelSelector.
- There are 3 types of services:.
ClusterIP:
- The deployment is only visible inside the cluster.
- The deployment gets an internal ClusterIP assigned to it.
- Traffic is load balanced between the Pods of the deployment.
Node Port:
- The deployment is visible inside the cluster.
- The deployment is bound to a port of the Master Node.
- Each Node will proxy that port to your Service.
- The service is available at http(s)://
- Traffic is load balanced between the Pods of the deployment.
Load Balancer:
- The deployment gets a Public IP address assigned.
- The service is available at http(s)://
:80 - Traffic is load balanced between the Pods of the deployment.
Credits:
2.3 - Deploying Your First Nginx Pod
Deploying Your First Nginx Pod
What are K8s Pods?
- Kubernetes pods are the foundational unit for all higher Kubernetes objects.
- A pod hosts one or more containers.
- It can be created using either a command or a YAML/JSON file.
- Use
kubectlto create pods, view the running ones, modify their configuration, or terminate them. Kuberbetes will attempt to restart a failing pod by default. - If the pod fails to start indefinitely, we can use the
kubectl describecommand to know what went wrong.
Why does Kubernetes use a Pod as the smallest deployable unit, and not a single container?
While it would seem simpler to just deploy a single container directly, there are good reasons to add a layer of abstraction represented by the Pod. A container is an existing entity, which refers to a specific thing. That specific thing might be a Docker container, but it might also be a rkt container, or a VM managed by Virtlet. Each of these has different requirements.
What’s more, to manage a container, Kubernetes needs additional information, such as a restart policy, which defines what to do with a container when it terminates, or a liveness probe, which defines an action to detect if a process in a container is still alive from the application’s perspective, such as a web server responding to HTTP requests.
Instead of overloading the existing “thing” with additional properties, Kubernetes architects have decided to use a new entity, the Pod, that logically contains (wraps) one or more containers that should be managed as a single entity.
Why does Kubernetes allow more than one container in a Pod?
Containers in a Pod run on a “logical host”; they use the same network namespace (in other words, the same IP address and port space), and the same IPC namespace. They can also use shared volumes. These properties make it possible for these containers to efficiently communicate, ensuring data locality. Also, Pods enable you to manage several tightly coupled application containers as a single unit.
So if an application needs several containers running on the same host, why not just make a single container with everything you need? Well first, you’re likely to violate the “one process per container” principle. This is important because with multiple processes in the same container it is harder to troubleshoot the container. That is because logs from different processes will be mixed together and it is harder manage the processes lifecycle. For example to take care of “zombie” processes when their parent process dies. Second, using several containers for an application is simpler, more transparent, and enables decoupling software dependencies. Also, more granular containers can be reused between teams.
Pre-requisite:
Steps
kubectl apply -f pods01.yaml
Viewing Your Pods
kubectl get pods
Which Node Is This Pod Running On?
kubectl get pods -o wide
$ kubectl describe po webserver
Name:               webserver
Namespace:          default
Priority:           0
PriorityClassName:  <none>
Node:               gke-standard-cluster-1-default-pool-78257330-5hs8/10.128.0.3
Start Time:         Thu, 28 Nov 2019 13:02:19 +0530
Labels:             <none>
Annotations:        kubectl.kubernetes.io/last-applied-configuration:
                      {"apiVersion":"v1","kind":"Pod","metadata":{"annotations":{},"name":"webserver","namespace":"default"},"spec":{"containers":[{"image":"ngi...
                    kubernetes.io/limit-ranger: LimitRanger plugin set: cpu request for container webserver
Status:             Running
IP:                 10.8.0.3
Containers:
  webserver:
    Container ID:   docker://ff06c3e6877724ec706485374936ac6163aff10822246a40093eb82b9113189c
    Image:          nginx:latest
    Image ID:       docker-pullable://nginx@sha256:189cce606b29fb2a33ebc2fcecfa8e33b0b99740da4737133cdbcee92f3aba0a
    Port:           80/TCP
    Host Port:      0/TCP
    State:          Running
      Started:      Thu, 28 Nov 2019 13:02:25 +0530
    Ready:          True
    Restart Count:  0
    Requests:
      cpu:        100m
    Environment:  <none>
    Mounts:
      /var/run/secrets/kubernetes.io/serviceaccount from default-token-mpxxg (ro)
Conditions:
  Type              Status
  Initialized       True
  Ready             True
  ContainersReady   True
  PodScheduled      True
Volumes:
  default-token-mpxxg:
    Type:        Secret (a volume populated by a Secret)
    SecretName:  default-token-mpxxg
    Optional:    false
QoS Class:       Burstable
Node-Selectors:  <none>
Tolerations:     node.kubernetes.io/not-ready:NoExecute for 300s
                 node.kubernetes.io/unreachable:NoExecute for 300s
Events:
  Type    Reason     Age    From                                                        Message
  ----    ------     ----   ----                                                        -------
  Normal  Scheduled  2m54s  default-scheduler                                           Successfully assigned default/webserver to gke-standard-cluster-1-default-pool-78257330-5hs8
  Normal  Pulling    2m53s  kubelet, gke-standard-cluster-1-default-pool-78257330-5hs8  pulling image "nginx:latest"
  Normal  Pulled     2m50s  kubelet, gke-standard-cluster-1-default-pool-78257330-5hs8  Successfully pulled image "nginx:latest"
  Normal  Created    2m48s  kubelet, gke-standard-cluster-1-default-pool-78257330-5hs8  Created container
  Normal  Started    2m48s  kubelet, gke-standard-cluster-1-default-pool-78257330-5hs8  Started container
Output in JSON
$ kubectl get pods -o json
{
    "apiVersion": "v1",
    "items": [
        {
            "apiVersion": "v1",
            "kind": "Pod",
            "metadata": {
                "annotations": {
                    "kubectl.kubernetes.io/last-applied-configuration": "{\"apiVersion\":\"v1\",\"kind\":\"Pod\",\"metadata\":{\"annotations\":{},\"name\":\"webserver\",\"namespace\":\"default\"},\"spec\":{\"con
tainers\":[{\"image\":\"nginx:latest\",\"name\":\"webserver\",\"ports\":[{\"containerPort\":80}]}]}}\n",
                    "kubernetes.io/limit-ranger": "LimitRanger plugin set: cpu request for container webserver"
                },
                "creationTimestamp": "2019-11-28T08:48:28Z",
                "name": "webserver",
                "namespace": "default",
                "resourceVersion": "20080",
                "selfLink": "/api/v1/namespaces/default/pods/webserver",
                "uid": "d8e0b56b-11bb-11ea-a1bf-42010a800006"
            },
            "spec": {
                "containers": [
                    {
                        "image": "nginx:latest",
                        "imagePullPolicy": "Always",
                        "name": "webserver",
                        "ports": [
                            {
                                "containerPort": 80,
                                "protocol": "TCP"
                            }
                        ],
                        "resources": {
                            "requests": {
                                "cpu": "100m"
                            }
                        },
                        "terminationMessagePath": "/dev/termination-log",
                        "terminationMessagePolicy": "File",
Executing Commands Against Pods
$ kubectl exec -it webserver -- /bin/bash
root@webserver:/#
root@webserver:/# cat /etc/os-release
PRETTY_NAME="Debian GNU/Linux 10 (buster)"
NAME="Debian GNU/Linux"
VERSION_ID="10"
VERSION="10 (buster)"
VERSION_CODENAME=buster
ID=debian
HOME_URL="https://www.debian.org/"
SUPPORT_URL="https://www.debian.org/support"
BUG_REPORT_URL="https://bugs.debian.org/"
Please exit from the shell (/bin/bash) session.
root@webserver:/# exit
Deleting the Pod
$ kubectl delete -f pods01.yaml
pod "webserver" deleted

$ kubectl get po -o wide
No resources found.
Get logs of Pod
$ kubectl logs webserver

/docker-entrypoint.sh: /docker-entrypoint.d/ is not empty, will attempt to perform configuration
/docker-entrypoint.sh: Looking for shell scripts in /docker-entrypoint.d/
/docker-entrypoint.sh: Launching /docker-entrypoint.d/10-listen-on-ipv6-by-default.sh
10-listen-on-ipv6-by-default.sh: Getting the checksum of /etc/nginx/conf.d/default.conf
10-listen-on-ipv6-by-default.sh: Enabled listen on IPv6 in /etc/nginx/conf.d/default.conf
/docker-entrypoint.sh: Launching /docker-entrypoint.d/20-envsubst-on-templates.sh
/docker-entrypoint.sh: Configuration complete; ready for start up
Ading a 2nd container to a Pod
In the microservices architecture, each module should live in its own space and communicate with other modules following a set of rules. But, sometimes we need to deviate a little from this principle. Suppose you have an Nginx web server running and we need to analyze its web logs in real-time. The logs we need to parse are obtained from GET requests to the web server. The developers created a log watcher application that will do this job and they built a container for it. In typical conditions, you’d have a pod for Nginx and another for the log watcher. However, we need to eliminate any network latency so that the watcher can analyze logs the moment they are available. A solution for this is to place both containers on the same pod.
Having both containers on the same pod allows them to communicate through the loopback interface (ifconfig lo) as if they were two processes running on the same host. They also share the same storage volume.
Let us see how a pod can host more than one container. Let’s take a look to the pods02.yaml file. It contains the following lines:
apiVersion: v1
kind: Pod
metadata:
  name: webserver
spec:
  containers:
  - name: webserver
    image: nginx:latest
    ports:
    - containerPort: 80
  - name: webwatcher
    image: afakharany/watcher:latest
Run the following command:
$ kubectl apply -f pods02.yaml
$ kubectl get po -o wide
NAME        READY   STATUS              RESTARTS   AGE   IP       NODE                                                NOMINATED NODE   READINESS GATES
webserver   0/2     ContainerCreating   0          13s   <none>   gke-standard-cluster-1-default-pool-78257330-5hs8   <none>           <none>
$ kubectl get po,svc,deploy
NAME            READY   STATUS    RESTARTS   AGE
pod/webserver   2/2     Running   0          3m6s
NAME                 TYPE        CLUSTER-IP   EXTERNAL-IP   PORT(S)   AGE
service/kubernetes   ClusterIP   10.12.0.1    <none>        443/TCP   107m
$ kubectl get po -o wide
NAME        READY   STATUS    RESTARTS   AGE     IP         NODE                                                NOMINATED NODE   READINESS GATES
webserver   2/2     Running   0          3m37s   10.8.0.5   gke-standard-cluster-1-default-pool-78257330-5hs8   <none>           <none>
How to verify 2 containers are running inside a Pod?
$ kubectl describe po
Containers:
  webserver:
    Container ID:   docker://0564fcb88f7c329610e7da24cba9de6555c0183814cf517e55d2816c6539b829
    Image:          nginx:latest
    Image ID:       docker-pullable://nginx@sha256:36b77d8bb27ffca25c7f6f53cadd059aca2747d46fb6ef34064e31727325784e
    Port:           80/TCP
    State:          Running
      Started:      Wed, 08 Jan 2020 13:21:57 +0530
    Ready:          True
    Restart Count:  0
    Requests:
      cpu:        100m
    Environment:  <none>
    Mounts:
      /var/run/secrets/kubernetes.io/serviceaccount from default-token-xhgmm (ro)
  webwatcher:
    Container ID:   docker://4cebbb220f7f9695f4d6492509e58152ba661f3ab8f4b5d0a7adec6c61bdde26
    Image:          afakharany/watcher:latest
    Image ID:       docker-pullable://afakharany/watcher@sha256:43d1b12bb4ce6e549e85447678a28a8e7b9d4fc398938a6f3e57d2908a9b7d80
    Port:           <none>
    State:          Running
      Started:      Wed, 08 Jan 2020 13:22:26 +0530
    Ready:          True
    Restart Count:  0
    Requests:
Since we have two containers in a pod, we will need to use the -c option with kubectl when we need to address a specific container. For example:
$ kubectl exec -it webserver -c webwatcher -- /bin/bash

root@webserver:/# cat /etc/hosts
# Kubernetes-managed hosts file.
127.0.0.1       localhost
::1     localhost ip6-localhost ip6-loopback
fe00::0 ip6-localnet
fe00::0 ip6-mcastprefix
fe00::1 ip6-allnodes
fe00::2 ip6-allrouters
10.8.0.5        webserver
Please exit from the shell (/bin/bash) session.
root@webserver:/# exit
Cleaning up
kubectl delete -f pods02.yaml
Example of Multi-Container Pod
Let’s talk about communication between containers in a Pod. Having multiple containers in a single Pod makes it relatively straightforward for them to communicate with each other. They can do this using several different methods.
Use Cases for Multi-Container Pods
The primary purpose of a multi-container Pod is to support co-located, co-managed helper processes for a primary application. There are some general patterns for using helper processes in Pods:
Sidecar containers help the main container. Some examples include log or data change watchers, monitoring adapters, and so on. A log watcher, for example, can be built once by a different team and reused across different applications. Another example of a sidecar container is a file or data loader that generates data for the main container.
Proxies, bridges, and adapters connect the main container with the external world. For example, Apache HTTP server or nginx can serve static files. It can also act as a reverse proxy to a web application in the main container to log and limit HTTP requests. Another example is a helper container that re-routes requests from the main container to the external world. This makes it possible for the main container to connect to the localhost to access, for example, an external database, but without any service discovery.
Shared volumes in a Kubernetes Pod
In Kubernetes, you can use a shared Kubernetes Volume as a simple and efficient way to share data between containers in a Pod. For most cases, it is sufficient to use a directory on the host that is shared with all containers within a Pod.
Kubernetes Volumes enables data to survive container restarts, but these volumes have the same lifetime as the Pod. That means that the volume (and the data it holds) exists exactly as long as that Pod exists. If that Pod is deleted for any reason, even if an identical replacement is created, the shared Volume is also destroyed and created anew.
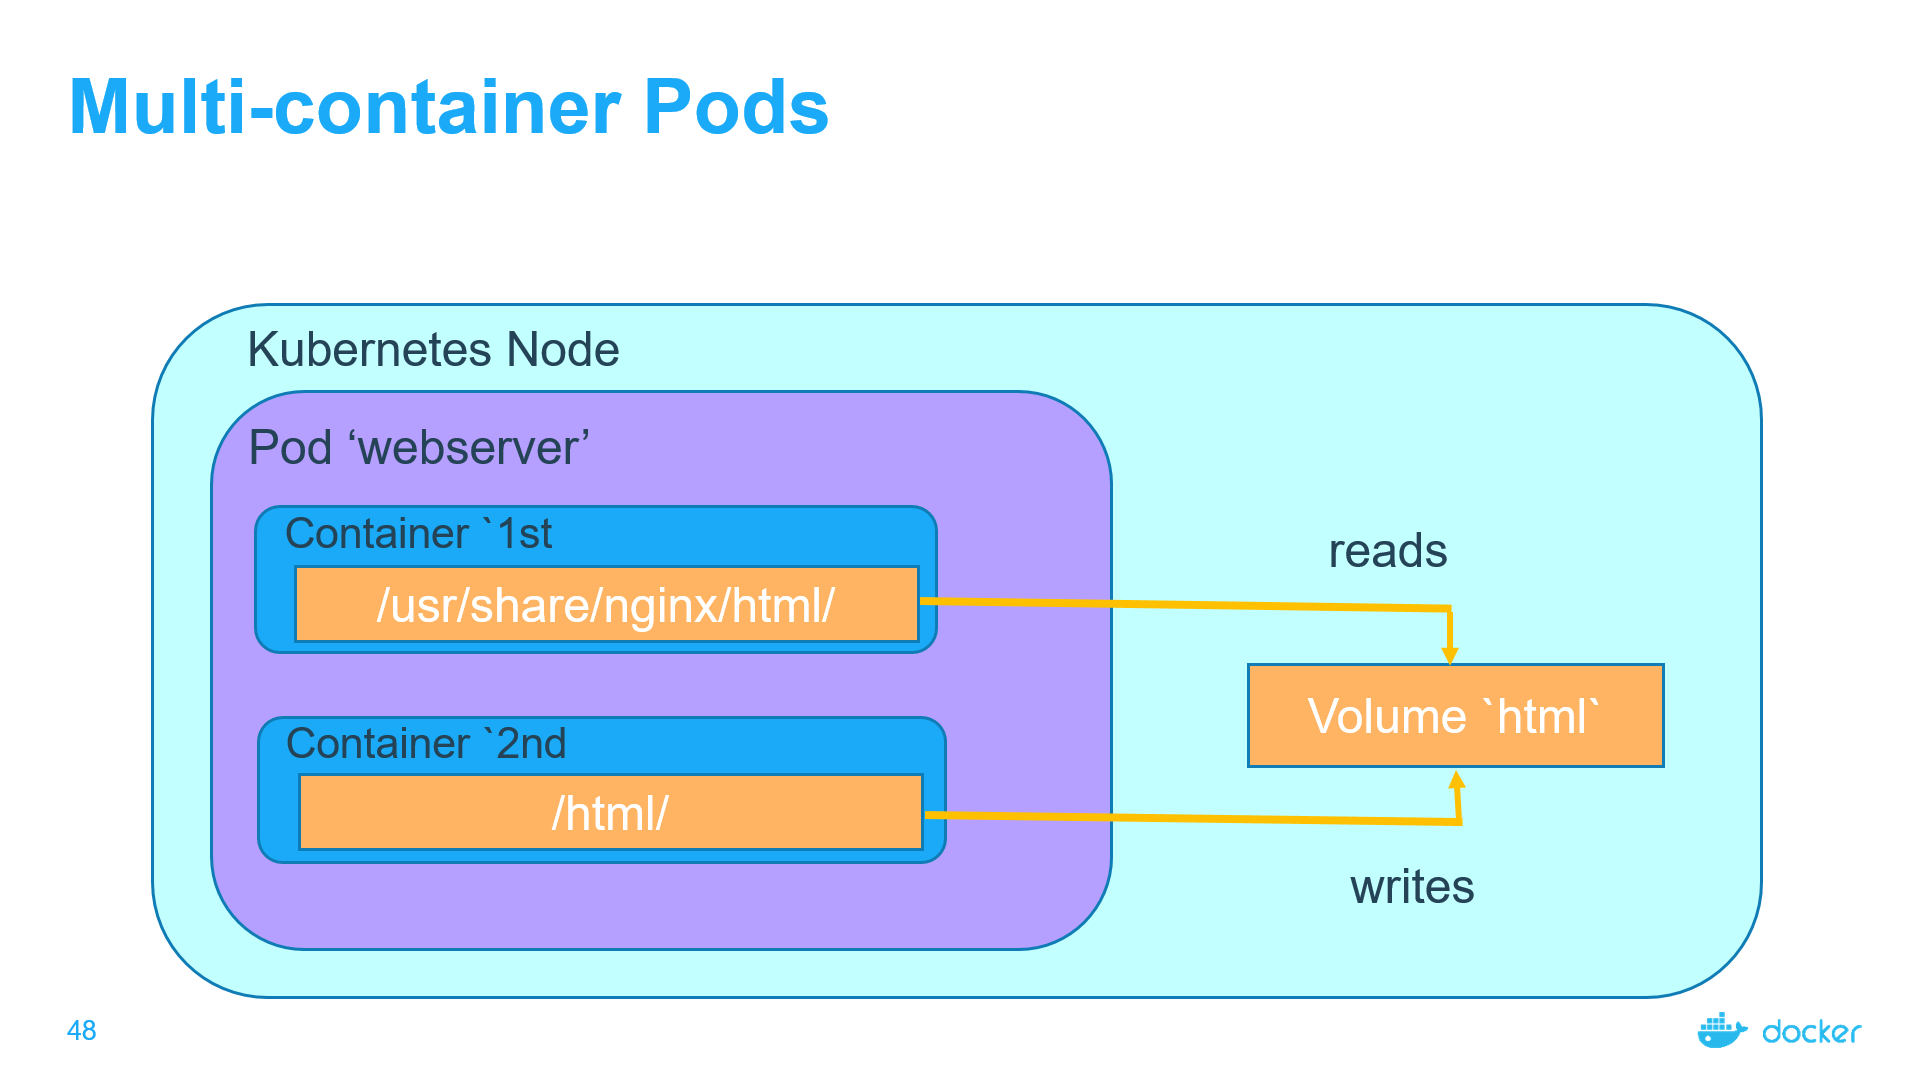
A standard use case for a multi-container Pod with a shared Volume is when one container writes logs or other files to the shared directory, and the other container reads from the shared directory. For example, we can create a Pod like so (pods03.yaml):
In this file (pods03.yaml) a volume named html has been defined. Its type is emptyDir, which means that the volume is first created when a Pod is assigned to a node, and exists as long as that Pod is running on that node. As the name says, it is initially empty. The 1st container runs nginx server and has the shared volume mounted to the directory /usr/share/nginx/html. The 2nd container uses the Debian image and has the shared volume mounted to the directory /html. Every second, the 2nd container adds the current date and time into the index.html file, which is located in the shared volume. When the user makes an HTTP request to the Pod, the Nginx server reads this file and transfers it back to the user in response to the request.
kubectl apply -f pods03.yaml
[Captains-Bay]🚩 >  kubectl get po,svc
NAME      READY     STATUS    RESTARTS   AGE
po/mc1    2/2       Running   0          11s

NAME             TYPE        CLUSTER-IP    EXTERNAL-IP   PORT(S)   AGE
svc/kubernetes   ClusterIP   10.15.240.1   <none>        443/TCP   1h
[Captains-Bay]🚩 >  kubectl describe po mc1
Name:         mc1
Namespace:    default
Node:         gke-k8s-lab1-default-pool-fd9ef5ad-pc18/10.140.0.16
Start Time:   Wed, 08 Jan 2020 14:29:08 +0530
Labels:       <none>
Annotations:  kubectl.kubernetes.io/last-applied-configuration={"apiVersion":"v1","kind":"Pod","metadata":{"annotations":{},"name":"mc1","namespace":"default"},"spec":{"containers":[{"image":"nginx","name":"1st","v...
              kubernetes.io/limit-ranger=LimitRanger plugin set: cpu request for container 1st; cpu request for container 2nd
Status:       Running
IP:           10.12.2.6
Containers:
  1st:
    Container ID:   docker://b08eb646f90f981cd36c605bf8fead3ca62178c7863598fd4558cb026ed067dd
    Image:          nginx
    Image ID:       docker-pullable://nginx@sha256:36b77d8bb27ffca25c7f6f53cadd059aca2747d46fb6ef34064e31727325784e
    Port:           <none>
    State:          Running
      Started:      Wed, 08 Jan 2020 14:29:09 +0530
    Ready:          True
    Restart Count:  0
    Requests:
      cpu:        100m
    Environment:  <none>
    Mounts:
      /usr/share/nginx/html from html (rw)
      /var/run/secrets/kubernetes.io/serviceaccount from default-token-xhgmm (ro)
  2nd:
    Container ID:  docker://63180b4128d477810d6062342f4b8e499de684ffd69ad245c29118e1661eafcb
    Image:         debian
    Image ID:      docker-pullable://debian@sha256:c99ed5d068d4f7ff36c7a6f31810defebecca3a92267fefbe0e0cf2d9639115a
    Port:          <none>
    Command:
      /bin/sh
      -c
    Args:
      while true; do date >> /html/index.html; sleep 1; done
    State:          Running
      Started:      Wed, 08 Jan 2020 14:29:14 +0530
    Ready:          True
    Restart Count:  0
    Requests:
      cpu:        100m
    Environment:  <none>
    Mounts:
      /html from html (rw)
      /var/run/secrets/kubernetes.io/serviceaccount from default-token-xhgmm (ro)
Conditions:
  Type              Status
  Initialized       True
  Ready             True
  ContainersReady   True
  PodScheduled      True
Volumes:
  html:
    Type:    EmptyDir (a temporary directory that shares a pod's lifetime)
    Medium:
  default-token-xhgmm:
    Type:        Secret (a volume populated by a Secret)
    SecretName:  default-token-xhgmm
    Optional:    false
QoS Class:       Burstable
Node-Selectors:  <none>
Tolerations:     node.kubernetes.io/not-ready:NoExecute for 300s
                 node.kubernetes.io/unreachable:NoExecute for 300s
Events:
  Type    Reason     Age   From                                              Message
  ----    ------     ----  ----                                              -------
  Normal  Scheduled  18s   default-scheduler                                 Successfully assigned default/mc1 to gke-k8s-lab1-default-pool-fd9ef5ad-pc18
  Normal  Pulling    17s   kubelet, gke-k8s-lab1-default-pool-fd9ef5ad-pc18  pulling image "nginx"
  Normal  Pulled     17s   kubelet, gke-k8s-lab1-default-pool-fd9ef5ad-pc18  Successfully pulled image "nginx"
  Normal  Created    17s   kubelet, gke-k8s-lab1-default-pool-fd9ef5ad-pc18  Created container
  Normal  Started    17s   kubelet, gke-k8s-lab1-default-pool-fd9ef5ad-pc18  Started container
  Normal  Pulling    17s   kubelet, gke-k8s-lab1-default-pool-fd9ef5ad-pc18  pulling image "debian"
  Normal  Pulled     13s   kubelet, gke-k8s-lab1-default-pool-fd9ef5ad-pc18  Successfully pulled image "debian"
  Normal  Created    12s   kubelet, gke-k8s-lab1-default-pool-fd9ef5ad-pc18  Created container
  Normal  Started    12s   kubelet, gke-k8s-lab1-default-pool-fd9ef5ad-pc18  Started container
$ kubectl exec mc1 -c 1st -- /bin/cat /usr/share/nginx/html/index.html
...
Wed Jan  8 08:59:14 UTC 2020
Wed Jan  8 08:59:15 UTC 2020
Wed Jan  8 08:59:16 UTC 2020

$ kubectl exec mc1 -c 2nd -- /bin/cat /html/index.html
...
Wed Jan  8 08:59:14 UTC 2020
Wed Jan  8 08:59:15 UTC 2020
Wed Jan  8 08:59:16 UTC 2020
Cleaning Up
kubectl delete -f pods03.yaml
2.4 - Deploying Your First Kubernetes Service
What are Kubernetes Services?
Say, you have pods running nginx in a flat, cluster wide, address space. In theory, you could talk to these pods directly, but what happens when a node dies? The pods die with it, and the Deployment will create new ones, with different IPs. This is the problem a Service solves.
Kubernetes Pods are mortal. They are born and when they die, they are not resurrected. If you use a Deployment to run your app, it can create and destroy Pods dynamically. Each Pod gets its own IP address, however in a Deployment, the set of Pods running in one moment in time could be different from the set of Pods running that application a moment later.
This leads to a problem: if some set of Pods (call them “backends”) provides functionality to other Pods (call them “frontends”) inside your cluster, how do the frontends find out and keep track of which IP address to connect to, so that the frontend can use the backend part of the workload?
Enter Services
A Kubernetes Service is an abstraction which defines a logical set of Pods running somewhere in your cluster, that all provide the same functionality. When created, each Service is assigned a unique IP address (also called clusterIP). This address is tied to the lifespan of the Service, and will not change while the Service is alive. Pods can be configured to talk to the Service, and know that communication to the Service will be automatically load-balanced out to some pod that is a member of the Service.
Deploying a Kubernetes Service
Like all other Kubernetes objects, a Service can be defined using a YAML or JSON file that contains the necessary definitions (they can also be created using just the command line, but this is not the recommended practice). Let’s create a NodeJS service definition. It may look like the following:
$ kubectl apply -f nginx-svc.yaml
This specification will create a Service which targets TCP port 80 on any Pod with the run: my-nginx label, and expose it on an abstracted Service port (targetPort: is the port the container accepts traffic on, port: is the abstracted Service port, which can be any port other pods use to access the Service). View Service API object to see the list of supported fields in service definition. Check your Service
$ kubectl get svc my-nginx
As mentioned previously, a Service is backed by a group of Pods. These Pods are exposed through endpoints. The Service’s selector will be evaluated continuously and the results will be POSTed to an Endpoints object also named my-nginx. When a Pod dies, it is automatically removed from the endpoints, and new Pods matching the Service’s selector will automatically get added to the endpoints. Check the endpoints, and note that the IPs are the same as the Pods created in the first step:
$ kubectl describe svc my-nginx
You should now be able to curl the nginx Service on
Accessing the Service
Kubernetes supports 2 primary modes of finding a Service - environment variables and DNS
Environment Variables
When a Pod runs on a Node, the kubelet adds a set of environment variables for each active Service. This introduces an ordering problem. To see why, inspect the environment of your running nginx Pods (your Pod name will be different):
$ kubectl exec my-nginx-3800858182-jr4a2 -- printenv | grep SERVICE
KUBERNETES_SERVICE_HOST=10.0.0.1
KUBERNETES_SERVICE_PORT=443
KUBERNETES_SERVICE_PORT_HTTPS=443
Note there’s no mention of your Service. This is because you created the replicas before the Service. Another disadvantage of doing this is that the scheduler might put both Pods on the same machine, which will take your entire Service down if it dies. We can do this the right way by killing the 2 Pods and waiting for the Deployment to recreate them. This time around the Service exists before the replicas. This will give you scheduler-level Service spreading of your Pods (provided all your nodes have equal capacity), as well as the right environment variables:
$ kubectl scale deployment my-nginx --replicas=0; kubectl scale deployment my-nginx --replicas=2;
$ kubectl get pods -l run=my-nginx -o wide
NAME                        READY     STATUS    RESTARTS   AGE     IP            NODE
my-nginx-3800858182-e9ihh   1/1       Running   0          5s      10.244.2.7    kubernetes-minion-ljyd
my-nginx-3800858182-j4rm4   1/1       Running   0          5s      10.244.3.8    kubernetes-minion-905m
You may notice that the pods have different names, since they are killed and recreated.
$ kubectl exec my-nginx-3800858182-e9ihh -- printenv | grep SERVICE
KUBERNETES_SERVICE_PORT=443
MY_NGINX_SERVICE_HOST=10.0.162.149
KUBERNETES_SERVICE_HOST=10.0.0.1
MY_NGINX_SERVICE_PORT=80
KUBERNETES_SERVICE_PORT_HTTPS=443
DNS
Kubernetes offers a DNS cluster addon Service that automatically assigns dns names to other Services. You can check if it’s running on your cluster:
$ kubectl get services kube-dns --namespace=kube-system
NAME       TYPE        CLUSTER-IP   EXTERNAL-IP   PORT(S)         AGE
kube-dns   ClusterIP   10.0.0.10    <none>        53/UDP,53/TCP   8m
The rest of this section will assume you have a Service with a long lived IP (my-nginx), and a DNS server that has assigned a name to that IP. Here we use the CoreDNS cluster addon (application name kube-dns), so you can talk to the Service from any pod in your cluster using standard methods (e.g. gethostbyname()). If CoreDNS isn’t running, you can enable it referring to the CoreDNS README or Installing CoreDNS. Let’s run another curl application to test this:
$ kubectl run curl --image=radial/busyboxplus:curl -i --tty
Waiting for pod default/curl-131556218-9fnch to be running, status is Pending, pod ready: false
Hit enter for command prompt
Then, hit enter and run nslookup my-nginx:

$ nslookup my-nginx
Server:    10.0.0.10
Address 1: 10.0.0.10

Name:      my-nginx
Address 1: 10.0.162.149
Exposing the Service
For some parts of your applications you may want to expose a Service onto an external IP address. Kubernetes supports two ways of doing this: NodePorts and LoadBalancers. The Service created in the last section already used NodePort, so your nginx HTTPS replica is ready to serve traffic on the internet if your node has a public IP.
$ kubectl get svc my-nginx -o yaml | grep nodePort -C 5
uid: 07191fb3-f61a-11e5-8ae5-42010af00002
spec:
  clusterIP: 10.0.162.149
  ports:
  - name: http
    nodePort: 31704
    port: 8080
    protocol: TCP
    targetPort: 80
  - name: https
    nodePort: 32453
    port: 443
    protocol: TCP
    targetPort: 443
  selector:
    run: my-nginx
$ kubectl get nodes -o yaml | grep ExternalIP -C 1
    - address: 104.197.41.11
      type: ExternalIP
    allocatable:
--
    - address: 23.251.152.56
      type: ExternalIP
    allocatable:
...
$ curl https://<EXTERNAL-IP>:<NODE-PORT> -k
...
<h1>Welcome to nginx!</h1>
Let’s now recreate the Service to use a cloud load balancer, just change the Type of my-nginx Service from NodePort to LoadBalancer:
$ kubectl edit svc my-nginx
kubectl get svc my-nginx
NAME       TYPE        CLUSTER-IP     EXTERNAL-IP        PORT(S)               AGE
my-nginx   ClusterIP   10.0.162.149   162.222.184.144    80/TCP,81/TCP,82/TCP  21s
curl https://<EXTERNAL-IP> -k
...
<title>Welcome to nginx!</title>
The IP address in the EXTERNAL-IP column is the one that is available on the public internet. The CLUSTER-IP is only available inside your cluster/private cloud network.
Note that on AWS, type LoadBalancer creates an ELB, which uses a (long) hostname, not an IP. It’s too long to fit in the standard kubectl get svc output, in fact, so you’ll need to do kubectl describe service my-nginx to see it. You’ll see something like this:
$ kubectl describe service my-nginx
...
LoadBalancer Ingress:   a320587ffd19711e5a37606cf4a74574-1142138393.us-east-1.elb.amazonaws.com
...
Service Exposing More Than One Port
Kubernetes Services allow you to define more than one port per service definition. Let’s see how a web server service definition file may look like:
apiVersion: v1
kind: Service
metadata:
  name: webserver
spec:
 selector:
   app: web
  ports:
  - name: http
    port: 80
    targetPort: 80
  - name: https
    port: 443
    targetPort: 443
Notice that if you are defining more than one port in a service, you must provide a name for each port so that they are recognizable.
Kubernetes Service Without Pods?
While the traditional use of a Kubernetes Service is to abstract one or more pods behind a layer, services can do more than that. Consider the following use cases where services do not work on pods:
You need to access an API outside your cluster (examples: weather, stocks, currency rates). You have a service in another Kubernetes cluster that you need to contact. You need to shift some of your infrastructure components to Kubernetes. But, since you’re still evaluating the technology, you need it to communicate with some backend applications that are still outside the cluster. You have another service in another namespace that you need to reach. The common thing here is that the service will not be pointing to pods. It’ll be communicating with other resources inside or outside your cluster. Let’s create a service definition that will route traffic to an external IP address:
apiVersion: v1
kind: Service
metadata:
  name: webserver
spec:
 selector:
   app: web
  ports:
  - name: http
    port: 80
    targetPort: 80
  - name: https
    port: 443
    targetPort: 443
Here, we have a service that connects to an external NodeJS backend on port 3000. But, this definition does not have pod selectors. It doesn’t even have the external IP address of the backend! So, how will the service route traffic then?
Normally, a service uses an Endpoint object behind the scenes to map to the IP addresses of the pods that match its selector.
Service Discovery
Let’s revisit our web application example. You are writing the configuration files for Nginx and you need to specify an IP address or URL to which web server shall route backend requests. For demonstration purposes, here’s a sample Nginx configuration snippet for proxying requests:
server {
  listen 80;

  server_name myapp.example.com;

  location /api {
      proxy_pass http://??/;
  }
}
The proxy_pass part here must point to the service’s IP address or DNS name to be able to reach one of the NodeJS pods. In Kubernetes, there are two ways to discover services: (1) environment variables, or (2) DNS. let’s talk about each one of them in a bit of detail.
Connectivity Methods
If you reached that far, you are able to contact your services by name. Whether you’re using environment variables or you’ve deployed a DNS, you get the service name resolved to an IP address. Now you want to be serious about it and make it accessible from outside your cluster? There are three ways to do that:
CLusterIP
The ClusterIP is the default service type. Kubernetes will assign an internal IP address to your service. This IP address is reachable only from inside the cluster. You can - optionally - set this IP in the service definition file. Think of the case when you have a DNS record that you don’t want to change and you want the name to resolve to the same IP address. You can do this by defining the clusterIP part of the service definition as follows:
apiVersion: v1
kind: Service
metadata:
  name: external-backend
spec:
  ports:
  - protocol: TCP
    port: 3000
    targetPort: 3000
  clusterIP: 10.96.0.1
However, you cannot just add any IP address. It must be within the service-cluster-ip-range, which is a range of IP addresses assigned to the service by the Kubernetes API server. You can get this range through a simple kubectl command as follows:
$ kubectl cluster-info dump | grep service-cluster-ip-range
You can also set the clusterIP to none, effectively creating a Headless Service.
Headless Service In Kubernetes?
As mentioned, the default behavior of Kubernetes is to assign an internal IP address to the service. Through this IP address, the service will proxy and load-balance the requests to the pods behind. If we explicitly set this IP address (clusterIP) to none, this is like telling Kubernetes “I don’t need load balancing or proxying, just connect me to the first available pod”.
Let’s consider a common use case. If you host, for example, MongoDB on a single pod, you will need a service definition on top of it to take care of the pod being restarted and acquiring a new IP address. But you don’t need any load balancing or routing. You only need the service to patch the request to the backend pod. Hence, the name: headless: a service that does have an IP.
But, what if a headless service was created and was managing more than one pod? In this case, any query to the service’s DNS name will return a list of all the pods managed by this service. The request will accept the first IP address returned. Obviously, this is not the best load-balancing algorithm if at all. The bottom line here, use a headless service when you need a single pod.
NodePort
This is one of the service types that are used when you want to enable external connectivity to your service. If you’re having four Nginx pods, the NodePort service type is going to use the IP address of any node in the cluster combined with a specific port to route traffic to those pods. The following graph will demonstrate the idea:
You can use the IP address of any node, the service will receive the request and route it to one of the pods.
A service definition file for a service of type NodePort may look like this:
apiVersion: v1
kind: Service
metadata:
  name: frontend
spec:
  type: NodePort
  ports:
    - port: 80
      nodePort: 30000
      targetPort: 80
  selector:
    app: web
Manually allocating a port to the service is optional. If left undefined, Kubernetes will automatically assign one. It must be in the range of 30000-32767. If you are going to choose it, ensure that the port was not already used by another service. Otherwise, Kubernetes will report that the API transaction has failed.
Notice that you must always anticipate the event of a node going down and its IP address becomes no longer reachable. The best practice here is to place a load balancer above your nodes.
LoadBalancer
his service type works when you are using a cloud provider to host your Kubernetes cluster. When you choose LoadBalancer as the service type, the cluster will contact the cloud provider and create a load balancer. Traffic arriving at this load balancer will be forwarded to the backend pods. The specifics of this process is dependent on how each provider implements its load balancing technology.
Different cloud providers handle load balancer provisioning differently. For example, some providers allow you to assign an IP address to the component, while others choose to assign short-lived addresses that constantly change. Kubernetes was designed to be highly portable. You can add loadBalancerIP to the service definition file. If the provider supports it, it will be implemented. Otherwise, it will be ignored. Let’s have a sample service definition that uses LoadBalancer as its type:
apiVersion: v1
kind: Service
metadata:
  name: frontend
spec:
  type: LoadBalancer
  loadBalancerIP: 78.11.24.19
  selector:
    app: web
  ports:
  - protocol: TCP
    port: 80
    targetPort: 80
One of the main differences between the LoadBalancer and the NodePort service types is that in the latter you get to choose your own load balancing layer. You are not bound to the cloud provider’s implementation
2.5 - Deploying Your First Nginx Deployment
Deployment 101
We looked at ReplicaSets earlier. However, ReplicaSet have one major drawback: once you select the pods that are managed by a ReplicaSet, you cannot change their pod templates.
For example, if you are using a ReplicaSet to deploy four pods with NodeJS running and you want to change the NodeJS image to a newer version, you need to delete the ReplicaSet and recreate it. Restarting the pods causes downtime till the images are available and the pods are running again.
A Deployment resource uses a ReplicaSet to manage the pods. However, it handles updating them in a controlled way. Let’s dig deeper into Deployment Controllers and patterns.
Step #1. Creating Your First Deployment
The following Deployment definition deploys four pods with nginx as their hosted application:
$ kubectl create -f nginx-dep.yaml
deployment.apps/nginx-deployment created
Checking the list of application deployment
To list your deployments use the get deployments command:
$ kubectl get deployments
NAME               READY   UP-TO-DATE   AVAILABLE   AGE
nginx-deployment   2/2     2            2           63s
$ kubectl describe deploy
Name:                   nginx-deployment
Namespace:              default
CreationTimestamp:      Mon, 30 Dec 2019 07:10:33 +0000
Labels:                 <none>
Annotations:            deployment.kubernetes.io/revision: 1
Selector:               app=nginx
Replicas:               2 desired | 2 updated | 2 total | 0 available | 2 unavailable
StrategyType:           RollingUpdate
MinReadySeconds:        0
RollingUpdateStrategy:  25% max unavailable, 25% max surge
Pod Template:
  Labels:  app=nginx
  Containers:
   nginx:
    Image:        nginx:1.7.9
    Port:         80/TCP
    Host Port:    0/TCP
    Environment:  <none>
    Mounts:       <none>
  Volumes:        <none>
Conditions:
  Type           Status  Reason
  ----           ------  ------
  Available      False   MinimumReplicasUnavailable
  Progressing    True    ReplicaSetUpdated
OldReplicaSets:  <none>
NewReplicaSet:   nginx-deployment-6dd86d77d (2/2 replicas created)
Events:
  Type    Reason             Age   From                   Message
  ----    ------             ----  ----                   -------
  Normal  ScalingReplicaSet  90s   deployment-controller  Scaled up replica set nginx-deployment-6dd86d77d to 2
We should have 1 Pod. If not, run the command again. This shows:
The DESIRED state is showing the configured number of replicas
The CURRENT state show how many replicas are running now
The UP-TO-DATE is the number of replicas that were updated to match the desired (configured) state
The AVAILABLE state shows how many replicas are actually AVAILABLE to the users
$ kubectl get deployments
NAME               READY   UP-TO-DATE   AVAILABLE   AGE
nginx-deployment   2/2     2            2           2m57s
$ kubectl get po
NAME                               READY   STATUS    RESTARTS   AGE
nginx-deployment-6dd86d77d-84fwp   1/1     Running   0          3m44s
nginx-deployment-6dd86d77d-xnrqp   1/1     Running   0          3m44s
Step #2. Scale up/down application deployment
Now let’s scale the Deployment to 4 replicas. We are going to use the kubectl scale command, followed by the deployment type, name and desired number of instances:
$ kubectl scale deployments/nginx-deployment --replicas=4
deployment.extensions/nginx-deployment scaled
The change was applied, and we have 4 instances of the application available. Next, let’s check if the number of Pods changed:
Now There should be 4 pods running in the cluster
$ kubectl get deployments
NAME               READY   UP-TO-DATE   AVAILABLE   AGE
nginx-deployment   4/4     4            4           4m
There are 4 Pods now, with different IP addresses. The change was registered in the Deployment events log. To check that, use the describe command:
$ kubectl describe deployments/nginx-deployment
Name:                   nginx-deployment
Namespace:              default
CreationTimestamp:      Sat, 30 Nov 2019 20:04:34 +0530
Labels:                 <none>
Annotations:            deployment.kubernetes.io/revision: 1
Selector:               app=nginx
Replicas:               4 desired | 4 updated | 4 total | 4 available | 0 unavailable
StrategyType:           RollingUpdate
MinReadySeconds:        0
RollingUpdateStrategy:  25% max unavailable, 25% max surge
Pod Template:
  Labels:  app=nginx
  Containers:
   nginx:
    Image:        nginx:1.7.9
    Port:         80/TCP
    Host Port:    0/TCP
    Environment:  <none>
    Mounts:       <none>
  Volumes:        <none>
Conditions:
  Type           Status  Reason
  ----           ------  ------
  Progressing    True    NewReplicaSetAvailable
  Available      True    MinimumReplicasAvailable
OldReplicaSets:  <none>
NewReplicaSet:   nginx-deployment-6dd86d77d (4/4 replicas created)
Events:
  Type    Reason             Age    From                   Message
  ----    ------             ----   ----                   -------
  Normal  ScalingReplicaSet  6m12s  deployment-controller  Scaled up replica set nginx-deployment-6dd86d77d to 2
  Normal  ScalingReplicaSet  3m6s   deployment-controller  Scaled up replica set nginx-deployment-6dd86d77d to 4
$ kubectl get pods -o wide
NAME                               READY   STATUS    RESTARTS   AGE     IP           NODE             NOMINATED NODE   READINESS GATES
nginx-deployment-6dd86d77d-b4v7k   1/1     Running   0          4m32s   10.1.0.237   docker-desktop   <none>           <none>
nginx-deployment-6dd86d77d-bnc5m   1/1     Running   0          4m32s   10.1.0.236   docker-desktop   <none>           <none>
nginx-deployment-6dd86d77d-bs6jr   1/1     Running   0          86s     10.1.0.239   docker-desktop   <none>           <none>
nginx-deployment-6dd86d77d-wbdzv   1/1     Running   0          86s     10.1.0.238   docker-desktop   <none>           <none>
You can also view in the output of this command that there are 4 replicas now.
Scaling the service to 2 Replicas
To scale down the Service to 2 replicas, run again the scale command:
$ kubectl scale deployments/nginx-deployment --replicas=2
deployment.extensions/nginx-deployment scaled
$ kubectl get deployments
NAME               READY   UP-TO-DATE   AVAILABLE   AGE
nginx-deployment   2/2     2            2           7m23s
Step #3. Perform rolling updates to application deployment
So far, everything our Deployment did is no different than a typical ReplicaSet. The real power of a Deployment lies in its ability to update the pod templates without causing application outage.
Let’s say that you have finished testing the nginx 1.7.9 , and you are ready to use it in production. The current pods are using the older nginx version . The following command changes the deployment pod template to use the new image:
To update the image of the application to new version, use the set image command, followed by the deployment name and the new image version:
$ kubectl get deployments
NAME               READY   UP-TO-DATE   AVAILABLE   AGE
nginx-deployment   2/2     2            2           7m23s
$ kubectl describe pods
Name:               nginx-deployment-6dd86d77d-b4v7k
Namespace:          default
Priority:           0
PriorityClassName:  <none>
Node:               docker-desktop/192.168.65.3
Start Time:         Sat, 30 Nov 2019 20:04:34 +0530
Labels:             app=nginx
                    pod-template-hash=6dd86d77d
Annotations:        <none>
Status:             Running
IP:                 10.1.0.237
Controlled By:      ReplicaSet/nginx-deployment-6dd86d77d
Containers:
  nginx:
    Container ID:   docker://2c739cf9fe4dac53a4cc5c6097207da0c5edc2183f1f36f9f3e5c7057f85da43
    Image:          nginx:1.7.9
    Image ID:       docker-pullable://nginx@sha256:e3456c851a152494c3e4ff5fcc26f240206abac0c9d794affb40e0714846c451
    Port:           80/TCP
    Host Port:      0/TCP
    State:          Running
      Started:      Sat, 30 Nov 2019 20:05:28 +0530
    Ready:          True
    Restart Count:  0
    Environment:    <none>
    Mounts:
      /var/run/secrets/kubernetes.io/serviceaccount from default-token-ds5tg (ro)
Conditions:
  Type              Status
  Initialized       True
  Ready             True
  ContainersReady   True
  PodScheduled      True
Volumes:
  default-token-ds5tg:
    Type:        Secret (a volume populated by a Secret)
    SecretName:  default-token-ds5tg
    Optional:    false
QoS Class:       BestEffort
Node-Selectors:  <none>
Tolerations:     node.kubernetes.io/not-ready:NoExecute for 300s
                 node.kubernetes.io/unreachable:NoExecute for 300s
Events:
  Type    Reason     Age    From                     Message
  ----    ------     ----   ----                     -------
  Normal  Scheduled  10m    default-scheduler        Successfully assigned default/nginx-deployment-6dd86d77d-b4v7k to docker-desktop
  Normal  Pulling    10m    kubelet, docker-desktop  Pulling image "nginx:1.7.9"
  Normal  Pulled     9m17s  kubelet, docker-desktop  Successfully pulled image "nginx:1.7.9"
  Normal  Created    9m17s  kubelet, docker-desktop  Created container nginx
  Normal  Started    9m17s  kubelet, docker-desktop  Started container nginx


Name:               nginx-deployment-6dd86d77d-bnc5m
Namespace:          default
Priority:           0
PriorityClassName:  <none>
Node:               docker-desktop/192.168.65.3
Start Time:         Sat, 30 Nov 2019 20:04:34 +0530
Labels:             app=nginx
                    pod-template-hash=6dd86d77d
Annotations:        <none>
Status:             Running
IP:                 10.1.0.236
Controlled By:      ReplicaSet/nginx-deployment-6dd86d77d
Containers:
  nginx:
    Container ID:   docker://12ab35cbf4fdf78997b106b5eb27135f2fc37c890e723fee44ac820ba1b1fd75
    Image:          nginx:1.7.9
    Image ID:       docker-pullable://nginx@sha256:e3456c851a152494c3e4ff5fcc26f240206abac0c9d794affb40e0714846c451
    Port:           80/TCP
    Host Port:      0/TCP
    State:          Running
      Started:      Sat, 30 Nov 2019 20:05:23 +0530
    Ready:          True
    Restart Count:  0
    Environment:    <none>
    Mounts:
      /var/run/secrets/kubernetes.io/serviceaccount from default-token-ds5tg (ro)
Conditions:
  Type              Status
  Initialized       True
  Ready             True
  ContainersReady   True
  PodScheduled      True
Volumes:
  default-token-ds5tg:
    Type:        Secret (a volume populated by a Secret)
    SecretName:  default-token-ds5tg
    Optional:    false
QoS Class:       BestEffort
Node-Selectors:  <none>
Tolerations:     node.kubernetes.io/not-ready:NoExecute for 300s
                 node.kubernetes.io/unreachable:NoExecute for 300s
Events:
  Type    Reason     Age    From                     Message
  ----    ------     ----   ----                     -------
  Normal  Scheduled  10m    default-scheduler        Successfully assigned default/nginx-deployment-6dd86d77d-bnc5m to docker-desktop
  Normal  Pulling    10m    kubelet, docker-desktop  Pulling image "nginx:1.7.9"
  Normal  Pulled     9m22s  kubelet, docker-desktop  Successfully pulled image "nginx:1.7.9"
  Normal  Created    9m22s  kubelet, docker-desktop  Created container nginx
  Normal  Started    9m22s  kubelet, docker-desktop  Started container nginx
The command notified the Deployment to use a different image for your app and initiated a rolling update. Check the status of the new Pods, and view the old one terminating with the get pods command:
$ kubectl set image  deployments/nginx-deployment nginx=nginx:1.9.1
deployment.extensions/nginx-deployment image updated
Checking description of pod again
$ kubectl describe pods
Name:               nginx-deployment-6dd86d77d-b4v7k
Namespace:          default
Priority:           0
PriorityClassName:  <none>
Node:               docker-desktop/192.168.65.3
Start Time:         Sat, 30 Nov 2019 20:04:34 +0530
Labels:             app=nginx
                    pod-template-hash=6dd86d77d
Annotations:        <none>
Status:             Running
IP:                 10.1.0.237
Controlled By:      ReplicaSet/nginx-deployment-6dd86d77d
Containers:
  nginx:
    Container ID:   docker://2c739cf9fe4dac53a4cc5c6097207da0c5edc2183f1f36f9f3e5c7057f85da43
    Image:          nginx:1.7.9
    Image ID:       docker-pullable://nginx@sha256:e3456c851a152494c3e4ff5fcc26f240206abac0c9d794affb40e0714846c451
    Port:           80/TCP
    Host Port:      0/TCP
    State:          Running
      Started:      Sat, 30 Nov 2019 20:05:28 +0530
    Ready:          True
    Restart Count:  0
    Environment:    <none>
    Mounts:
      /var/run/secrets/kubernetes.io/serviceaccount from default-token-ds5tg (ro)
Conditions:
  Type              Status
  Initialized       True
  Ready             True
  ContainersReady   True
  PodScheduled      True
Volumes:
  default-token-ds5tg:
    Type:        Secret (a volume populated by a Secret)
    SecretName:  default-token-ds5tg
    Optional:    false
QoS Class:       BestEffort
Node-Selectors:  <none>
Tolerations:     node.kubernetes.io/not-ready:NoExecute for 300s
                 node.kubernetes.io/unreachable:NoExecute for 300s
Events:
  Type    Reason     Age   From                     Message
  ----    ------     ----  ----                     -------
  Normal  Scheduled  16m   default-scheduler        Successfully assigned default/nginx-deployment-6dd86d77d-b4v7k to docker-desktop
  Normal  Pulling    16m   kubelet, docker-desktop  Pulling image "nginx:1.7.9"
  Normal  Pulled     15m   kubelet, docker-desktop  Successfully pulled image "nginx:1.7.9"
  Normal  Created    15m   kubelet, docker-desktop  Created container nginx
  Normal  Started    15m   kubelet, docker-desktop  Started container nginx


Name:               nginx-deployment-6dd86d77d-bnc5m
Namespace:          default
Priority:           0
PriorityClassName:  <none>
Node:               docker-desktop/192.168.65.3
Start Time:         Sat, 30 Nov 2019 20:04:34 +0530
Labels:             app=nginx
                    pod-template-hash=6dd86d77d
Annotations:        <none>
Status:             Running
IP:                 10.1.0.236
Controlled By:      ReplicaSet/nginx-deployment-6dd86d77d
Containers:
  nginx:
    Container ID:   docker://12ab35cbf4fdf78997b106b5eb27135f2fc37c890e723fee44ac820ba1b1fd75
    Image:          nginx:1.7.9
    Image ID:       docker-pullable://nginx@sha256:e3456c851a152494c3e4ff5fcc26f240206abac0c9d794affb40e0714846c451
    Port:           80/TCP
    Host Port:      0/TCP
    State:          Running
      Started:      Sat, 30 Nov 2019 20:05:23 +0530
    Ready:          True
    Restart Count:  0
    Environment:    <none>
    Mounts:
      /var/run/secrets/kubernetes.io/serviceaccount from default-token-ds5tg (ro)
Conditions:
  Type              Status
  Initialized       True
  Ready             True
  ContainersReady   True
  PodScheduled      True
Volumes:
  default-token-ds5tg:
    Type:        Secret (a volume populated by a Secret)
    SecretName:  default-token-ds5tg
    Optional:    false
QoS Class:       BestEffort
Node-Selectors:  <none>
Tolerations:     node.kubernetes.io/not-ready:NoExecute for 300s
                 node.kubernetes.io/unreachable:NoExecute for 300s
Events:
  Type    Reason     Age   From                     Message
  ----    ------     ----  ----                     -------
  Normal  Scheduled  16m   default-scheduler        Successfully assigned default/nginx-deployment-6dd86d77d-bnc5m to docker-desktop
  Normal  Pulling    16m   kubelet, docker-desktop  Pulling image "nginx:1.7.9"
  Normal  Pulled     15m   kubelet, docker-desktop  Successfully pulled image "nginx:1.7.9"
  Normal  Created    15m   kubelet, docker-desktop  Created container nginx
  Normal  Started    15m   kubelet, docker-desktop  Started container nginx


Name:               nginx-deployment-784b7cc96d-kxc68
Namespace:          default
Priority:           0
PriorityClassName:  <none>
Node:               docker-desktop/192.168.65.3
Start Time:         Sat, 30 Nov 2019 20:20:04 +0530
Labels:             app=nginx
                    pod-template-hash=784b7cc96d
Annotations:        <none>
Status:             Pending
IP:
Controlled By:      ReplicaSet/nginx-deployment-784b7cc96d
Containers:
  nginx:
    Container ID:
    Image:          nginx:1.9.1
    Image ID:
    Port:           80/TCP
    Host Port:      0/TCP
    State:          Waiting
      Reason:       ContainerCreating
    Ready:          False
    Restart Count:  0
    Environment:    <none>
    Mounts:
      /var/run/secrets/kubernetes.io/serviceaccount from default-token-ds5tg (ro)
Conditions:
  Type              Status
  Initialized       True
  Ready             False
  ContainersReady   False
  PodScheduled      True
Volumes:
  default-token-ds5tg:
    Type:        Secret (a volume populated by a Secret)
    SecretName:  default-token-ds5tg
    Optional:    false
QoS Class:       BestEffort
Node-Selectors:  <none>
Tolerations:     node.kubernetes.io/not-ready:NoExecute for 300s
                 node.kubernetes.io/unreachable:NoExecute for 300s
Events:
  Type    Reason     Age   From                     Message
  ----    ------     ----  ----                     -------
  Normal  Scheduled  36s   default-scheduler        Successfully assigned default/nginx-deployment-784b7cc96d-kxc68 to docker-desktop
  Normal  Pulling    35s   kubelet, docker-desktop  Pulling image "nginx:1.9.1"
Step #4. Rollback updates to application deployment
The rollout command reverted the deployment to the previous known state. Updates are versioned and you can revert to any previously know state of a Deployment. List again the Pods:
$ kubectl rollout undo deployments/nginx-deployment
deployment.extensions/nginx-deployment rolled back

$ kubectl rollout status deployments/nginx-deployment
deployment "nginx-deployment" successfully rolled out
After the rollout succeeds, you may want to get the Deployment.
The output shows the update progress until all the pods use the new container image.
The algorithm that Kubernetes Deployments use when deciding how to roll updates is to keep at least 25% of the pods running. Accordingly, it doesn’t kill old pods unless a sufficient number of new ones are up. In the same sense, it does not create new pods until enough pods are no longer running. Through this algorithm, the application is always available during updates.
You can use the following command to determine the update strategy that the Deployment is using:
$ kubectl describe deployments | grep Strategy
StrategyType:           RollingUpdate
RollingUpdateStrategy:  25% max unavailable, 25% max surge
Step #5. Cleanup
Finally you can clean up the resources you created in your cluster:
$ kubectl delete service nginx-deployment
$ kubectl delete deployment nginx-deployment
2.6 - Deploying Your First DaemonSet
What is a DaemonSet?
Say, you want to run a process on all the nodes of the cluster. One of the easy solution could be running cron job that runs on machine boot or reboot. Also, alternatively one can use the /etc/init.local file to ensure that a specific process or command gets executed as soon as the server gets started. Though it looks to be viable solution, using the node itself to control the daemons that run on it (especially within a Kubernetes cluster) suffers some drawbacks:
- We need the process to remain running on the node as long as it is part of the cluster. It should be terminated when the node is evicted.
- The process may need a particular runtime environment that may or may not be available on the node (for example, a specific JDK version, a required kernel library, a specific Linux distro…etc.). So, the process should run inside a container. Kubernetes uses Pods to run containers. This daemon should be aware that it is running within Kubernetes. Hence, it has access to other pods in the cluster and is part of the network.
Enter DaemonSets
DaemonSets are used to ensure that some or all of your K8S nodes run a copy of a pod, which allows you to run a daemon on every node.
When you add a new node to the cluster, a pod gets added to match the nodes. Similarly, when you remove a node from your cluster, the pod is put into the trash. Deleting a DaemonSet cleans up the pods that it previously created.
A Daemonset is another controller that manages pods like Deployments, ReplicaSets, and StatefulSets. It was created for one particular purpose: ensuring that the pods it manages to run on all the cluster nodes. As soon as a node joins the cluster, the DaemonSet ensures that it has the necessary pods running on it. When the node leaves the cluster, those pods are garbage collected.
DaemonSets are used in Kubernetes when you need to run one or more pods on all (or a subset of) the nodes in a cluster. The typical use case for a DaemonSet is logging and monitoring for the hosts. For example, a node needs a service (daemon) that collects health or log data and pushes them to a central system or database (like ELK stack). DaemonSets can be deployed to specific nodes either by the nodes’ user-defined labels or using values provided by Kubernetes like the node hostname.
Why use DaemonSets?
-
Now that we understand DaemonSets, here are some examples of why and how to use it:
-
To run a daemon for cluster storage on each node, such as: - glusterd - ceph
-
To run a daemon for logs collection on each node, such as: - fluentd - logstash
-
To run a daemon for node monitoring on ever note, such as: - Prometheus Node Exporter - collectd - Datadog agent
-
As your use case gets more complex, you can deploy multiple DaemonSets for one kind of daemon, using a variety of flags or memory and CPU requests for various hardware types.
Creating your first DeamonSet Deployment
$ kubectl apply -f daemonset.yml
The other way to do this:
$ kubectl create -f daemonset.yml --record
The –record flag will track changes made through each revision.
Getting the basic details about daemonsets:
$ kubectl get daemonsets/prometheus-daemonset
Further Details
$ kubectl describe daemonset/prometheus-daemonset
$ kubectl describe daemonset/prometheus-daemonset
Name:           prometheus-daemonset
Selector:       name=prometheus-exporter,tier=monitoring
Node-Selector:  <none>
Labels:         name=prometheus-exporter
                tier=monitoring
Annotations:    deprecated.daemonset.template.generation: 1
                kubectl.kubernetes.io/last-applied-configuration:
                  {"apiVersion":"extensions/v1beta1","kind":"DaemonSet","metadata":{"annotations":{},"name":"prometheus-daemonset","namespace":"default"},"s...
Desired Number of Nodes Scheduled: 1Current Number of Nodes Scheduled: 1
Number of Nodes Scheduled with Up-to-date Pods: 1
Number of Nodes Scheduled with Available Pods: 1
Number of Nodes Misscheduled: 0
Pods Status:  1 Running / 0 Waiting / 0 Succeeded / 0 Failed
Pod Template:
  Labels:  name=prometheus-exporter
           tier=monitoring
  Containers:
   prometheus:
    Image:        prom/node-exporter
    Port:         80/TCP
    Host Port:    0/TCP
    Environment:  <none>
    Mounts:       <none>
  Volumes:        <none>
Events:
  Type    Reason            Age    From                  Message
  ----    ------            ----   ----                  -------
  Normal  SuccessfulCreate  3m21s  daemonset-controller  Created pod: prometheus-daemonset-nsjwx
Getting pods in daemonset:
$ kubectl get pods -lname=prometheus-exporter
$ kubectl get pods -lname=prometheus-exporterNAME
READY   STATUS    RESTARTS   AGE
prometheus-daemonset-nsjwx   1/1     Running   0          4m12s
Delete a daemonset:
$ kubectl delete -f daemonset.yml
Restrict DaemonSets To Run On Specific Nodes
By default, a DaemonSet schedules its pods on all the cluster nodes. But sometimes you may need to run specific processes on specific nodes. For example, nodes that host database pods need different monitoring or logging rules. DaemonSets allow you to select which nodes you want to run the pods on. You can do this by using nodeSelector. With nodeSelector, you can select nodes by their labels the same way you do with pods. However, Kubernetes also allows you to select nodes based on some already-defined node properties. For example, kubernetes.io/hostname matches the node name. So, our example cluster has two nodes. We can modify the DaemonSet definition to run only on the first node. Lets’ first get the node names:
$ kubectl get nodes
NAME    STATUS   ROLES    AGE   VERSION
node1   Ready    master   17m   v1.18.0
node2   Ready    <none>   17m   v1.18.0
You need to add the below entry in the above YAML file:
nodeSelector:
    	  kubernetes.io/hostname: node1
How To Reach a DaemonSet Pod
-
There are several design patterns DaemonSet-pods communication in the cluster:
-
The Push pattern: pods do not receive traffic. Instead, they push data to other services like ElasticSearch, for example.
-
NodeIP and known port pattern: in this design, pods use the hostPort to acquire the node’s IP address. Clients can use the node IP and the known port (for example, port 80 if the DaemonSet has a web server) to connect to the pod.
-
DNS pattern: create a Headless Service that selects the DaemonSet pods. Use Endpoints to discover DaemonSet pods.
-
Service pattern: create a traditional service that selects the DaemonSet pods. Use NodePort to expose the pods using a random port. The drawback of this approach is that there is no way to choose a specific pod.
2.7 - Deploying Your First Nginx ReplicaSet
Kubernetes ReplicaSet
-
ReplicaSets are Kubernetes controllers that are used to maintain the number and running state of pods.
-
It uses labels to select pods that it should be managing.
-
A pod must labeled with a matching label to the ReplicaSet selector, and it must not be already owned by another controller so that the ReplicaSet can acquire it.
-
Pods can be isolated from a ReplicaSet by simply changing their labels so that they no longer match the ReplicaSet’s selector.
-
ReplicaSets can be deleted with or without deleting their dependent pods.
-
You can easily control the number of replicas (pods) the ReplicaSet should maintain through the command line or by directly editing the ReplicaSet configuration on the fly.
-
You can also configure the ReplicaSet to autoscale based on the amount of CPU load the node is experiencing.
-
You may have read about ReplicationControllers in older Kubernetes documentation, articles or books. ReplicaSets are the successors of ReplicationControllers. They are recommended to be used instead of ReplicationControllers as they provide more features.
-
A Kubernetes pod serves as a deployment unit for the cluster.
-
It may contain one or more containers.
-
However, containers (and accordingly, pods) are short-lived entities.
-
A container hosting a PHP application, for example may experience an unhandled code exception causing the process to fail, effectively crashing the container. Of course, the perfect solution for such a case is to refactor the code to properly handle exceptions.
-
But, till that happens we need to keep the application running and the business going. In other words, we need to restart the pod whenever it fails.
-
In parallel, developers are monitoring, investigating and fixing any errors that make it crash.
-
At some point, a new version of the pod is deployed, monitored and maintained. It’s an ongoing process that is part of the DevOps practice.
Another requirement is to keep a predefined number of pods running. If more pods are up, the additional ones are terminated. Similarly, of one or more pods failed, new pods are activated until the desired count is reached.
A Kubernetes ReplicaSet resource was designed to address both of those requirements. It creates and maintains a specific number of similar pods (replicas).
Under this lab, we’ll discuss how we can define a ReplicaSet and what are the different options that can be used for fine-tuning it.
How Does ReplicaSet Manage Pods?
-
In order for a ReplicaSet to work, it needs to know which pods it will manage so that it can restart the failing ones or kill the unneeded.
-
It also requires to understand how to create new pods from scratch in case it needs to spawn new ones.
-
A ReplicaSet uses labels to match the pods that it will manage. It also needs to check whether the target pod is already managed by another controller (like a Deployment or another ReplicaSet). So, for example if we need our ReplicaSet to manage all pods with the label role=webserver, the controller will search for any pod with that label. It will also examine the ownerReferences field of the pod’s metadata to determine whether or not this pod is already owned by another controller. If it isn’t, the ReplicaSet will start controlling it. Subsequently, the ownerReferences field of the target pods will be updated to reflect the new owner’s data.
To be able to create new pods if necessary, the ReplicaSet definition includes a template part containing the definition for new pods.
Creating Your First ReplicaSet
$ kubectl apply -f nginx_replicaset.yaml
$ kubectl get rs
NAME   DESIRED   CURRENT   READY   AGE
web	4     	4     	4   	2m
A Peep into the ReplicaSet definition file
Let’s examine the definition file that was used to create our ReplicaSet:
- The apiVersion for this object is currently app/v1
- The kind of this object is ReplicaSet
- In the metadata part, we define the name by which we can refer to this ReplicaSet. We also define a number of labels through which we can identify it.
- The spec part is mandatory in the ReplicaSet object. It defines:
- The number of replicas this controller should maintain. It default to 1 if it was not specified.
- The selection criteria by which the ReplicaSet will choose its pods. Be careful not to use a label that is already in use by another controller. Otherwise, another ReplicaSet may acquire the pod(s) first. Also notice that the labels defined in the pod template (spec.template.metadata.label) cannot be different than those defined in the matchLabels part (spec.selector).
- The pod template is used to create (or recreate) new pods. It has its own metadata, and spec where the containers are specified. You can refer to our article for more information about pods.
Is Our ReplicaSet the Owner of Those Pods?
OK, so we do have four pods running, and our ReplicaSet reports that it is controlling four pods. In a busier environment, you may want to verify that a particular pod is actually managed by this ReplicaSet and not by another controller. By simply querying the pod, you can get this info:
$ kubectl get pods web-6n9cj -o yaml | grep -A 5 owner
The first part of the command will get all the pod information, which may be too verbose. Using grep with the -A flag (it takes a number and prints that number of lines after the match) will get us the required information as in the example:
ownerReferences:
  - apiVersion: apps/v1
	blockOwnerDeletion: true
	controller: true
	kind: ReplicaSet
	name: web
Removing a Pod From a ReplicaSet
You can remove (not delete) a pod that is managed by a ReplicaSet by simply changing its label. Let’s isolate one of the pods created in our previous example:
$ kubectl edit pods web-44cjb
Then, once the YAML file is opened, change the pod label to be role=isolated or anything different than role=web. In a few moments, run kubectl get pods. You will notice that we have five pods now. That’s because the ReplicaSet dutifully created a new pod to reach the desired number of four pods. The isolated one is still running, but it is no longer managed by the ReplicaSet.
Scaling the Replicas to 5
$ kubectl scale --replicas=5 -f nginx_replicaset.yaml
Scaling and Autoscaling ReplicaSets
You can easily change the number of pods a particular ReplicaSet manages in one of two ways:
-
Edit the controllers configuration by using kubectl edit rs ReplicaSet_name and change the replicas count up or down as you desire.
-
Use kubectl directly. For example, kubectl scale –replicas=2 rs/web. Here, I’m scaling down the ReplicaSet used in the article’s example to manage two pods instead of four. The ReplicaSet will get rid of two pods to maintain the desired count. If you followed the previous section, you may find that the number of running pods is three instead of two; as we isolated one of the pods so it is no longer managed by our ReplicaSet.
$ kubectl autoscale rs web --max=5
This will use the Horizontal Pod Autoscaler (HPA) with the ReplicaSet to increase the number of pods when the CPU load gets higher, but it should not exceed five pods. When the load decreases, it cannot have less than the number of pods specified before (two in our example).
Best Practices
The recommended practice is to always use the ReplicaSet’s template for creating and managing pods. However, because of the way ReplicaSets work, if you create a bare pod (not owned by any controller) with a label that matches the ReplicaSet selector, the controller will automatically adopt it. This has a number of undesirable consequences. Let’s have a quick lab to demonstrate them.
Deploy a pod by using a definition file like the following:
apiVersion: v1
kind: Pod
metadata:
  name: orphan
  labels:
	role: web
spec:
  containers:
  - name: orphan
	image: httpd
It looks a lot like the other pods, but it is using Apache (httpd) instead of Nginx for an image. Using kubectl, we can apply this definition like:
$ kubectl apply -f orphan.yaml
Give it a few moments for the image to get pulled and the container is spawned then run kubectl get pods. You should see an output that looks like the following:
NAME    	READY   STATUS    	RESTARTS   AGE
orphan  	0/1 	Terminating   0      	1m
web-6n9cj   1/1 	Running   	0      	25m
web-7kqbm   1/1 	Running   	0      	25m
web-9src7   1/1 	Running   	0      	25m
web-fvxzf   1/1 	Running   	0      	25m
The pod is being terminated by the ReplicaSet because, by adopting it, the controller has more pods than it was configured to handle. So, it is killing the excess one.
Another scenario where the ReplicaSet won’t terminate the bare pod is that the latter gets created before the ReplicaSet does. To demonstrate this case, let’s destroy our ReplicaSet:
$ kubectl delete -f nginx_replicaset.yaml
Now, let’s create it again (our orphan pod is still running):
$ kubectl apply -f nginx_replicaset.yaml
Let’s have a look at our pods status by running kubectl get pods. The output should resemble the following:
orphan  	1/1 	Running   0      	29s
web-44cjb   1/1 	Running   0      	12s
web-hcr9j   1/1 	Running   0      	12s
web-kc4r9   1/1 	Running   0      	12s
The situation now is that we’re having three pods running Nginx, and one pod running Apache (the httpd image). As far as the ReplicaSet is concerned, it is handling four pods (the desired number), and their labels match its selector. But what if the Apache pod went down?
Let’s do just that:
$ kubectl delete pods orphan
Now, let’s see how the ReplicaSet responded to this event:
$ kubectl get pods
The output should be something like:
NAME    	READY   STATUS          	RESTARTS   AGE
web-44cjb   1/1 	Running         	0      	24s
web-5kjwx   0/1 	ContainerCreating   0      	3s
web-hcr9j   1/1 	Running         	0      	24s
web-kc4r9   1/1 	Running         	0      	24s
The ReplicaSet is doing what is was programmed to: creating a new pod to reach the desired state using the template that was added in its definition. Obviously, it is creating a new Nginx container instead of the Apache one that was deleted.
So, although the ReplicaSet is supposed to maintain the state of the pods it manages, it failed to respawn the Apache web server. It replaced it with an Nginx one.
The bottom line: you should never create a pod with a label that matches the selector of a controller unless its template matches the pod definition. The more-encouraged procedure is to always use a controller like a ReplicaSet or, even better, a Deployment to create and maintain your pods.
Deleting Replicaset
$ kubectl delete rs ReplicaSet_name
Alternatively, you can also use the file that was used to create the resource (and possibly, other resource definitions as well) to delete all the resources defined in the file as follows:
$ kubectl delete -f definition_file.yaml
The above commands will delete the ReplicaSet and all the pods that it manges. But sometimes you may want to just delete the ReplicaSet resource, keeping the pods unowned (orphaned). Maybe you want to manually delete the pods and you don’t want the ReplicaSet to restart them. This can be done using the following command:
$ kubectl delete rs ReplicaSet_name --cascade=false
If you run kubectl get rs now you should see that there are no ReplicaSets there. Yet if you run kubectl get pods, you should see all the pods that were managed by the destroyed ReplicaSet still running.
The only way to get those pods managed by a ReplicaSet again is to create this ReplicaSet with the same selector and pod template as the previous one. If you need a different pod template, you should consider using a Deployment instead, which will handle replacing pods in a controlled way.
2.8 - Understand Kubernetes Scheduling
What is Kubernetes Scheduling?
- The Kubernetes Scheduler is a core component of Kubernetes: After a user or a controller creates a Pod, the Kubernetes Scheduler, monitoring the Object Store for unassigned Pods, will assign the Pod to a Node. Then, the Kubelet, monitoring the Object Store for assigned Pods, will execute the Pod.
what is the scheduler for?
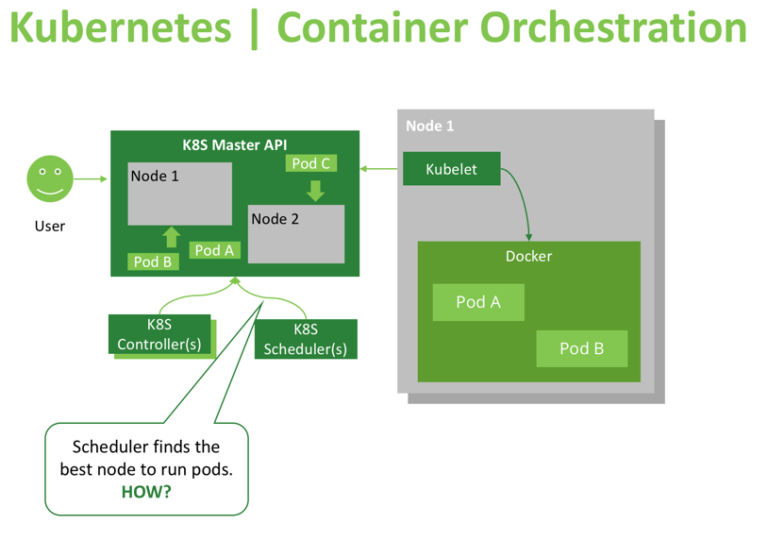
The Kubernetes scheduler is in charge of scheduling pods onto nodes. Basically it works like this:
- You create a pod
- The scheduler notices that the new pod you created doesn’t have a node assigned to it
- The scheduler assigns a node to the pod
It’s not responsible for actually running the pod – that’s the kubelet’s job. So it basically just needs to make sure every pod has a node assigned to it. Easy, right?
Kubernetes in general has this idea of a “controller”. A controller’s job is to:
- look at the state of the system
- notice ways in which the actual state does not match the desired state (like “this pod needs to be assigned a node”)
- repeat
The scheduler is a kind of controller. There are lots of different controllers and they all have different jobs and operate independently.
How Kubernetes Selects The Right node?
What is node affinity ?
- In simple words this allows you to tell Kubernetes to schedule pods only to specific subsets of nodes.
- The initial node affinity mechanism in early versions of Kubernetes was the nodeSelector field in the pod specification. The node had to include all the labels specified in that field to be eligible to become the target for the pod.
nodeSelector
Steps
$ kubectl label nodes node2 mynode=worker-1
$ kubectl apply -f pod-nginx.yaml
- We have label on the node with node name,in this case i have given node2 as mynode=worker-1 label.
Viewing Your Pods
$ kubectl get pods --output=wide
$ kubectl describe po nginx
Name:               nginx
Namespace:          default
Priority:           0
PriorityClassName:  <none>
Node:               node2/192.168.0.17
Start Time:         Mon, 30 Dec 2019 16:40:53 +0000
Labels:             env=test
Annotations:        kubectl.kubernetes.io/last-applied-configuration:
                      {"apiVersion":"v1","kind":"Pod","metadata":{"annotations":{},"labels":{"env":"test"},"name":"nginx","namespace":"default"},"spec":{"contai...
Status:             Pending
IP:
Containers:
  nginx:
    Container ID:
    Image:          nginx
    Image ID:
    Port:           <none>
    Host Port:      <none>
    State:          Waiting
      Reason:       ContainerCreating
    Ready:          False
    Restart Count:  0
    Environment:    <none>
    Mounts:
      /var/run/secrets/kubernetes.io/serviceaccount from default-token-qpgxq (ro)
Conditions:
  Type              Status
  Initialized       True
  Ready             False
  ContainersReady   False
  PodScheduled      True
Volumes:
  default-token-qpgxq:
    Type:        Secret (a volume populated by a Secret)
    SecretName:  default-token-qpgxq
    Optional:    false
QoS Class:       BestEffort
Node-Selectors:  mynode=worker-1
Tolerations:     node.kubernetes.io/not-ready:NoExecute for 300s
                 node.kubernetes.io/unreachable:NoExecute for 300s
Events:
  Type    Reason     Age   From               Message
  ----    ------     ----  ----               -------
  Normal  Scheduled  7s    default-scheduler  Successfully assigned default/nginx to node2
  Normal  Pulling    3s    kubelet, node2     Pulling image "nginx"
[node1 Scheduler101]$
- You can check in above output Node-Selectors: mynode=worker-1
Deleting the Pod
$ kubectl delete -f pod-nginx.yaml
pod "nginx" deleted
Node affinity
-
Node affinity is conceptually similar to nodeSelector – it allows you to constrain which nodes your pod is eligible to be scheduled on, based on labels on the node.
-
There are currently two types of node affinity.
- requiredDuringSchedulingIgnoredDuringExecution (Preferred during scheduling, ignored during execution; we are also known as “hard” requirements)
- preferredDuringSchedulingIgnoredDuringExecution (Required during scheduling, ignored during execution; we are also known as “soft” requirements)
Steps
$ kubectl label nodes node2 mynode=worker-1
$ kubectl label nodes node3 mynode=worker-3
$ kubectl apply -f pod-with-node-affinity.yaml
Viewing Your Pods
$ kubectl get pods --output=wide
NAME                 READY   STATUS    RESTARTS   AGE     IP          NODE          NOMINATED NODE   READINESS GATES
with-node-affinity   1/1     Running   0          9m46s   10.44.0.1   kube-slave1   <none>           <none>
$ kubectl describe po
Name:               with-node-affinity
Namespace:          default
Priority:           0
PriorityClassName:  <none>
Node:               node3/192.168.0.16
Start Time:         Mon, 30 Dec 2019 19:28:33 +0000
Labels:             <none>
Annotations:        kubectl.kubernetes.io/last-applied-configuration:
                      {"apiVersion":"v1","kind":"Pod","metadata":{"annotations":{},"name":"with-node-affinity","namespace":"default"},"spec":{"affinity":{"nodeA...
Status:             Pending
IP:
Containers:
  nginx:
    Container ID:
    Image:          nginx
    Image ID:
    Port:           <none>
    Host Port:      <none>
    State:          Waiting
      Reason:       ContainerCreating
    Ready:          False
    Restart Count:  0
    Environment:    <none>
    Mounts:
      /var/run/secrets/kubernetes.io/serviceaccount from default-token-qpgxq (ro)
Conditions:
  Type              Status
  Initialized       True
  Ready             False
  ContainersReady   False
  PodScheduled      True
Volumes:
  default-token-qpgxq:
    Type:        Secret (a volume populated by a Secret)
    SecretName:  default-token-qpgxq
    Optional:    false
QoS Class:       BestEffort
Node-Selectors:  <none>
Tolerations:     node.kubernetes.io/not-ready:NoExecute for 300s
                 node.kubernetes.io/unreachable:NoExecute for 300s
Events:
  Type    Reason     Age   From               Message
  ----    ------     ----  ----               -------
  Normal  Scheduled  26s   default-scheduler  Successfully assigned default/with-node-affinity to node3
  Normal  Pulling    22s   kubelet, node3     Pulling image "nginx"
  Normal  Pulled     20s   kubelet, node3     Successfully pulled image "nginx"
  Normal  Created    2s    kubelet, node3     Created container nginx
  Normal  Started    0s    kubelet, node3     Started container nginx
Step Cleanup
Finally you can clean up the resources you created in your cluster:
$ kubectl delete -f pod-with-node-affinity.yaml
Anti-Node Affinity ?
- Some scenarios require that you don’t use one or more nodes except for particular pods. Think of the nodes that host your monitoring application.
- Those nodes shouldn’t have many resources due to the nature of their role. Thus, if other pods than those which have the monitoring app are scheduled to those nodes, they hurt monitoring and also degrades the application they are hosting.
- In such a case, you need to use node anti-affinity to keep pods away from a set of nodes.
Steps
$ kubectl label nodes node2 mynode=worker-1
$ kubectl label nodes node3 mynode=worker-3
$ kubectl apply -f pod-anti-node-affinity.yaml
Viewing Your Pods
$ kubectl get pods --output=wide
NAME    READY   STATUS    RESTARTS   AGE     IP          NODE    NOMINATED NODE   READINESS GATES
nginx   1/1     Running   0          2m37s   10.44.0.1   node2   <none>           <none>
Get nodes label detail
$ kubectl get nodes --show-labels | grep mynode
node2   Ready    <none>   166m   v1.14.9   beta.kubernetes.io/arch=amd64,beta.kubernetes.io/os=linux,kubernetes.io/arch=amd64,kubernetes.io/hostname=node2,kubernetes.io/os=linux,mynode=worker-1,role=dev
node3   Ready    <none>   165m   v1.14.9   beta.kubernetes.io/arch=amd64,beta.kubernetes.io/os=linux,kubernetes.io/arch=amd64,kubernetes.io/hostname=node3,kubernetes.io/os=linux,mynode=worker-3
Get pod describe
$ kubectl describe pods nginx
Name:               nginx
Namespace:          default
Priority:           0
PriorityClassName:  <none>
Node:               node2/192.168.0.17
Start Time:         Mon, 30 Dec 2019 19:02:46 +0000
Labels:             <none>
Annotations:        kubectl.kubernetes.io/last-applied-configuration:
                      {"apiVersion":"v1","kind":"Pod","metadata":{"annotations":{},"name":"nginx","namespace":"default"},"spec":{"affinity":{"nodeAffinity":{"re...
Status:             Running
IP:                 10.44.0.1
Containers:
  nginx:
    Container ID:   docker://2bdc20d79c360e1cd857eeb9bbb9424c726b2133e78f25bf4587e0befe3fbcc7
    Image:          nginx
    Image ID:       docker-pullable://nginx@sha256:b2d89d0a210398b4d1120b3e3a7672c16a4ba09c2c4a0395f18b9f7999b768f2
    Port:           <none>
    Host Port:      <none>
    State:          Running
      Started:      Mon, 30 Dec 2019 19:03:07 +0000
    Ready:          True
    Restart Count:  0
    Environment:    <none>
    Mounts:
      /var/run/secrets/kubernetes.io/serviceaccount from default-token-qpgxq (ro)
Conditions:
  Type              Status
  Initialized       True
  Ready             True
  ContainersReady   True
  PodScheduled      True
Volumes:
  default-token-qpgxq:
    Type:        Secret (a volume populated by a Secret)
    SecretName:  default-token-qpgxq
    Optional:    false
QoS Class:       BestEffort
Node-Selectors:  <none>
Tolerations:     node.kubernetes.io/not-ready:NoExecute for 300s
                 node.kubernetes.io/unreachable:NoExecute for 300s
Events:
  Type    Reason     Age   From               Message
  ----    ------     ----  ----               -------
  Normal  Scheduled  60s   default-scheduler  Successfully assigned default/nginx to node2
  Normal  Pulling    56s   kubelet, node2     Pulling image "nginx"
  Normal  Pulled     54s   kubelet, node2     Successfully pulled image "nginx"
  Normal  Created    40s   kubelet, node2     Created container nginx
  Normal  Started    39s   kubelet, node2     Started container nginx
- Adding another key to the matchExpressions with the operator NotIn will avoid scheduling the nginx pods on any node labelled worker-1.
Step Cleanup
Finally you can clean up the resources you created in your cluster:
$ kubectl delete -f pod-anti-node-affinity.yaml
What is Node taints and tolerations ?
-
This Kubernetes feature allows users to mark a node (taint the node) so that no pods can be scheduled to it, unless a pod explicitly tolerates the taint.
-
When you taint a node, it is automatically excluded from pod scheduling. When the schedule runs the predicate tests on a tainted node, they’ll fail unless the pod has toleration for that node.
-
Like last monitoring example: Let assume new member joins the development team, writes a Deployment for her application, but forgets to exclude the monitoring nodes from the target nodes? Kubernetes administrators need a way to repel pods from nodes without having to modify every pod definition.
Steps
$ kubectl label nodes node2 role=dev
$ kubectl label nodes node3 role=dev

$ kubectl taint nodes node2 role=dev:NoSchedule
node/node2 tainted
$ kubectl apply -f pod-taint-node.yaml
Viewing Your Pods
$ kubectl get pods --output=wide
Get nodes label detail
[node1 Scheduler101]$ kubectl get nodes --show-labels|grep mynode |grep role
node2   Ready    <none>   175m   v1.14.9   beta.kubernetes.io/arch=amd64,beta.kubernetes.io/os=linux,kubernetes.io/arch=amd64,kubernetes.io/hostname=node2,kubernetes.io/os=linux,mynode=worker-1,role=dev
node3   Ready    <none>   175m   v1.14.9   beta.kubernetes.io/arch=amd64,beta.kubernetes.io/os=linux,kubernetes.io/arch=amd64,kubernetes.io/hostname=node3,kubernetes.io/os=linux,mynode=worker-3,role=dev
Get pod describe
$ kubectl describe pods nginx
Name:               nginx
Namespace:          default
Priority:           0
PriorityClassName:  <none>
Node:               node3/192.168.0.16
Start Time:         Mon, 30 Dec 2019 19:13:45 +0000
Labels:             <none>
Annotations:        kubectl.kubernetes.io/last-applied-configuration:
                      {"apiVersion":"v1","kind":"Pod","metadata":{"annotations":{},"name":"nginx","namespace":"default"},"spec":{"affinity":{"nodeAffinity":{"re...
Status:             Running
IP:                 10.36.0.1
Containers:
  nginx:
    Container ID:   docker://57d032f4358be89e2fcad7536992b175503565af82ce4f66f4773f6feaf58356
    Image:          nginx
    Image ID:       docker-pullable://nginx@sha256:b2d89d0a210398b4d1120b3e3a7672c16a4ba09c2c4a0395f18b9f7999b768f2
    Port:           <none>
    Host Port:      <none>
    State:          Running
      Started:      Mon, 30 Dec 2019 19:14:45 +0000
    Ready:          True
    Restart Count:  0
    Environment:    <none>
    Mounts:
      /var/run/secrets/kubernetes.io/serviceaccount from default-token-qpgxq (ro)
Conditions:
  Type              Status
  Initialized       True
  Ready             True
  ContainersReady   True
  PodScheduled      True
Volumes:
  default-token-qpgxq:
    Type:        Secret (a volume populated by a Secret)
    SecretName:  default-token-qpgxq
    Optional:    false
QoS Class:       BestEffort
Node-Selectors:  <none>
Tolerations:     node.kubernetes.io/not-ready:NoExecute for 300s
                 node.kubernetes.io/unreachable:NoExecute for 300s
Events:
  Type    Reason     Age   From               Message
  ----    ------     ----  ----               -------
  Normal  Scheduled  105s  default-scheduler  Successfully assigned default/nginx to node3
  Normal  Pulling    101s  kubelet, node3     Pulling image "nginx"
  Normal  Pulled     57s   kubelet, node3     Successfully pulled image "nginx"
  Normal  Created    47s   kubelet, node3     Created container nginx
  Normal  Started    45s   kubelet, node3     Started container nginx
- Deployed pod on node3.
Step Cleanup
Finally you can clean up the resources you created in your cluster:
$ kubectl delete -f pod-tain-node.yaml
Tolerations
- A toleration is a way of ignoring a taint during scheduling. Tolerations aren’t applied to nodes, but rather the pods. So, in the example above, if we apply a toleration to the PodSpec, we could “tolerate” the slow disks on that node and still use it.
Steps
$ kubectl apply -f pod-tolerations-node.yaml
Viewing Your Pods
$ kubectl get pods --output=wide
Which Node Is This Pod Running On?
$ kubectl describe pods nginx
Name:               nginx
Namespace:          default
Priority:           0
PriorityClassName:  <none>
Node:               node3/192.168.0.16
Start Time:         Mon, 30 Dec 2019 19:20:35 +0000
Labels:             env=test
Annotations:        kubectl.kubernetes.io/last-applied-configuration:
                      {"apiVersion":"v1","kind":"Pod","metadata":{"annotations":{},"labels":{"env":"test"},"name":"nginx","namespace":"default"},"spec":{"contai...
Status:             Pending
IP:
Containers:
  nginx:
    Container ID:
    Image:          nginx:1.7.9
    Image ID:
    Port:           <none>
    Host Port:      <none>
    State:          Waiting
      Reason:       ContainerCreating
    Ready:          False
    Restart Count:  0
    Environment:    <none>
    Mounts:
      /var/run/secrets/kubernetes.io/serviceaccount from default-token-qpgxq (ro)
Conditions:
  Type              Status
  Initialized       True
  Ready             False
  ContainersReady   False
  PodScheduled      True
Volumes:
  default-token-qpgxq:
    Type:        Secret (a volume populated by a Secret)
    SecretName:  default-token-qpgxq
    Optional:    false
QoS Class:       BestEffort
Node-Selectors:  <none>
Tolerations:     node.kubernetes.io/not-ready:NoExecute for 300s
                 node.kubernetes.io/unreachable:NoExecute for 300s
                 role=dev:NoSchedule
Events:
  Type    Reason     Age   From               Message
  ----    ------     ----  ----               -------
  Normal  Scheduled  4s    default-scheduler  Successfully assigned default/nginx to node3
  Normal  Pulling    1s    kubelet, node3     Pulling image "nginx:1.7.9
Step Cleanup
Finally you can clean up the resources you created in your cluster:
$ kubectl delete -f pod-tolerations-node.yaml
- An important thing to notice, though, is that tolerations may enable a tainted node to accept a pod but it does not guarantee that this pod runs on that specific node.
- In other words, the tainted node will be considered as one of the candidates for running our pod. However, if another node has a higher priority score, it will be chosen instead. For situations like this, you need to combine the toleration with nodeSelector or node affinity parameters.
2.9 - Deploying Your First Ingress Deployment
What is an Ingress?
-
In Kubernetes, an Ingress is an object that allows access to your Kubernetes services from outside the Kubernetes cluster. You configure access by creating a collection of rules that define which inbound connections reach which services.
-
This lets you consolidate your routing rules into a single resource. For example, you might want to send requests to example.com/api/v1/ to an api-v1 service, and requests to example.com/api/v2/ to the api-v2 service. With an Ingress, you can easily set this up without creating a bunch of LoadBalancers or exposing each service on the Node.
Kubernetes Ingress vs LoadBalancer vs NodePort
These options all do the same thing. They let you expose a service to external network requests. They let you send a request from outside the Kubernetes cluster to a service inside the cluster.
NodePort

-
NodePort is a configuration setting you declare in a service’s YAML. Set the service spec’s type to NodePort. Then, Kubernetes will allocate a specific port on each Node to that service, and any request to your cluster on that port gets forwarded to the service.
-
This is cool and easy, it’s just not super robust. You don’t know what port your service is going to be allocated, and the port might get re-allocated at some point.
LoadBalancer
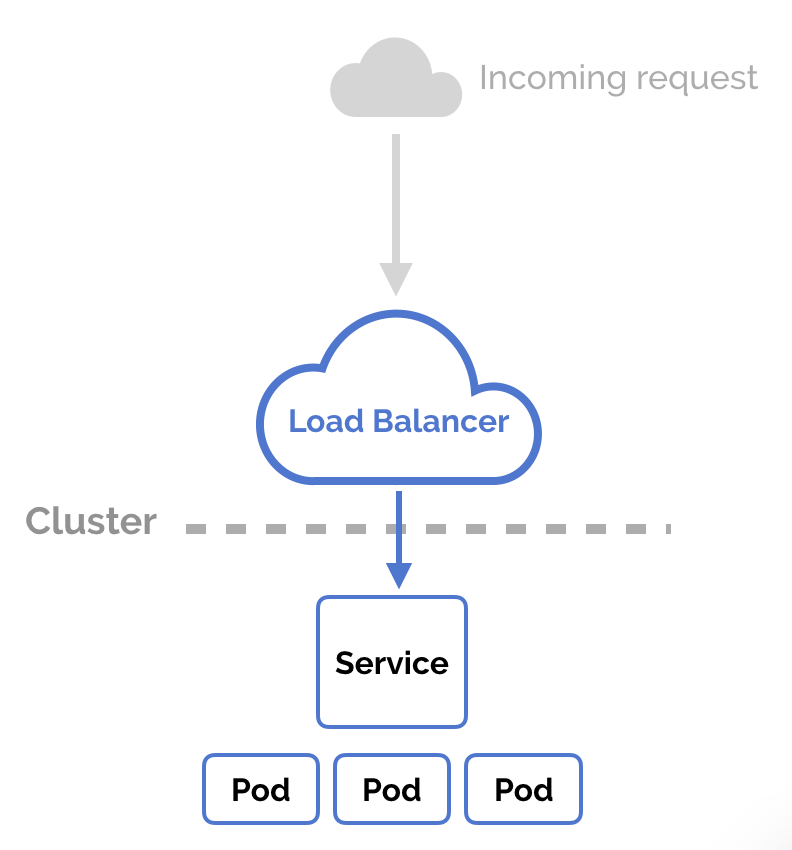
-
You can set a service to be of type LoadBalancer the same way you’d set NodePort— specify the type property in the service’s YAML. There needs to be some external load balancer functionality in the cluster, typically implemented by a cloud provider.
-
This is typically heavily dependent on the cloud provider—GKE creates a Network Load Balancer with an IP address that you can use to access your service.
-
Every time you want to expose a service to the outside world, you have to create a new LoadBalancer and get an IP address.
Ingress
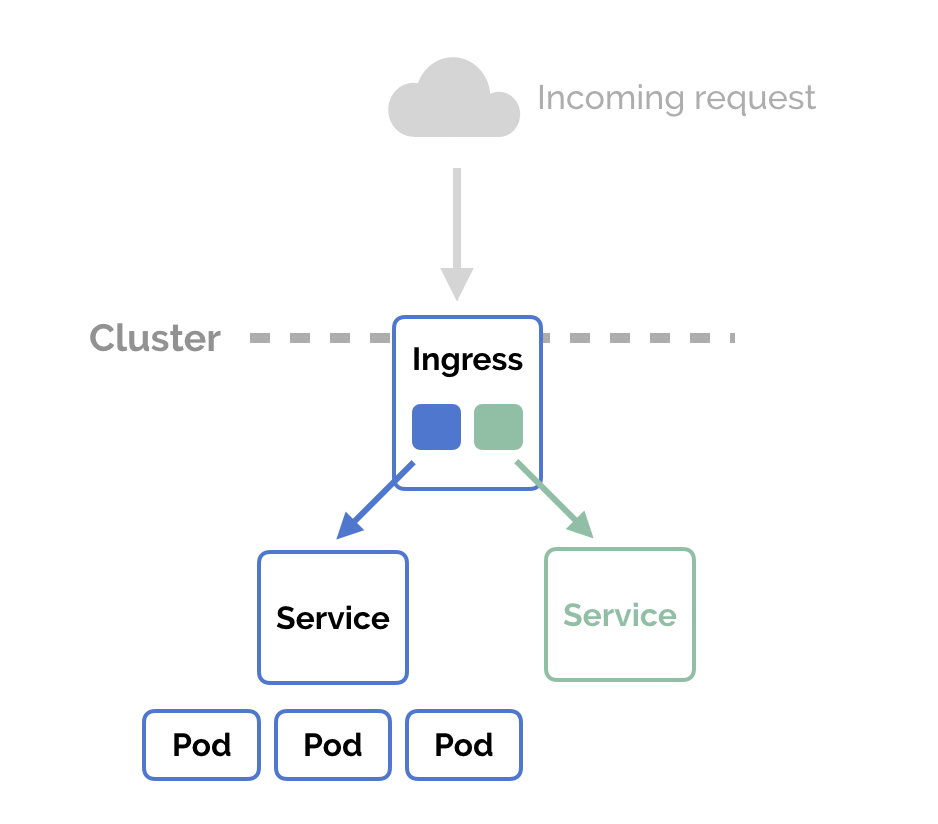
-
NodePort and LoadBalancer let you expose a service by specifying that value in the service’s type. Ingress, on the other hand, is a completely independent resource to your service. You declare, create and destroy it separately to your services.
-
This makes it decoupled and isolated from the services you want to expose. It also helps you to consolidate routing rules into one place.
-
The one downside is that you need to configure an Ingress Controller for your cluster. But that’s pretty easy—in this example, we’ll use the Nginx Ingress Controller.
How to Use Nginx Ingress Controller
- Start by creating the “mandatory” resources for Nginx Ingress in your cluster.
kubectl apply -f https://raw.githubusercontent.com/kubernetes/ingress-nginx/master/deploy/mandatory.yaml
- Then, enable the ingress add-on for Minikube
minikube addons enable ingress
- Or, if you’re using Docker for Mac to run Kubernetes instead of Minikube.
kubectl apply -f https://raw.githubusercontent.com/kubernetes/ingress-nginx/master/deploy/provider/cloud-generic.yaml
- Check that it’s all set up correctly.
kubectl get pods --all-namespaces -l app=ingress-nginx
Creating a Kubernetes Ingress
- First, let’s create two services to demonstrate how the Ingress routes our request. We’ll run two web applications that output a slightly different response.
$ kubectl apply -f apple.yaml
$ kubectl apply -f banana.yaml
- Create the Ingress in the cluster
kubectl create -f ingress.yaml
Perfect! Let’s check that it’s working. If you’re using Minikube, you might need to replace localhost with minikube IP.
$ curl -kL http://localhost/apple
apple

$ curl -kL http://localhost/banana
banana

$ curl -kL http://localhost/notfound
default backend - 404
Ingress Controllers and Ingress Resources
-
Kubernetes supports a high level abstraction called Ingress, which allows simple host or URL based HTTP routing. An ingress is a core concept (in beta) of Kubernetes, but is always implemented by a third party proxy. These implementations are known as ingress controllers. An ingress controller is responsible for reading the Ingress Resource information and processing that data accordingly. Different ingress controllers have extended the specification in different ways to support additional use cases.
-
Ingress is tightly integrated into Kubernetes, meaning that your existing workflows around kubectl will likely extend nicely to managing ingress. Note that an ingress controller typically doesn’t eliminate the need for an external load balancer — the ingress controller simply adds an additional layer of routing and control behind the load balancer.
3 - Docker
3.1 - Docker for Beginners
3.1.1 - Agenda
| Description | Timing |
|---|---|
| Welcome | 8:45 AM to 9:00 AM |
| Creating a DockerHub Account | 9:00 AM to 9:15 AM |
| Getting Started with Docker Image | 9:15 AM to 10:15 AM |
| Accessing & Managing Docker Container | 10:15 AM to 11:15 AM |
| Coffee/Tea Break | 11:15 AM to 11:30 AM |
| Getting Started with Dockerfile - Part 1 | 11:30 AM to 1:00 PM |
| Lunch | 1:00 PM to 2:00 PM |
| Getting Started with Dockerfile - Part 2 | 2:00 PM to 3:30 PM |
| Creating Private Docker Registry | 3:30 PM to 4:00 PM |
| Docker Volumes | 4:00 PM to 4:30 PM |
| Coffee/Tea Break | 4:00 PM to 4:30 PM |
| Docker Networking | 4:45 PM to 5:45 PM |
| Quiz/Prize/Certificate Distribution | 5:45 PM to 6:00 PM |
3.1.2 - Pre-requisite
- Creating Your DockerHub Account - 15 min
Creating a DockerHub Account
Open https://hub.docker.com and click on “Sign Up” for DockerHub

Enter your username as DockerID and provide your email address( I would suggest you to provide your Gmail ID)

Example:
I have added ajeetraina as my userID as shown below. Please note that we will require this userID at the later point of time during the workshop. Hence, do keep it handy.

That’s it. Head over to your Email account to validate this account.

3.1.3 - Getting Started with Docker Image
- Running Hello World Example
- Working with Docker Image
- Saving Images and Containers as Tar Files for Sharing
- Building Your First Alpine Docker Image and Push it to DockerHub
- Test Your Knowledge
Getting Started with Docker Image
Demonstrating Hello World Example
Tested Infrastructure
| Platform | Number of Instance | Reading Time |
|---|---|---|
| Play with Docker | 1 | 5 min |
Pre-requisite
- Create an account with DockerHub
- Open PWD Platform on your browser
- Click on Add New Instance on the left side of the screen to bring up Alpine OS instance on the right side
Running Hello World Example
$ docker run hello-world
Unable to find image 'hello-world:latest' locally
latest: Pulling from library/hello-world
0e03bdcc26d7: Pull complete
Digest: sha256:31b9c7d48790f0d8c50ab433d9c3b7e17666d6993084c002c2ff1ca09b96391d
Status: Downloaded newer image for hello-world:latest

Hello from Docker!
This message shows that your installation appears to be working correctly.

To generate this message, Docker took the following steps:
 1. The Docker client contacted the Docker daemon.
 2. The Docker daemon pulled the "hello-world" image from the Docker Hub.
    (amd64)
 3. The Docker daemon created a new container from that image which runs the
    executable that produces the output you are currently reading.
 4. The Docker daemon streamed that output to the Docker client, which sent it
    to your terminal.

To try something more ambitious, you can run an Ubuntu container with:
 $ docker run -it ubuntu bash

Share images, automate workflows, and more with a free Docker ID:
 https://hub.docker.com/

For more examples and ideas, visit:
 https://docs.docker.com/get-started/
Explanation
This image is a prime example of using the scratch image effectively. See hello.c in https://github.com/docker-library/hello-world for the source code of the hello binary included in this image.
So what’s happened here? We’ve called the docker run command, which is responsible for launching containers.
The argument hello-world is the name of the image someone created on dockerhub for us. It will first search for “hello-world” image locally and then search in Dockerhub.
Once the image has been downloaded, Docker turns the image into a running container and executes it.
Did you Know?
- The Hello World Docker Image is only 1.84 KB size.
[node1] (local) root@192.168.0.18 ~
$ docker images
REPOSITORY          TAG                 IMAGE ID            CREATED             SIZE
hello-world         latest              4ab4c602aa5e        6 weeks ago         1.84kB
- While running
docker pscommand, it doesn’t display any running container. Reason - It gets executed once and exit immediately.
$ docker ps
CONTAINER ID        IMAGE               COMMAND             CREATED             STATUS
      PORTS               NAMES
- You can use
docker inspect <imagename>command to inspect about this particular Docker Image.
$ docker inspect 4ab
[
    {
        "Id": "sha256:4ab4c602aa5eed5528a6620ff18a1dc4faef0e1ab3a5eddeddb410714478c67f",
        "RepoTags": [
            "hello-world:latest"
        ],
        "RepoDigests": [
            "hello-world@sha256:0add3ace90ecb4adbf7777e9aacf18357296e799f81cabc9fde470971e499788"
        ],
        "Parent": "",
        "Comment": "",
        "Created": "2018-09-07T19:25:39.809797627Z",
        "Container": "15c5544a385127276a51553acb81ed24a9429f9f61d6844db1fa34f46348e420",
        "ContainerConfig": {
            "Hostname": "15c5544a3851",
            "Domainname": "",
            "User": "",
            "AttachStdin": false,
            "AttachStdout": false,
            "AttachStderr": false,
            "Tty": false,
            "OpenStdin": false,
            "StdinOnce": false,
            "Env": [
                "PATH=/usr/local/sbin:/usr/local/bin:/usr/sbin:/usr/bin:/sbin:/bin"
            ],
            "Cmd": [
                "/bin/sh",
                "-c",
                "#(nop) ",
                "CMD [\"/hello\"]"
            ],
            "ArgsEscaped": true,
            "Image": "sha256:9a5813f1116c2426ead0a44bbec252bfc5c3d445402cc1442ce9194fc1397027",
            "Volumes": null,
            "WorkingDir": "",
            "Entrypoint": null,
            "OnBuild": null,
            "Labels": {}
        },
        "DockerVersion": "17.06.2-ce",
        "Author": "",
        "Config": {
            "Hostname": "",
            "Domainname": "",
            "User": "",
            "AttachStdin": false,
            "AttachStdout": false,
            "AttachStderr": false,
            "Tty": false,
            "OpenStdin": false,
            "StdinOnce": false,
            "Env": [
                "PATH=/usr/local/sbin:/usr/local/bin:/usr/sbin:/usr/bin:/sbin:/bin"
            ],
            "Cmd": [
                "/hello"
            ],
            "ArgsEscaped": true,
            "Image": "sha256:9a5813f1116c2426ead0a44bbec252bfc5c3d445402cc1442ce9194fc1397027",
            "Volumes": null,
            "WorkingDir": "",
            "Entrypoint": null,
            "OnBuild": null,
            "Labels": null
        },
        "Architecture": "amd64",
        "Os": "linux",
        "Size": 1840,
        "VirtualSize": 1840,
        "GraphDriver": {
            "Data": {
                "MergedDir": "/var/lib/docker/overlay2/e494ae30abc49ad403ef5c2a32bcb894629ea4da6d4d226fbca70d27ed9a74d8/merged",
                "UpperDir": "/var/lib/docker/overlay2/e494ae30abc49ad403ef5c2a32bcb894629ea4da6d4d226fbca70d27ed9a74d8/diff",
                "WorkDir": "/var/lib/docker/overlay2/e494ae30abc49ad403ef5c2a32bcb894629ea4da6d4d226fbca70d27ed9a74d8/work"
            },
            "Name": "overlay2"
        },
        "RootFS": {
            "Type": "layers",
            "Layers": [
                "sha256:428c97da766c4c13b19088a471de6b622b038f3ae8efa10ec5a37d6d31a2df0b"
            ]
        },
        "Metadata": {
            "LastTagTime": "0001-01-01T00:00:00Z"
        }
    }
]
Working with Docker Image
Tested Infrastructure
| Platform | Number of Instance | Reading Time |
|---|---|---|
| Play with Docker | 1 | 5 min |
Pre-requisite
- Create an account with DockerHub
- Open PWD Platform on your browser
- Click on Add New Instance on the left side of the screen to bring up Alpine OS instance on the right side
Listing the Docker Images
$ docker images
REPOSITORY          TAG                 IMAGE ID            CREATED             SIZE
hello-world         latest              4ab4c602aa5e        6 weeks ago         1.84kB
Show all images (default hides intermediate images)
docker images -a
REPOSITORY          TAG                 IMAGE ID            CREATED             SIZE
hello-world         latest              4ab4c602aa5e        6 weeks ago         1.84kB
List images by name and tag
The docker images command takes an optional [REPOSITORY[:TAG]] argument that restricts the list to images that match the argument. If you specify REPOSITORY but no TAG, the docker images command lists all images in the given repository.
To demo this, let us pull all various versions of alpine OS
docker pull alpine:3.6
docker pull alpine:3.7
docker pull alpine:3.8
docker pull alpine:3.9
[node4] (local) root@192.168.0.20 ~
$ docker images
REPOSITORY          TAG                 IMAGE ID            CREATED             SIZE
alpine              3.6                 43773d1dba76        7 days ago          4.03MB
alpine              3.7                 6d1ef012b567        7 days ago          4.21MB
alpine              3.8                 dac705114996        7 days ago          4.41MB
alpine              3.9                 5cb3aa00f899        7 days ago          5.53MB
[node4] (local) root@192.168.0.20 ~
$ docker images alpine:3.7
REPOSITORY          TAG                 IMAGE ID            CREATED             SIZE
alpine              3.7                 6d1ef012b567        7 days ago          4.21MB
List the full length image IDs
$ docker images --no-trunc
REPOSITORY          TAG                 IMAGE ID                                                                  CREATED
     SIZE
alpine              3.6                 sha256:43773d1dba76c4d537b494a8454558a41729b92aa2ad0feb23521c3e58cd0440   7 days ago
     4.03MB
alpine              3.7                 sha256:6d1ef012b5674ad8a127ecfa9b5e6f5178d171b90ee462846974177fd9bdd39f   7 days ago
     4.21MB
alpine              3.8                 sha256:dac7051149965716b0acdcab16380b5f4ab6f2a1565c86ed5f651e954d1e615c   7 days ago
     4.41MB
alpine              3.9                 sha256:5cb3aa00f89934411ffba5c063a9bc98ace875d8f92e77d0029543d9f2ef4ad0   7 days ago
     5.53MB
Listing out images with filter
$ docker images
REPOSITORY          TAG                 IMAGE ID            CREATED             SIZE
ubuntu              latest              94e814e2efa8        3 days ago          88.9MB
alpine              3.6                 43773d1dba76        7 days ago          4.03MB
alpine              3.7                 6d1ef012b567        7 days ago          4.21MB
alpine              3.8                 dac705114996        7 days ago          4.41MB
alpine              3.9                 5cb3aa00f899        7 days ago          5.53MB
If you want to filter out just alpine
$ docker images --filter=reference='alpine'
REPOSITORY          TAG                 IMAGE ID            CREATED             SIZE
alpine              3.6                 43773d1dba76        7 days ago          4.03MB
alpine              3.7                 6d1ef012b567        7 days ago          4.21MB
alpine              3.8                 dac705114996        7 days ago          4.41MB
alpine              3.9                 5cb3aa00f899        7 days ago          5.53MB
Saving Images and Containers as Tar Files for Sharing
Imagine a scenario where you have built Docker images and containers that you would be interested to keep and share it with your other collaborators or colleagues. The below methods shall help you achieve it.
Four basic Docker CLI comes into action:
- The
docker export- Export a container’s filesystem as a tar archive - The
docker import- Import the contents from a tarball to create a filesystem image - The
docker save- Save one or more images to a tar archive (streamed to STDOUT by default) - The
docker load- Load an image from a tar archive or STDIN
Tested Infrastructure
| Platform | Number of Instance | Reading Time |
|---|---|---|
| Play with Docker | 1 | 5 min |
Pre-requisite
- Create an account with DockerHub
- Open PWD Platform on your browser
- Click on Add New Instance on the left side of the screen to bring up Alpine OS instance on the right side
Create Nginx Container
$ docker run -d -p 80:80 nginx
Unable to find image 'nginx:latest' locally
latest: Pulling from library/nginx
a5a6f2f73cd8: Pull complete
1ba02017c4b2: Pull complete
33b176c904de: Pull complete
Digest: sha256:5d32f60db294b5deb55d078cd4feb410ad88e6fe77500c87d3970eca97f54dba
Status: Downloaded newer image for nginx:latest
df2caf9283e84a15bb2321a17aabe84e3e0762ec82fc180e2a4c15fcf0f96588
[node1] (local) root@192.168.0.33 ~
Displaying Running Container
$ docker ps -a
CONTAINER ID        IMAGE               COMMAND                  CREATED             STATUS              PORTS                NAMES
df2caf9283e8        nginx               "nginx -g 'daemon of…"   35 seconds ago      Up 34 seconds       0.0.0.0:80->80/tcp   vigorous_jang
$ docker export df2 > nginx.tar
You could commit this container as a new image locally, but you could also use the Docker import command:
$ docker import - mynginx < nginx.tar
sha256:aaaed50d250a671042e8dc383c6e05012e245f5eaf555d10c40be63f6028ee7b
$ docker images
REPOSITORY          TAG                 IMAGE ID            CREATED             SIZE
mynginx             latest              aaaed50d250a        25 seconds ago      107MB
nginx               latest              568c4670fa80        2 weeks ago         109MB
If you wanted to share this image with one of your collaborators, you could upload the tar file on a web server and let your collaborator download it and use the import command on his Docker host.
If you would rather deal with images that you have already committed, you can use the load and save commands:
$ docker save -o mynginx1.tar nginx
$ ls -l
total 218756
-rw-------    1 root     root     112844800 Dec 18 02:53 mynginx1.tar
-rw-r--r--    1 root     root     111158784 Dec 18 02:50 nginx.tar
$ docker rmi mynginx
Untagged: mynginx:latest
Deleted: sha256:aaaed50d250a671042e8dc383c6e05012e245f5eaf555d10c40be63f6028ee7b
Deleted: sha256:41135ad184eaac0f5c4f46e4768555738303d30ab161a7431d28a5ccf1778a0f
Now delete all images and containers running and try to run the below command to load Docker image into your system:
$ docker images
REPOSITORY          TAG                 IMAGE ID            CREATED             SIZE
$ docker load < mynginx1.tar
Loaded image: nginx:latest
[node1] (local) root@192.168.0.33 ~$ docker images
REPOSITORY          TAG                 IMAGE ID            CREATED             SIZE
nginx               latest              568c4670fa80        2 weeks ago         109MB
[node1] (local) root@192.168.0.33 ~
$
Building Your First Alpine Docker Image and Push it to DockerHub
How to build Your First Alpine Docker Image and Push it to DockerHub
Tested Infrastructure
| Platform | Number of Instance | Reading Time |
|---|---|---|
| Play with Docker | 1 | 5 min |
Pre-requisite
- Create an account with DockerHub
- Open PWD Platform on your browser
- Click on Add New Instance on the left side of the screen to bring up Alpine OS instance on the right side
Under this tutorial we will see how to build our own first alpine based Docker Image.
$ docker run -dit alpine sh
620e1bcb5ab6e84b75a7a5c35790a77691112e59830ea1d5d85244bc108578c9
[node4] (local) root@192.168.0.20 ~
$ docker ps
CONTAINER ID        IMAGE               COMMAND             CREATED             STATUS              PORTS               NAMES
620e1bcb5ab6        alpine              "sh"                3 seconds ago       Up 2 seconds                            keen_alba
ttani
[node4] (local) root@192.168.0.20 ~
$ docker attach 62
/ #
/ #
/ # cat /etc/os-release
NAME="Alpine Linux"
ID=alpine
VERSION_ID=3.9.2
PRETTY_NAME="Alpine Linux v3.9"
HOME_URL="https://alpinelinux.org/"
BUG_REPORT_URL="https://bugs.alpinelinux.org/"
/ #
Updating APK Packages
/ # apk update
fetch http://dl-cdn.alpinelinux.org/alpine/v3.9/main/x86_64/APKINDEX.tar.gz
fetch http://dl-cdn.alpinelinux.org/alpine/v3.9/community/x86_64/APKINDEX.tar.gz
v3.9.2-21-g3dda2a36ce [http://dl-cdn.alpinelinux.org/alpine/v3.9/main]
v3.9.2-19-gfdf726d41a [http://dl-cdn.alpinelinux.org/alpine/v3.9/community]
OK: 9756 distinct packages available
/ # ^
/ # apk add git
(1/7) Installing ca-certificates (20190108-r0)
(2/7) Installing nghttp2-libs (1.35.1-r0)
(3/7) Installing libssh2 (1.8.0-r4)
(4/7) Installing libcurl (7.64.0-r1)
(5/7) Installing expat (2.2.6-r0)
(6/7) Installing pcre2 (10.32-r1)
(7/7) Installing git (2.20.1-r0)
Executing busybox-1.29.3-r10.trigger
Executing ca-certificates-20190108-r0.trigger
OK: 20 MiB in 21 packages
/ #
Now lets come out of it by Ctrl+P+Q and commit the changes
$ docker ps
CONTAINER ID        IMAGE               COMMAND             CREATED             STATUS              PORTS               NAMES
620e1bcb5ab6        alpine              "sh"                4 minutes ago       Up 4 minutes                            keen_alba
ttani
[node4] (local) root@192.168.0.20 ~
$ docker commit -m "Added GIT" 620 ajeetraina/alpine-git
sha256:9a8cd6c3bd8761013b2b932c58af2870f5637bfdf4227d7414073b0458ed0c54
[node4] (local) root@192.168.0.20 ~
$ docker images
REPOSITORY              TAG                 IMAGE ID            CREATED             SIZE
ajeetraina/alpine-git   latest              9a8cd6c3bd87        11 seconds ago      31.2MB
ubuntu                  latest              94e814e2efa8        3 days ago          88.9MB
alpine                  3.6                 43773d1dba76        7 days ago          4.03MB
alpine                  3.7                 6d1ef012b567        7 days ago          4.21MB
alpine                  3.8                 dac705114996        7 days ago          4.41MB
alpine                  3.9                 5cb3aa00f899        7 days ago          5.53MB
alpine                  latest              5cb3aa00f899        7 days ago          5.53MB
There you see a new image just created.
Time to tag the image
$ docker tag --help

Usage:  docker tag SOURCE_IMAGE[:TAG] TARGET_IMAGE[:TAG]

Create a tag TARGET_IMAGE that refers to SOURCE_IMAGE
[node4] (local) root@192.168.0.20 ~
$ docker tag ajeetraina/alpine-git:latest ajeetraina/alpine-git:1.0
$ docker images
REPOSITORY              TAG                 IMAGE ID            CREATED             SIZE
ajeetraina/alpine-git   1.0                 9a8cd6c3bd87        2 minutes ago       31.2MB
ajeetraina/alpine-git   latest              9a8cd6c3bd87        2 minutes ago       31.2MB
ubuntu                  latest              94e814e2efa8        3 days ago          88.9MB
alpine                  3.6                 43773d1dba76        7 days ago          4.03MB
alpine                  3.7                 6d1ef012b567        7 days ago          4.21MB
alpine                  3.8                 dac705114996        7 days ago          4.41MB
alpine                  3.9                 5cb3aa00f899        7 days ago          5.53MB
alpine                  latest              5cb3aa00f899        7 days ago          5.53MB
Pushing it to DockerHub
$ docker login
Login with your Docker ID to push and pull images from Docker Hub. If you don't have a Docker ID, head over to https://hub.docker
.com to create one.
Username: ajeetraina
Password:
WARNING! Your password will be stored unencrypted in /root/.docker/config.json.
Configure a credential helper to remove this warning. See
https://docs.docker.com/engine/reference/commandline/login/#credentials-store

Login Succeeded
[node4] (local) root@192.168.0.20 ~
$ docker push ajeetraina/alpine-git:1.0
The push refers to repository [docker.io/ajeetraina/alpine-git]
3846235f8c17: Pushed
bcf2f368fe23: Mounted from library/alpine
1.0: digest: sha256:85d50f702e930db9e5b958387e667b7e26923f4de340534085cea184adb8411e size: 740
[node4] (local) root@192.168.0.20 ~
Test Your Knowledge
| S. No. | Question. | Response |
|---|---|---|
| 1 | What is difference between Docker Image and Docker Container? | |
| 2 | Where are all Docker images stored? | |
| 3 | Is DockerHub a public or private Docker registry? | |
| 4 | What is the main role of Docker Engine? | |
| 5 | Can you run Alpine container without even pulling it? | |
| 6 | What is the minimal size of Docker image you have built? | |
| 7 | I have mix of Ubuntu and CentOS-based Docker images. How shall I filter it out? |
3.1.4 - Accessing & Managing Docker Image
- Accessing the Container Shell
- Running a Command inside running Container
- Managing Docker Containers
- Test Your Knowledge
Accessing the Container Shell
Tested Infrastructure
| Platform | Number of Instance | Reading Time |
|---|---|---|
| Play with Docker | 1 | 5 min |
Pre-requisite
- Create an account with DockerHub
- Open PWD Platform on your browser
- Click on Add New Instance on the left side of the screen to bring up Alpine OS instance on the right side
Create Ubuntu Container
docker run -dit ubuntu
Accessing the container shell
docker exec -t <container-id> bash
Accesssing the container shell
docker attach <container-id>
Running a command inside running Container
Tested Infrastructure
| Platform | Number of Instance | Reading Time |
|---|---|---|
| Play with Docker | 1 | 5 min |
Pre-requisite
- Create an account with DockerHub
- Open PWD Platform on your browser
- Click on Add New Instance on the left side of the screen to bring up Alpine OS instance on the right side
Create Ubuntu Container
docker run -dit ubuntu
Opening up the bash shell
docker exec -t <container-id> bash
Managing Docker containers
Tested Infrastructure
| Platform | Number of Instance | Reading Time |
|---|---|---|
| Play with Docker | 1 | 5 min |
Pre-requisite
- Create an account with DockerHub
- Open PWD Platform on your browser
- Click on Add New Instance on the left side of the screen to bring up Alpine OS instance on the right side
Preparations
- Clean your docker host using the commands (in bash):
$ docker rm -f $(docker ps -a -q)
Instructions
- Run the following containers from the dockerhub:
$ docker run -d -p 5000:5000 --name app1 selaworkshops/python-app:1.0
$ docker run -d -p 5001:5001 -e "port=5001" --name app2 selaworkshops/python-app:2.0
- Ensure the containers are running:
$ docker ps
- Stop the first container:
$ docker stop app1
- Kill the second container:
$ docker kill app2
- Display running containers:
$ docker ps
- Show all the containers (includind non running containers):
$ docker ps -a
- Let’s start both containers again:
$ docker start app1 app2
- Restart the second container:
$ docker restart app2
- Display the docker host information with:
$ docker info
- Show the running processes in the first container using:
$ docker top app1
- Retrieve the history of the second container:
$ docker history selaworkshops/python-app:2.0
- Inspect the second container image:
$ docker inspect selaworkshops/python-app:2.0
- Inspect the first container and look for the internal ip:
$ docker inspect app1
"Networks": {
                "bridge": {
                    "IPAMConfig": null,
                    "Links": null,
                    "Aliases": null,
                    "NetworkID": "822cb66790c6358d9decab874916120f3bdeff7193a4375c94ca54d50832303d",
                    "EndpointID": "9aa96dc29be08eddc6d8f429ebecd2285c064fda288681a3611812413cbdfc1f",
                    "Gateway": "172.17.0.1",
                    "IPAddress": "172.17.0.3",
                    "IPPrefixLen": 16,
                    "IPv6Gateway": "",
                    "GlobalIPv6Address": "",
                    "GlobalIPv6PrefixLen": 0,
                    "MacAddress": "02:42:ac:11:00:03",
                    "DriverOpts": null
                }
            }
- Show the logs of the second container using the flag –follow:
$ docker logs --follow app2
- Browse to the application and see the containers logs from the terminal:
http://localhost:5001
- Stop to tracking logs:
$ CTRL + C
Test Your Knowledge - Quiz2
| S. No. | Question. | Response |
|---|---|---|
| 1 | What are different ways to access container shell? | |
| 2 | How to run a command inside a Docker container | |
| 3 | Is it possible to stop overall Docker containers in a single shot? | |
| 4 | How do you remove all dangling images in Docker? | |
| 5 | How do you access services ports under Docker? |
3.1.5 - Getting Started with Dockerfile
- What is a Dockerfile?
- Understanding Layering Concept with Dockerfile
- Creating Docker Image
- ENTRYPOINT vs RUN
- Writing Dockerfile with Hello Python Script Added
- Test Your Knowledge
What is a Dockerfile?
- A Dockerfile is a text file which contains a series of commands or instructions.
- These instructions are executed in the order in which they are written.
- Execution of these instructions takes place on a base image.
- On building the Dockerfile, the successive actions form a new image from the base parent image.
Understanding Image Layering Concept with Dockerfile
Docker container is a runnable instance of an image, which is actually made by writing a readable/writable layer on top of some read-only layers.
The parent image used to create another image from a Dockerfile is read-only. When we execute instructions on this parent image, new layers keep adding up. These layers are created when we run docker build command.
The instructions RUN, COPY, ADD mostly contribute to the addition of layers in a Docker build.
Each layer is read-only except the last one - this is added to the image for generating a runnable container. This last layer is called “container layer”. All changes made to the container, like making new files, installing applications, etc. are done in this thin layer.
Let’s understand this layering using an example:
Consider the Dockerfile given below:
FROM ubuntu:latest
RUN mkdir -p /hello/hello
COPY hello.txt /hello/hello
RUN chmod 600 /hello/hello/hello.txt
Layer ID
Each instruction the Dockerfile generates a layer. Each of this layer has a randomly generated unique ID. This ID can be seen at the time of build. See the image below:
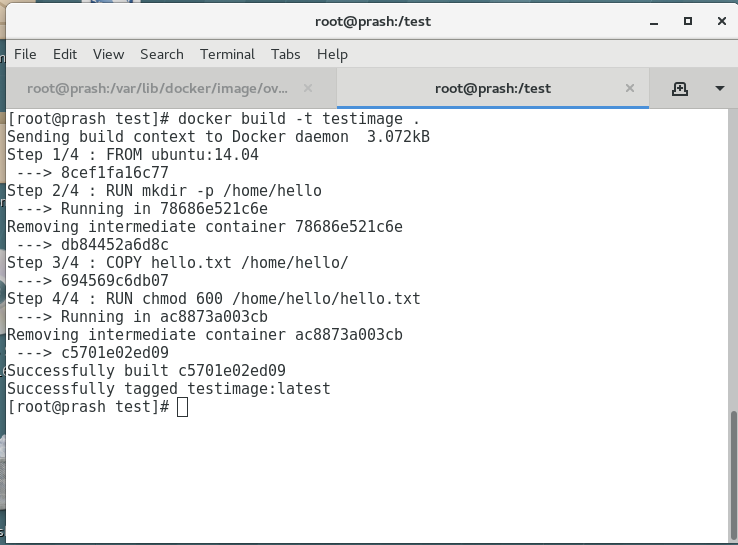
To view all these layers once an image is built from a Dockerfile, we can use docker history command.
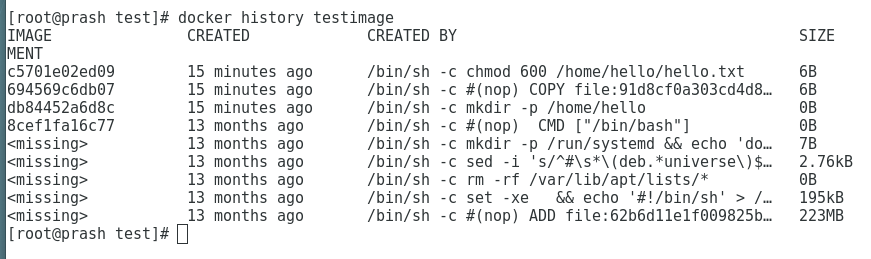
To see more information about the Docker image and the layers use ‘docker inspect’ command as such:
# docker inspect testimage:latest

[
    {
        "Id": "sha256:c5701e02ed095ae7cabaef9fcef009d1f272206ff707deca13a680e024db7f02",
        "RepoTags": [
            "testimage:latest"
        ],
        "RepoDigests": [],
        "Parent": "sha256:694569c6db07ecef432cee1a9a4a6d45f2fd1f6be16814bf59e101bed966e612",
        "Comment": "",
        "Created": "2019-06-03T23:47:01.026463541Z",
        "Container": "ac8873a003cb9ed972b4675f8d27181b99112e7530a5803ff89780e3ecc18b1c",
        "ContainerConfig": {
            "Hostname": "",
            "Domainname": "",
            "User": "",
            "AttachStdin": false,
            "AttachStdout": false,
            "AttachStderr": false,
            "Tty": false,
            "OpenStdin": false,
            "StdinOnce": false,
            "Env": [
                "PATH=/usr/local/sbin:/usr/local/bin:/usr/sbin:/usr/bin:/sbin:/bin"
            ],
            "Cmd": [
                "/bin/sh",
                "-c",
                "chmod 600 /home/hello/hello.txt"
            ],
            "ArgsEscaped": true,
            "Image": "sha256:694569c6db07ecef432cee1a9a4a6d45f2fd1f6be16814bf59e101bed966e612",
            "Volumes": null,
            "WorkingDir": "",
            "Entrypoint": null,
            "OnBuild": null,
            "Labels": null
        },
        "DockerVersion": "18.03.1-ce",
        "Author": "",
        "Config": {
            "Hostname": "",
            "Domainname": "",
            "User": "",
            "AttachStdin": false,
            "AttachStdout": false,
            "AttachStderr": false,
            "Tty": false,
            "OpenStdin": false,
            "StdinOnce": false,
            "Env": [
                "PATH=/usr/local/sbin:/usr/local/bin:/usr/sbin:/usr/bin:/sbin:/bin"
            ],
            "Cmd": [
                "/bin/bash"
            ],
            "ArgsEscaped": true,
            "Image": "sha256:694569c6db07ecef432cee1a9a4a6d45f2fd1f6be16814bf59e101bed966e612",
            "Volumes": null,
            "WorkingDir": "",
            "Entrypoint": null,
            "OnBuild": null,
            "Labels": null
        },
        "Architecture": "amd64",
        "Os": "linux",
        "Size": 222876395,
        "VirtualSize": 222876395,
        "GraphDriver": {
            "Data": {
                "LowerDir": "/var/lib/docker/overlay2/86a76eac21ae67f6d78e59076107a121e6dfb9cc922e68e1be975fc97e711eb1/diff:/var/lib/docker/overlay2/0604b502d31eff670769257ba3411fca09fbe2eab03343660ba557024915a1e6/diff:/var/lib/docker/overlay2/16af32e079fbc252ea5de044628285d5c3a34fc8441602a762729482666b2431/diff:/var/lib/docker/overlay2/732c4ab0164f92664ce831b4a830251132bf17cbcb7d093334a7a367b1a665e5/diff:/var/lib/docker/overlay2/c8a69709e5093c6eefa317f015cbf1422a446b2fe5d3f3d52a7e0d8af8dc6a28/diff:/var/lib/docker/overlay2/c93b36ec3a753592518727a2ea4547ab4e53d58489b9fae0838b2806e9c18346/diff:/var/lib/docker/overlay2/e67589599c2a5ed3bd74a269f3effaa52f94975fd811a866f1fe2bbcb2edabe4/diff",
                "MergedDir": "/var/lib/docker/overlay2/31c68adcd824f155d23de4197b3d0b8776b079c307c1e4c0f2f8bbc73807adc0/merged",
                "UpperDir": "/var/lib/docker/overlay2/31c68adcd824f155d23de4197b3d0b8776b079c307c1e4c0f2f8bbc73807adc0/diff",
                "WorkDir": "/var/lib/docker/overlay2/31c68adcd824f155d23de4197b3d0b8776b079c307c1e4c0f2f8bbc73807adc0/work"
            },
            "Name": "overlay2"
        },
        "RootFS": {
            "Type": "layers",
            "Layers": [
                "sha256:05b0f7f2a81723fd647744a7340477ef9619f5ddeba3f2ca039dac3dd143cd59",
                "sha256:0c3819952093832ffd8865bf72bc17f2f5475795cffe97e2b4c4ff36e638c244",
                "sha256:14fa4a9494bf9e61f83a1bb96cd9e963ab0cbbdaf8ed91ff5eec5196c5bf7b12",
                "sha256:b33859b66bfd3ad176ccf3be8dbd52d6b9823de8cc26688f2efeb76a0ea24a78",
                "sha256:4622c8e1bdc0716e185fa3b338fa415dfdad3724336315de0bebd173a6ceaf05",
                "sha256:6427efc3a0d7bae1fe315b844703580b2095073dcdf54a6ed9c7b1c0d982d9b0",
                "sha256:59cd898074ac7765bacd76a11724b8d666ed8e9c14e7806dfb20a486102f6f1e",
                "sha256:ad24f18512fddb8794612f7ec5955d06dcee93641d02932d809f0640263b8e79"
            ]
        },
        "Metadata": {
            "LastTagTime": "2019-06-04T05:17:01.430558997+05:30"
        }
    }
]
Visualizing layers of Docker Image
docker run --rm -it -v /var/run/docker.sock:/var/run/docker.sock wagoodman/dive testimage
[● Layers]───────────────────────────────────────────────────────────────────────────── [Current Layer Contents]───────────────────────────────────────────────────────────────
Cmp   Size  Command                                                                     Permission     UID:GID       Size  Filetree
     63 MB  FROM e388568efdf7281                                                        drwxr-xr-x         0:0     4.8 MB  ├── bin
    988 kB  [ -z "$(apt-get indextargets)" ]                                            -rwxr-xr-x         0:0     1.1 MB  │   ├── bash
     745 B  set -xe   && echo '#!/bin/sh' > /usr/sbin/policy-rc.d  && echo 'exit 101' > -rwxr-xr-x         0:0      35 kB  │   ├── bunzip2
       7 B  mkdir -p /run/systemd && echo 'docker' > /run/systemd/container             -rwxr-xr-x         0:0        0 B  │   ├── bzcat → bin/bunzip2
       0 B  mkdir -p /hello/hello                                                       -rwxrwxrwx         0:0        0 B  │   ├── bzcmp → bzdiff
      37 B  #(nop) COPY file:666735678ded52c6f9e0693ca27b4dc3d466e3d79c585a58c3b9a91357 -rwxr-xr-x         0:0     2.1 kB  │   ├── bzdiff
      37 B  chmod 600 /hello/hello/hello.txt                                            -rwxrwxrwx         0:0        0 B  │   ├── bzegrep → bzgrep
                                                                                        -rwxr-xr-x         0:0     4.9 kB  │   ├── bzexe
[Layer Details]──────────────────────────────────────────────────────────────────────── -rwxrwxrwx         0:0        0 B  │   ├── bzfgrep → bzgrep
                                                                                        -rwxr-xr-x         0:0     3.6 kB  │   ├── bzgrep
Tags:   (unavailable)                                                                   -rwxr-xr-x         0:0        0 B  │   ├── bzip2 → bin/bunzip2
Id:     e388568efdf72814bd6439a80d822ce06b631689a82292a2b96382d020d63a4c                -rwxr-xr-x         0:0      14 kB  │   ├── bzip2recover
Digest: sha256:43c67172d1d182ca5460fc962f8f053f33028e0a3a1d423e05d91b532429e73d         -rwxrwxrwx         0:0        0 B  │   ├── bzless → bzmore
Command:                                                                                -rwxr-xr-x         0:0     1.3 kB  │   ├── bzmore
#(nop) ADD file:08e718ed0796013f5957a1be7da3bef6225f3d82d8be0a86a7114e5caad50cbc in /   -rwxr-xr-x         0:0      35 kB  │   ├── cat
                                                                                        -rwxr-xr-x         0:0      64 kB  │   ├── chgrp
[Image Details]──────────────────────────────────────────────────────────────────────── -rwxr-xr-x         0:0      60 kB  │   ├── chmod
                                                                                        -rwxr-xr-x         0:0      68 kB  │   ├── chown
Total Image size: 64 MB                                                                 -rwxr-xr-x         0:0     142 kB  │   ├── cp
Potential wasted space: 308 B                                                           -rwxr-xr-x         0:0     121 kB  │   ├── dash
Image efficiency score: 99 %                                                            -rwxr-xr-x         0:0     101 kB  │   ├── date
                                                                                        -rwxr-xr-x         0:0      76 kB  │   ├── dd
Count   Total Space  Path                                                               -rwxr-xr-x         0:0      85 kB  │   ├── df
    2         234 B  /var/lib/dpkg/diversions                                           -rwxr-xr-x         0:0     134 kB  │   ├── dir
    2          74 B  /hello/hello/hello.txt                                             -rwxr-xr-x         0:0      72 kB  │   ├── dmesg
                                                                                        -rwxrwxrwx         0:0        0 B  │   ├── dnsdomainname → hostname
                                                                                        -rwxrwxrwx         0:0        0 B  │   ├── domainname → hostname
                                                                                        -rwxr-xr-x         0:0      35 kB  │   ├── echo
                                                                                        -rwxr-xr-x         0:0       28 B  │   ├── egrep
                                                                                        -rwxr-xr-x         0:0      31 kB  │   ├── false
                                                                                        -rwxr-xr-x         0:0       28 B  │   ├── fgrep
                                                                                        -rwxr-xr-x         0:0      65 kB  │   ├── findmnt
                                                                                        -rwxr-xr-x         0:0     220 kB  │   ├── grep
                                                                                        -rwxr-xr-x         0:0     2.3 kB  │   ├── gunzip
                                                                                        -rwxr-xr-x         0:0     5.9 kB  │   ├── gzexe
                                                                                        -rwxr-xr-x         0:0     102 kB  │   ├── gzip
Lab #1: Create an image with GIT installed
Pre-requisite:
Tested Infrastructure
| Platform | Number of Instance | Reading Time |
|---|---|---|
| Play with Docker | 1 | 5 min |
Pre-requisite
- Create an account with DockerHub
- Open PWD Platform on your browser
- Click on Add New Instance on the left side of the screen to bring up Alpine OS instance on the right side
Assignment:
- Create an image with GIT installed
- Tag your image as labs-git:v1.0
- Create a container based on that image, and run git –version to check that it is installed correctly
Creating Dockerfile
FROM alpine:3.5
RUN apk update
RUN apk add git
Build Docker Image
docker build -t ajeetraina/alpine-git .
Tagging image as labs-git
docker tag ajeetraina/alpine-git ajeetraina/labs-git:v1.0
Verify the Images
$ docker images
REPOSITORY              TAG                 IMAGE ID            CREATED             SIZE
ajeetraina/alpine-git   latest              cb913e37a593        16 seconds ago      26.6MB
ajeetraina/labs-git     v1.0                cb913e37a593        16 seconds ago      26.6MB
Create a container
docker run -itd ajeetraina/labs-git:v1.0 /bin/sh
$ docker ps
CONTAINER ID        IMAGE                      COMMAND             CREATED             STATUS              PORTS               NAMES
3e26a5268f55        ajeetraina/labs-git:v1.0   "/bin/sh"           4 seconds ago       Up 2 seconds                            elated_neumann
Enter into Container Shell
docker attach 3e26
Please press “Enter” key twice so as to enter into container shell
Verify if GIT is installed
/ # git --version
git version 2.13.7
Lab #2: Create an image with ADD instruction
COPY and ADD are both Dockerfile instructions that serve similar purposes. They let you copy files from a specific location into a Docker image.
COPY takes in a src and destination. It only lets you copy in a local file or directory from your host (the machine building the Docker image) into the Docker image itself.
ADD lets you do that too, but it also supports 2 other sources. First, you can use a URL instead of a local file / directory. Secondly, you can extract a tar file from the source directly into the destination.
Pre-requisite:
Tested Infrastructure
| Platform | Number of Instance | Reading Time |
|---|---|---|
| Play with Docker | 1 | 5 min |
Pre-requisite
- Create an account with DockerHub
- Open PWD Platform on your browser
- Click on Add New Instance on the left side of the screen to bring up Alpine OS instance on the right side
Assignment:
- Create an image with ADD instruction
- Tag your image as labs-add:v1.0
- Create a container based on that image, and see the extracted tar file.
Creating Dockerfile
FROM alpine:3.5
RUN apk update
ADD http://www.vlsitechnology.org/pharosc_8.4.tar.gz .
Build Docker Image
docker build -t saiyam911/alpine-add . -f <name of dockerfile>
Tagging image as labs-git
docker tag saiyam911/alpine-add saiyam911/labs-add:v1.0
Verify the Images
$ docker images
REPOSITORY                   TAG                 IMAGE ID            CREATED             SIZE
saiyam911/alpine-add        latest              cdf97cb49d48        38 minutes ago       300MB
saiyam911/labs-add          v1.0                cdf97cb49d48        38 minutes ago       300MB
Create a container
docker run -itd saiyam911/labs-add:v1.0 /bin/sh
$ docker ps
CONTAINER ID        IMAGE                      COMMAND             CREATED             STATUS              PORTS               NAMES
f0940750f61a        saiyam911/labs-add:v1.0   "/bin/sh"           20 seconds ago      Up 18 seconds                           distracted_darwin
Enter into Container Shell
docker attach f094
Please press “Enter” key twice so as to enter into container shell
Verify if the link has been extracted onto the container
/ # ls -ltr
-rw-------    1 root     root     295168000 Sep 19  2007 pharosc_8.4.tar.gz
ADD Command lets you to add a tar directly from a link and explode to the container.
Lab #3: Create an image with COPY instruction
The COPY instruction copies files or directories from source and adds them to the filesystem of the container at destinatio.
Two form of COPY instruction
COPY [--chown=<user>:<group>] <src>... <dest>
COPY [--chown=<user>:<group>] ["<src>",... "<dest>"] (this form is required for paths containing whitespace)
Tested Infrastructure
| Platform | Number of Instance | Reading Time |
|---|---|---|
| Play with Docker | 1 | 5 min |
Pre-requisite
- Create an account with DockerHub
- Open PWD Platform on your browser
- Click on Add New Instance on the left side of the screen to bring up Alpine OS instance on the right side
Assignment:
- Create an image with COPY instruction
- COPY instruction in Multi-stage Builds
Create an image with COPY instruction
Dockerfile
FROM nginx:alpine
LABEL maintainer="Collabnix"

COPY index.html /usr/share/nginx/html/
ENTRYPOINT ["nginx", "-g", "daemon off;"]
Lets create the index.html file
$ echo "Welcome to Dockerlabs !" > index.html
Building Docker Image
$ docker image build -t cpy:v1 .
Staring the container
$ docker container run -d --rm --name myapp1 -p 80:80 cpy:v1
Checking index file
$ curl localhost
Welcome to Dockerlabs !
COPY instruction in Multi-stage Builds
Dockerfile
FROM alpine AS stage1
LABEL maintainer="Collabnix"
RUN echo "Welcome to Docker Labs!" > /opt/index.html

FROM nginx:alpine
LABEL maintainer="Collabnix"
COPY --from=stage1 /opt/index.html /usr/share/nginx/html/
ENTRYPOINT ["nginx", "-g", "daemon off;"]
Building Docker Image
$ docker image build -t cpy:v2 .
Staring the container
$ docker container run -d --rm --name myapp2 -p 8080:80 cpy:v2
Checking index file
$ curl localhost:8080
Welcome to Docker Labs !
NOTE: You can name your stages, by adding an AS
COPY --from=nginx:latest /etc/nginx/nginx.conf /nginx.conf
Lab #4: Create an image with CMD instruction
Tested Infrastructure
| Platform | Number of Instance | Reading Time |
|---|---|---|
| Play with Docker | 1 | 5 min |
Pre-requisite
- Create an account with DockerHub
- Open PWD Platform on your browser
- Click on Add New Instance on the left side of the screen to bring up Alpine OS instance on the right side
Creating Dockerfile
FROM alpine:3.6

RUN apk update
CMD ["top"]
Building Docker Container
docker build -t ajeetraina/lab3_cmd . -f Dockerfile_cmd
Running the Docker container
docker run ajeetraina/lab3_cmd:latest
Lab #5: Create an image with ENTRYPOINT instruction
The ENTRYPOINT instruction make your container run as an executable.
ENTRYPOINT can be configured in two forms:
- Exec Form
ENTRYPOINT [“executable”, “param1”, “param2”] - Shell Form
ENTRYPOINT command param1 param2
If an image has an ENTRYPOINT if you pass an argument it, while running container it wont override the existing entrypoint, it will append what you passed with the entrypoint.To override the existing ENTRYPOINT you should user –entrypoint flag when running container.
Tested Infrastructure
| Platform | Number of Instance | Reading Time |
|---|---|---|
| Play with Docker | 1 | 5 min |
Pre-requisite
- Create an account with DockerHub
- Open PWD Platform on your browser
- Click on Add New Instance on the left side of the screen to bring up Alpine OS instance on the right side
Assignment:
- Create an image with ENTRYPOINT instruction(Exec Form)
- ENTRYPOINT instruction in Shell Form
- Override the existing ENTRYPOINT
Create an image with ENTRYPOINT instruction(Exec Form)
Dockerfile
FROM alpine:3.5
LABEL maintainer="Collabnix"

ENTRYPOINT ["/bin/echo", "Hi, your ENTRYPOINT instruction in Exec Form !"]
Build Docker Image
$ docker build -t entrypoint:v1 .
Verify the Image
$ docker image ls

REPOSITORY          TAG                 IMAGE ID            CREATED             SIZE
entrypoint          v1                  1d06f06c2062        2 minutes ago       4MB
alpine              3.5                 f80194ae2e0c        7 months ago        4MB
Create a container
$ docker container run entrypoint:v1
Hi, your ENTRYPOINT instruction in Exec Form !
ENTRYPOINT instruction in Shell Form
Dockerfile
$ cat Dockerfile
FROM alpine:3.5
LABEL maintainer="Collabnix"

ENTRYPOINT echo "Hi, your ENTRYPOINT instruction in Shell Form !"
Build Docker Image
$ docker build -t entrypoint:v2 .
Verify the Image
$ docker image ls

REPOSITORY          TAG                 IMAGE ID            CREATED             SIZE
entrypoint          v2                  cde521f13080        2 minutes ago       4MB
entrypoint          v1                  1d06f06c2062        5 minutes ago      4MB
alpine              3.5                 f80194ae2e0c        7 months ago        4MB
Create a container
$ docker container run entrypoint:v2
Hi, your ENTRYPOINT instruction in Shell Form !
Override the existing ENTRYPOINT
$ docker container run --entrypoint "/bin/echo" entrypoint:v2 "Hello, Welocme to Docker Meetup! "
Hello, Welocme to Docker Meetup!
Lab #6: Create an image with WORKDIR instruction
The WORKDIR directive in Dockerfile defines the working directory for the rest of the instructions in the Dockerfile. The WORKDIR instruction wont create a new layer in the image but will add metadata to the image config. If the WORKDIR doesn’t exist, it will be created even if it’s not used in any subsequent Dockerfile instruction. you can have multiple WORKDIR in same Dockerfile. If a relative path is provided, it will be relative to the previous WORKDIR instruction.
WORKDIR /path/to/workdir
If no WORKDIR is specified in the Dockerfile then the default path is /. The WORKDIR instruction can resolve environment variables previously set in Dockerfile using ENV.
Tested Infrastructure
| Platform | Number of Instance | Reading Time |
|---|---|---|
| Play with Docker | 1 | 5 min |
Pre-requisite
- Create an account with DockerHub
- Open PWD Platform on your browser
- Click on Add New Instance on the left side of the screen to bring up Alpine OS instance on the right side
Assignment
- Dockerfile with WORKDIR instruction
- WORKDIR with Relative path
- WORKDIR with Absolute path
- WORKDIR with environment variables as path
Dockerfile with WORKDIR instruction
Dockerfile
FROM alpine:3.9.3
LABEL maintainer="Collabnix"

WORKDIR /opt
Building Docker image
$ docker build -t workdir:v1 .
Testing current WORKDIR by running container
$ docker run -it workdir:v1 pwd
WORKDIR with relative path
Dockerfile
FROM alpine:3.9.3
LABEL maintainer="Collabnix"

WORKDIR /opt
RUN echo "Welcome to Docker Labs" > opt.txt
WORKDIR folder1
RUN echo "Welcome to Docker Labs" > folder1.txt
WORKDIR folder2
RUN echo "Welcome to Docker Labs" > folder2.txt
Building Docker image
$ docker build -t workdir:v2 .
Testing current WORKDIR by running container
$ docker run -it workdir:v2 pwd
WORKDIR with Absolute path
Dockerfile
FROM alpine:3.9.3
LABEL maintainer="Collabnix"

WORKDIR /opt/folder1
RUN echo "Welcome to Docker Labs" > opt.txt
WORKDIR /var/tmp/
Building Docker image
$ docker build -t workdir:v3 .
Testing current WORKDIR by running container
$ docker run -it workdir:v3 pwd
WORKDIR with environment variables as path
Dockerfile
FROM alpine:3.9.3
LABEL maintainer="Collabnix"

ENV DIRPATH /myfolder
WORKDIR $DIRPATH
Building Docker image
$ docker build -t workdir:v4 .
Testing current WORKDIR by running container
$ docker run -it workdir:v4 pwd
Lab #7: Create an image with RUN instruction
The RUN instruction execute command on top of the below layer and create a new layer.
RUN instruction can be wrote in two forms:
- RUN
(shell form) - RUN [“executable”, “param1”, “param2”] (exec form)
Tested Infrastructure
| Platform | Number of Instance | Reading Time |
|---|---|---|
| Play with Docker | 1 | 5 min |
Pre-requisite
- Create an account with DockerHub
- Open PWD Platform on your browser
- Click on Add New Instance on the left side of the screen to bring up Alpine OS instance on the right side
Assignment:
- Create an image with RUN instruction
- Combining multiple RUN instruction to one
Create an image with RUN instruction
FROM alpine:3.9.3
LABEL maintainer="Collabnix"
RUN apk add --update
RUN apk add curl
RUN rm -rf /var/cache/apk/
Building Docker image
$ docker image build -t run:v1 .
Checking layer of the image
$  docker image history run:v1
IMAGE               CREATED             CREATED BY                                      SIZE
NT
5b09d7ba1736        19 seconds ago      /bin/sh -c rm -rf /var/cache/apk/               0B
192115cc597a        21 seconds ago      /bin/sh -c apk add curl                         1.55MB
0518580850f1        43 seconds ago      /bin/sh -c apk add --update                     1.33MB
8590497d994e        45 seconds ago      /bin/sh -c #(nop)  LABEL maintainer=Collabnix   0B
cdf98d1859c1        4 months ago        /bin/sh -c #(nop)  CMD ["/bin/sh"]              0B
<missing>           4 months ago        /bin/sh -c #(nop) ADD file:2e3a37883f56a4a27…   5.53MB
Number of layers 6
Checking image size
$ docker image ls run:v1
REPOSITORY          TAG                 IMAGE ID            CREATED             SIZE
run                 v1                  5b09d7ba1736        4 minutes ago       8.42MB
Its 8.42MB
Combining multiple RUN instruction to one
FROM alpine:3.9.3
LABEL maintainer="Collabnix"
RUN apk add --update && \
	apk add curl  && \
	rm -rf /var/cache/apk/
Building Docker image
$ docker image build -t run:v2 .
Checking layer of the image
$ docker image history run:v2
IMAGE               CREATED             CREATED BY                                      SIZE
NT
784298155541        50 seconds ago      /bin/sh -c apk add --update  && apk add curl…   1.55MB
8590497d994e        8 minutes ago       /bin/sh -c #(nop)  LABEL maintainer=Collabnix   0B
cdf98d1859c1        4 months ago        /bin/sh -c #(nop)  CMD ["/bin/sh"]              0B
<missing>           4 months ago        /bin/sh -c #(nop) ADD file:2e3a37883f56a4a27…   5.53MB
Number of layers 4
Checking image size
$ docker image ls run:v2
REPOSITORY          TAG                 IMAGE ID            CREATED             SIZE
run                 v2                  784298155541        3 minutes ago       7.08MB
its now 7.08MB
Lab #8: Create an image with ARG instruction
The ARG directive in Dockerfile defines the parameter name and defines its default value. This default value can be overridden by the --build-arg <parameter name>=<value> in the build command docker build.
`ARG <parameter name>[=<default>]`
The build parameters have the same effect as ENV, which is to set the environment variables. The difference is that the environment variables of the build environment set by ARG will not exist in the future when the container is running. But don’t use ARG to save passwords and the like, because docker history can still see all the values.
Tested Infrastructure
| Platform | Number of Instance | Reading Time |
|---|---|---|
| Play with Docker | 1 | 5 min |
Pre-requisite
- Create an account with DockerHub
- Open PWD Platform on your browser
- Click on Add New Instance on the left side of the screen to bring up Alpine OS instance on the right side
Assignment
- Writing a Dockerfile with ARG instruction
- Building Docker Image with default argument
- Running container argv:v1
- Passing the argument during image build time
- Running container argv:v2
Writing a Dockerfile with ARG instruction
We are writing a Dockerfile which echo “Welcome $WELCOME_USER, to Docker World!” where default argument value for WELCOME_USER as Collabnix.
FROM alpine:3.9.3
LABEL maintainer="Collabnix"

#Setting a default value to Argument WELCOME_USER
ARG WELCOME_USER=Collabnix
RUN echo "Welcome $WELCOME_USER, to Docker World!" > message.txt
CMD cat message.txt
Building Docker Image with default argument
$ docker image build -t arg:v1 .
Running container argv:v1
$ docker run arg:v1

Welcome Collabnix, to Docker World!
Passing the argument(WELCOME_USER) during image build time using –build-arg flag
$ docker image build -t arg:v2 --build-arg WELCOME_USER=Savio .
Running container argv:v2
$ docker run arg:v2

Welcome Savio, to Docker World!
NOTE: ARG is the only one instruction which can come before FROM instruction, but then arg value can be used only by FROM.
Lab #9: Create an image with ENV instruction
The ENV instruction in Dockerfile sets the environment variable for your container when you start. The default value can be overridden by passing --env <key>=<value> when you start the container.
Tested Infrastructure
| Platform | Number of Instance | Reading Time |
|---|---|---|
| Play with Docker | 1 | 5 min |
Pre-requisite
- Create an account with DockerHub
- Open PWD Platform on your browser
- Click on Add New Instance on the left side of the screen to bring up Alpine OS instance on the right side
Assignment
- Writing a Dockerfile with ENV instruction
- Building Docker Image
- Running container env:v1
- Override existing env while running container
Writing a Dockerfile with ENV instruction
Dockerfile
FROM alpine:3.9.3
LABEL maintainer="Collabnix"

ENV WELCOME_MESSAGE="Welcome to Docker World"

CMD ["sh", "-c", "echo $WELCOME_MESSAGE"]
Building Docker Image
$ docker build -t env:v1 .
Running container env:v1
$ docker container run env:v1
Welcome to Docker World
Override existing env while running container
$ docker container run --env WELCOME_MESSAGE="Welcome to Docker Workshop" env:v1
Welcome to Docker Workshop
Lab #10: Create an image with VOLUME instruction
Pre-requisite:
Tested Infrastructure
| Platform | Number of Instance | Reading Time |
|---|---|---|
| Play with Docker | 1 | 5 min |
Pre-requisite
- Create an account with DockerHub
- Open PWD Platform on your browser
- Click on Add New Instance on the left side of the screen to bring up Alpine OS instance on the right side
Assignment
- Create an image with VOLUME instruction
- Finding the volume created on the host
- Testing mount working as exepected
Create an image with VOLUME instruction
Dockerfile
FROM nginx:alpine
LABEL maintainer="Collabnix"

VOLUME /myvol
CMD [ "nginx","-g","daemon off;" ]
Building Docker image
$ docker build -t volume:v1 .
Create a container based on volume:v1 image
$ docker container run --rm -d --name volume-test volume:v1
Finding the volume created on the host
Checking the volume name of the container
$ docker container inspect -f '{{ (index .Mounts 0).Name }}' volume-test
ed09456a448934218f03acbdaa31f465ebbb92e0d45e8284527a2c538cc6b016
Listout Volume in the host
$ docker volume ls
DRIVER              VOLUME NAME
local               ed09456a448934218f03acbdaa31f465ebbb92e0d45e8284527a2c538cc6b016
You will see the volume has been created.
Volume mount path in host
$ docker container inspect -f '{{ (index .Mounts 0).Source }}' volume-test
/var/lib/docker/volumes/ed09456a448934218f03acbdaa31f465ebbb92e0d45e8284527a2c538cc6b016/_data
Testing mount working as exepected
Create a file in this folder
$ touch /var/lib/docker/volumes/ed09456a448934218f03acbdaa31f465ebbb92e0d45e8284527a2c538cc6b016/_data/mytestfile.txt
Checking file is there in run container
$ docker container exec -it volume-test ls myvol
Lab #11: Create an image with EXPOSE instruction
The EXPOSE instruction expose a port, the protocol can be UDP or TCP associated with the indicated port, default is TCP with no specification. The EXPOSE won’t be able to map the ports on the host machine. Regardless of the EXPOSE settings, EXPOSE port can be override using -p flag while starting the container.
Pre-requisite:
Tested Infrastructure
| Platform | Number of Instance | Reading Time |
|---|---|---|
| Play with Docker | 1 | 5 min |
Pre-requisite
- Create an account with DockerHub
- Open PWD Platform on your browser
- Click on Add New Instance on the left side of the screen to bring up Alpine OS instance on the right side
Assignment
- Create an image with EXPOSE instruction
- Inspecting the EXPOSE port in the image
- Publish all exposed port
Create an image with VOLUME instruction
Dockerfile
FROM nginx:alpine
LABEL maintainer="Collabnix"

EXPOSE 80/tcp
EXPOSE 80/udp

CMD [ "nginx","-g","daemon off;" ]
Building Docker image
$ docker build -t expose:v1 .
Create a container based on expose:v1 image
$ docker container run --rm -d --name expose-inst expose:v1
Inspecting the EXPOSE port in the image
$ docker image inspect --format={{.ContainerConfig.ExposedPorts}} expose:v1
Publish all exposed ports
We can publish all EXPOSE port using -P flag.
$ docker container run --rm -P -d --name expose-inst-Publish expose:v1
Checking the publish port
$  docker container ls
CONTAINER ID        IMAGE               COMMAND                  CREATED             STATUS              PORTS                                          NAMES
24983e09bd86        expose:v1           "nginx -g 'daemon of…"   46 seconds ago      Up 45 seconds       0.0.0.0:32768->80/tcp, 0.0.0.0:32768->80/udp   expose-inst-Publish
Lab #12: Create an image with LABEL Instruction
You can add labels to your image to help organize images by project, record licensing information, to aid in automation, or for other reasons. For each label, add a line beginning with LABEL and with one or more key-value pairs. The following examples show the different acceptable formats.
Docker offers support to add labels into images as a way to add custom metadata on them. The label syntax on your Dockerfile is as follows:
LABEL <key>=<value> <key>=<value> <key>=<value> ...
The LABEL instruction adds metadata to an image. A LABEL is a key-value pair. To include spaces within a LABEL value, use quotes and backslashes as you would in command-line parsing. A few usage examples:
LABEL "com.example.vendor"="ACME Incorporated"
LABEL com.example.label-with-value="foo"
LABEL version="1.0"
LABEL description="This text illustrates \
that label-values can span multiple lines."
An image can have more than one label. You can specify multiple labels on a single line. Prior to Docker 1.10, this decreased the size of the final image, but this is no longer the case. You may still choose to specify multiple labels in a single instruction, in one of the following two ways:
LABEL multi.label1="value1" multi.label2="value2" other="value3"
LABEL multi.label1="value1" \
      multi.label2="value2" \
      other="value3"
Labels included in base or parent images (images in the FROM line) are inherited by your image. If a label already exists but with a different value, the most-recently-applied value overrides any previously-set value.
To view an image’s labels, use the docker inspect command.
"Labels": {
    "com.example.vendor": "ACME Incorporated"
    "com.example.label-with-value": "foo",
    "version": "1.0",
    "description": "This text illustrates that label-values can span multiple lines.",
    "multi.label1": "value1",
    "multi.label2": "value2",
    "other": "value3"
},
Lab #13: Create an image with ONBUILD instruction
Format: ONBUILD <other instructions>.
ONBUILD is a special instruction, followed by other instructions, such as RUN, COPY, etc., and these instructions will not be executed when the current image is built. Only when the current image is mirrored, the next level of mirroring will be executed.
The other instructions in Dockerfile are prepared to customize the current image. Only ONBUILD is prepared to help others customize themselves.
Suppose we want to make an image of the application written by Node.js. We all know that Node.js uses npm for package management, and all dependencies, configuration, startup information, etc. are placed in the package.json file. After getting the program code, you need to do npm install first to get all the required dependencies. Then you can start the app with npm start. Therefore, in general, Dockerfile will be written like this:
FROM node:slim
RUN mkdir /app
WORKDIR /app
COPY ./package.json /app
RUN [ "npm", "install" ]
COPY . /app/
CMD [ "npm", "start" ]
Put this Dockerfile in the root directory of the Node.js project, and after building the image, you can use it to start the container. But what if we have a second Node.js project? Ok, then copy this Dockerfile to the second project. If there is a third project? Copy it again? The more copies of a file, the more difficult it is to have version control, so let’s continue to look at the maintenance of such scenarios.
If the first Node.js project is in development, I find that there is a problem in this Dockerfile, such as typing a typo, or installing an extra package, then the developer fixes the Dockerfile, builds it again, and solves the problem. The first project is ok, but the second one? Although the original Dockerfile was copied and pasted from the first project, it will not fix their Dockerfile because the first project, and the Dockerfile of the second project will be automatically fixed.
So can we make a base image, and then use the base image for each project? In this way, the basic image is updated, and each project does not need to synchronize the changes of Dockerfile. After rebuilding, it inherits the update of the base image. Ok, yes, let’s see the result. Then the above Dockerfile will become:
FROM node:slim
RUN mkdir /app
WORKDIR /app
CMD [ "npm", "start" ]
Here we take out the project-related build instructions and put them in the subproject. Assuming that the name of the base image is my-node, the own Dockerfile in each project becomes:
FROM my-node
Yes, there is only one such line. When constructing a mirror with this one-line Dockerfile in each project directory, the three lines of the previous base image ONBUILD will start executing, successfully copy the current project code into the image, and execute for this project. npm install, generate an application image.
Lab
# Dockerfile
FROM busybox
ONBUILD RUN echo "You won't see me until later"
Docker build
docker build -t me/no_echo_here .

Uploading context  2.56 kB
Uploading context
Step 0 : FROM busybox
Pulling repository busybox
769b9341d937: Download complete
511136ea3c5a: Download complete
bf747efa0e2f: Download complete
48e5f45168b9: Download complete
 ---> 769b9341d937
Step 1 : ONBUILD RUN echo "You won't see me until later"
 ---> Running in 6bf1e8f65f00
 ---> f864c417cc99
Successfully built f864c417cc9
Here the ONBUILD instruction is read, not run, but stored for later use.
# Dockerfile
FROM me/no_echo_here
docker build -t me/echo_here . Uploading context 2.56 kB Uploading context Step 0 : FROM cpuguy83/no_echo_here
Executing 1 build triggers
Step onbuild-0 : RUN echo "You won't see me until later"
 ---> Running in ebfede7e39c8
You won't see me until later
 ---> ca6f025712d4
 ---> ca6f025712d4
Successfully built ca6f025712d4
Ubutu Rails
FROM ubuntu:12.04

RUN apt-get update -qq && apt-get install -y ca-certificates sudo curl git-core
RUN rm /bin/sh && ln -s /bin/bash /bin/sh

RUN locale-gen  en_US.UTF-8
ENV LANG en_US.UTF-8
ENV LANGUAGE en_US.UTF-8
ENV LC_ALL en_US.UTF-8

RUN curl -L https://get.rvm.io | bash -s stable
ENV PATH /usr/local/rvm/bin:/usr/local/sbin:/usr/local/bin:/usr/sbin:/usr/bin:/sbin:/bin
RUN /bin/bash -l -c rvm requirements
RUN source /usr/local/rvm/scripts/rvm && rvm install ruby
RUN rvm all do gem install bundler

ONBUILD ADD . /opt/rails_demo
ONBUILD WORKDIR /opt/rails_demo
ONBUILD RUN rvm all do bundle install
ONBUILD CMD rvm all do bundle exec rails server
This Dockerfile is doing some initial setup of a base image. Installs Ruby and bundler. Pretty typical stuff. At the end are the ONBUILD instructions.
ONBUILD ADD . /opt/rails_demo Tells any child image to add everything in the current directory to /opt/railsdemo. Remember, this only gets run from a child image, that is when another image uses this one as a base (or FROM). And it just so happens if you look in the repo I have a skeleton rails app in railsdemo that has it’s own Dockerfile in it, we’ll take a look at this later.
ONBUILD WORKDIR /opt/rails_demo Tells any child image to set the working directory to /opt/rails_demo, which is where we told ADD to put any project files
ONBUILD RUN rvm all do bundle install Tells any child image to have bundler install all gem dependencies, because we are assuming a Rails app here.
ONBUILD CMD rvm all do bundle exec rails server Tells any child image to set the CMD to start the rails server
Ok, so let’s see this image build, go ahead and do this for yourself so you can see the output.
git clone git@github.com:sangam14/docker_onbuild.git
cd docker_onbuild
docker build -t sangam14/docker_onbuild .

Step 0 : FROM ubuntu:12.04
 ---> 9cd978db300e
Step 1 : RUN apt-get update -qq && apt-get install -y ca-certificates sudo curl git-core
 ---> Running in b32a089b7d2d
# output supressed
ldconfig deferred processing now taking place
 ---> d3fdefaed447
Step 2 : RUN rm /bin/sh && ln -s /bin/bash /bin/sh
 ---> Running in f218cafc54d7
 ---> 21a59f8613e1
Step 3 : RUN locale-gen  en_US.UTF-8
 ---> Running in 0fcd7672ddd5
Generating locales...
done
Generation complete.
 ---> aa1074531047
Step 4 : ENV LANG en_US.UTF-8
 ---> Running in dcf936d57f38
 ---> b9326a787f78
Step 5 : ENV LANGUAGE en_US.UTF-8
 ---> Running in 2133c36335f5
 ---> 3382c53f7f40
Step 6 : ENV LC_ALL en_US.UTF-8
 ---> Running in 83f353aba4c8
 ---> f849fc6bd0cd
Step 7 : RUN curl -L https://get.rvm.io | bash -s stable
 ---> Running in b53cc257d59c
# output supressed
---> 482a9f7ac656
Step 8 : ENV PATH /usr/local/rvm/bin:/usr/local/sbin:/usr/local/bin:/usr/sbin:/usr/bin:/sbin:/bin
 ---> Running in c4666b639c70
 ---> b5d5c3e25730
Step 9 : RUN /bin/bash -l -c rvm requirements
 ---> Running in 91469dbc25a6
# output supressed
Step 10 : RUN source /usr/local/rvm/scripts/rvm && rvm install ruby
 ---> Running in cb4cdfcda68f
# output supressed
Step 11 : RUN rvm all do gem install bundler
 ---> Running in 9571104b3b65
Successfully installed bundler-1.5.3
Parsing documentation for bundler-1.5.3
Installing ri documentation for bundler-1.5.3
Done installing documentation for bundler after 3 seconds
1 gem installed
 ---> e2ea33486d62
Step 12 : ONBUILD ADD . /opt/rails_demo
 ---> Running in 5bef85f266a4
 ---> 4082e2a71c7e
Step 13 : ONBUILD WORKDIR /opt/rails_demo
 ---> Running in be1a06c7f9ab
 ---> 23bec71dce21
Step 14 : ONBUILD RUN rvm all do bundle install
 ---> Running in 991da8dc7f61
 ---> 1547bef18de8
Step 15 : ONBUILD CMD rvm all do bundle exec rails server
 ---> Running in c49139e13a0c
 ---> 23c388fb84c1
Successfully built 23c388fb84c1
Lab #14: Create an image with HEALTHCHECK instruction
The HEALTHCHECK directive tells Docker how to determine if the state of the container is normal. This was a new directive introduced during Docker 1.12. Before the HEALTHCHECK directive, the Docker engine can only determine if the container is in a state of abnormality by whether the main process in the container exits. In many cases, this is fine, but if the program enters a deadlock state, or an infinite loop state, the application process does not exit, but the container is no longer able to provide services. Prior to 1.12, Docker did not detect this state of the container and would not reschedule it, causing some containers to be unable to serve, but still accepting user requests.
The syntax look like:
HEALTHCHECK [options] CMD <command>:
The above syntax set the command to check the health of the container
How does it work?
When a HEALTHCHECK instruction is specified in an image, the container is started with it, the initial state will be starting, and will become healthy after the HEALTHCHECK instruction is checked successfully. If it fails for a certain number of times, it will become unhealthy.
What options does HEALTHCHECK support?
--interval=<interval>: interval between two health checks, the default is 30 seconds;
--timeout=<time length>: The health check command runs the timeout period. If this time is exceeded, the health check is regarded as a failure. The default is 30 seconds.
--retries=<number>: When the specified number of consecutive failures, the container status is treated as unhealthy, the default is 3 times.
Like CMD, ENTRYPOINT, HEALTHCHECK can only appear once. If more than one is written, only the last one will take effect.
Pre-requisite:
Tested Infrastructure
| Platform | Number of Instance | Reading Time |
|---|---|---|
| Play with Docker | 1 | 5 min |
Pre-requisite
- Create an account with DockerHub
- Open PWD Platform on your browser
- Click on Add New Instance on the left side of the screen to bring up Alpine OS instance on the right side
Assignment:
- Writing a Dockerfile with HEALTHCHECK instruction
- Build a Docker Image
- Check that the nginx config file exists
- Check if nginx is healthy
- Make Docker container Unhealthy and check
- Create the nginx.conf file and Making the container go healthy
Writing a Dockerfile with HEALTHCHECK instruction
Suppose we have a simple Web service. We want to add a health check to determine if its Web service is working. We can use curl to help determine the HEALTHCHECK of its Dockerfile:
FROM nginx:1.13
HEALTHCHECK --interval=30s --timeout=3s \
  CMD curl -f http://localhost/ || exit 1
EXPOSE 80
Here we set a check every 3 seconds (here the interval is very short for the test, it should be relatively long), if the health check command does not respond for more than 3 seconds, it is considered a failure, and use curl -fs http://localhost/ || exit 1 As a health check command.
Building Docker Image
docker image build -t nginx:1.13 .
Check that the nginx config file exists
docker run --name=nginx-proxy -d \
        --health-cmd='stat /etc/nginx/nginx.conf || exit 1' \
        nginx:1.13
Check if nginx is healthy
docker inspect --format='{{.State.Health.Status}}' nginx-proxy
Make Docker container Unhealthy and check
docker exec nginx-proxy rm /etc/nginx/nginx.conf
Check if nginx is healthy
sleep 5; docker inspect --format='{{.State.Health.Status}}' nginx-proxy
Creating the nginx.conf file and Making the container go healthy
docker exec nginx-proxy touch /etc/nginx/nginx.conf
sleep 5; docker inspect --format='{{.State.Health.Status}}' nginx-proxy
healthy
Lab #15: Create an image with SHELL instruction
Pre-requisite:
- Create an account with DockerHub
- Open PWD Platform on your browser
- Click on Add New Instance on the left side of the screen to bring up Alpine OS instance on the right side
Tested Infrastructure
| Platform | Number of Instance | Reading Time |
|---|---|---|
| Play with Docker | 1 | 5 min |
How does it work?
Format: SHELL ["executable", "parameters"]
- The SHELL instruction allows the default shell used for the shell form of commands to be overridden.
The default shell on Linux is
["/bin/sh", "-c"], and on Windows is["cmd", "/S", "/C"]. The SHELL instruction must be written in JSON form in a Dockerfile. - The SHELL instruction is particularly useful on Windows where there are two commonly used and quite different native shells:
cmdandpowershell, as well as alternate shells available includingsh. - The SHELL instruction can appear multiple times. Each SHELL instruction overrides all previous SHELL instructions, and affects all subsequent instructions.
Create a Dockerfile
FROM windowsservercore

# Executed as cmd /S /C echo default
RUN echo default

# Executed as cmd /S /C powershell -command Write-Host default
RUN powershell -command Write-Host default

# Executed as powershell -command Write-Host hello
SHELL ["powershell", "-command"]
RUN Write-Host hello

# Executed as cmd /S /C echo hello
SHELL ["cmd", "/S"", "/C"]
RUN echo hello
The following instructions can be affected by the SHELL instruction when the shell form of them is used in a Dockerfile: RUN, CMD and ENTRYPOINT.
The following example is a common pattern found on Windows which can be streamlined by using the SHELL instruction:
RUN powershell -command Execute-MyCmdlet -param1 "c:\foo.txt"
The command invoked by docker will be:
cmd /S /C powershell -command Execute-MyCmdlet -param1 "c:\foo.txt"
This is inefficient for two reasons.
First, there is an un-necessary cmd.exe command processor (aka shell) being invoked.
Second, each RUN instruction in the shell form requires an extra powershell -command prefixing the command.
To make it more efficient, one of two mechanisms can be employed. One is to use the JSON form of the RUN command such as:
RUN ["powershell", "-command", "Execute-MyCmdlet", "-param1 \"c:\\foo.txt\""]
While the JSON form is unambiguous and does not use the un-necessary cmd.exe, it does require more verbosity through double-quoting and escaping.
The alternate mechanism is to use the SHELL instruction and the shell form, making a more natural syntax for Windows users, especially when combined with the escape parser directive:
# escape=`

FROM windowsservercore
SHELL ["powershell","-command"]
RUN New-Item -ItemType Directory C:\Example
ADD Execute-MyCmdlet.ps1 c:\example\
RUN c:\example\Execute-MyCmdlet -sample 'hello world'
Build an image
PS E:\docker\build\shell> docker build -t shell .
Sending build context to Docker daemon 3.584 kB
Step 1 : FROM windowsservercore
 ---> 5bc36a335344
Step 2 : SHELL powershell -command
 ---> Running in 87d7a64c9751
 ---> 4327358436c1
Removing intermediate container 87d7a64c9751
Step 3 : RUN New-Item -ItemType Directory C:\Example
 ---> Running in 3e6ba16b8df9


Directory: C:\

Mode                LastWriteTime         Length Name
----                -------------         ------ ----
d-----         6/2/2016   2:59 PM                Example


 ---> 1f1dfdcec085
Removing intermediate container 3e6ba16b8df9
Step 4 : ADD Execute-MyCmdlet.ps1 c:\example\
 ---> 6770b4c17f29
Removing intermediate container b139e34291dc
Step 5 : RUN c:\example\Execute-MyCmdlet -sample 'hello world'
 ---> Running in abdcf50dfd1f
Hello from Execute-MyCmdlet.ps1 - passed hello world
 ---> ba0e25255fda
Removing intermediate container abdcf50dfd1f
Successfully built ba0e25255fda
PS E:\docker\build\shell>
- The SHELL instruction could also be used to modify the way in which a shell operates.
For example, using
SHELL cmd /S /C /V:ON|OFFon Windows, delayed environment variable expansion semantics could be modified. - The
SHELLinstruction can also be used on Linux should an alternate shell be required suchzsh,csh,tcshand others. - The
SHELLfeature was added in Docker 1.12.
Lab 16: Create an image with USER Instruction
The USER directive is similar to WORKDIR, which changes the state of the environment and affects future layers. WORKDIR is to change the working directory, and USER is the identity of the commands such as RUN, CMD and ENTRYPOINT.
Of course, like WORKDIR, USER just helps you switch to the specified user. This user must be pre-established, otherwise it cannot be switched.
Example:
RUN groupadd -r redis && useradd -r -g redis redis
USER redis
RUN [ "redis-server" ]
If the script executed with root wants to change the identity during execution, such as wanting to run a service process with an already established user, don’t use su or sudo, which requires a more cumbersome configuration. And often in the absence of TTY environment. It is recommended to use [gosu] (https://github.com/tianon/gosu).
# Create a redis user and use gosu to change another user to execute the command
RUN groupadd -r redis && useradd -r -g redis redis
# download gosu
RUN wget -O /usr/local/bin/gosu "https://github.com/tianon/gosu/releases/download/1.7/gosu-amd64" \
    && chmod +x /usr/local/bin/gosu \
    && gosu nobody true
# Set CMD and execute it as another user
CMD [ "exec", "gosu", "redis", "redis-server" ]
Pre-requisite:
Tested Infrastructure
| Platform | Number of Instance | Reading Time |
|---|---|---|
| Play with Docker | 1 | 5 min |
Pre-requisite
- Create an account with DockerHub
- Open PWD Platform on your browser
- Click on Add New Instance on the left side of the screen to bring up Alpine OS instance on the right side
How is ENTRYPOINT different from the RUN instruction?
Tested Infrastructure
| Platform | Number of Instance | Reading Time |
|---|---|---|
| Play with Docker | 1 | 5 min |
Pre-requisite
- Create an account with DockerHub
- Open PWD Platform on your browser
- Click on Add New Instance on the left side of the screen to bring up Alpine OS instance on the right side
What is ENTRYPOINT meant for?
ENTRYPOINT is meant to provide the executable while CMD is to pass the default arguments to the executable. To understand it clearly, let us consider the below Dockerfile:
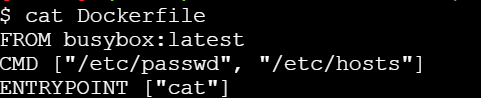
If you try building this Docker image using docker build command -
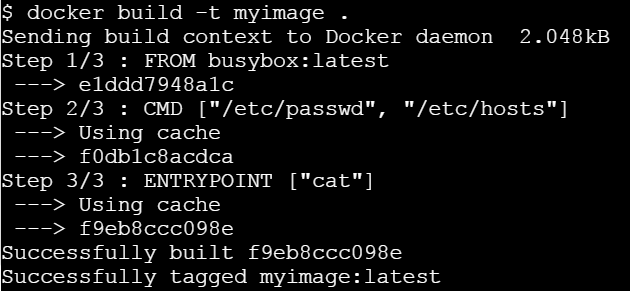
Let us run this image without any argument.
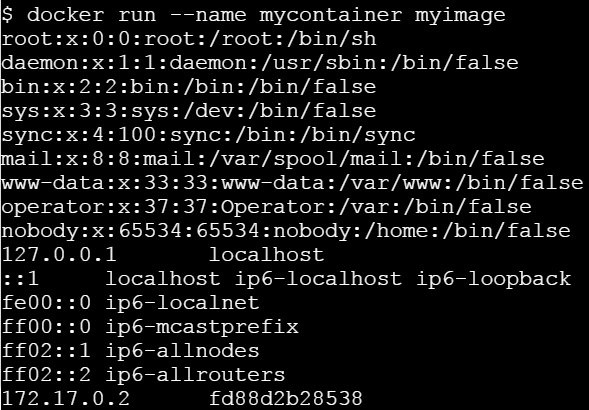
Let’s run it passing a command line argument

This clearly state that ENTRYPOINT is meant to provide the executable while CMD is to pass the default arguments to the executable.
Writing Dockerfile with Hello Python Script Added
Pre-requisite:
- Create an account with DockerHub
- Open PWD Platform on your browser
- Click on Add New Instance on the left side of the screen to bring up Alpine OS instance on the right side
Tested Infrastructure
| Platform | Number of Instance | Reading Time |
|---|---|---|
| Play with Docker | 1 | 5 min |
[node1] (local) root@192.168.0.38 ~
$ mkdir /test
[node1] (local) root@192.168.0.38 ~
$ cd /test
[node1] (local) root@192.168.0.38 /test
$ pwd
/test
Open a file named ‘Dockerfile’ with a text editor.
[node1] (local) root@192.168.0.38 /test
$ vi Dockerfile
Writing a Dockerfile
Setting a Base Image using FROM keyword
FROM ubuntu
Thus, our image would start building taking base as Ubuntu.
Defining the Author (Optional) using MAINTAINER keyword
MAINTAINER Prashansa Kulshrestha
Running a commands on the base image to form new layers using RUN keyword
RUN apt-get update
RUN apt-get install python
Since, the base image was Ubuntu, we can run Ubuntu commands here. These commands above install python over Ubuntu.
Adding a simple Hello World printing python file to the container’s file system using ADD command
ADD hello.py /home/hello.py
ADD a.py /home/a.py
We will place our hello.py and a.py files in the newly created directory itself (/test). ADD command would copy it from /test (current working directory) of host system to container’s filesystem at /home. The destination directories in the container would be create incase they don’t exist.
Code for hello.py:
print ("Hello World")
Code for a.py:
print ("Overriden Hello")
Specifying default execution environment for the container using CMD and ENTRYPOINT
These keywords let us define the default execution environment for a container when it just initiates from an image or just starts. If a command is specified with CMD keyword, it is the first command which a container executes as soon as it instantiates from an image. However, command and arguments provided with CMD can be overridden if user specifies his own commands while running the container using ‘docker run’ command.'
ENTRYPOINT helps to create a executable container and the commands and arguments provided with this keyword are not overridden.
We can also provide the default application environment using ENTRYPOINT and default arguments to be passed to it via CMD keyword. This can be done as follows:
CMD ["/home/hello.py"]
ENTRYPOINT ["python"]
So, default application mode of container would be python and if no other filename is provided as argument to it then it will execute hello.py placed in its /home directory.
Benefit of this is that user can choose some other file to run with the same application at runtime, that is, while launching the container.
So, our overall Dockerfile currently looks like this:
FROM ubuntu
MAINTAINER Prashansa Kulshrestha
RUN apt-get update
RUN apt-get install -y python
ADD hello.py /home/hello.py
ADD a.py /home/a.py
CMD ["/home/hello.py"]
ENTRYPOINT ["python"]
Building a Dockerfile
To create an image from the Dockerfile, we need to build it. This is done as follows:
[node1] (local) root@192.168.0.38 /test
$ docker build -t pythonimage .
The option -t lets us tag our image with a name we desire. So, here we have named our image as ‘pythonimage’. The ‘.’ in the end specifies current working directory i.e. /test. We initiated our build process from here. Docker would find the file named ‘Dockerfile’ in the current directory to process the build.
Running a container from the newly built image
[node1] (local) root@192.168.0.38 /test
$ docker run --name test1 pythonimage
Hello World
[node1] (local) root@192.168.0.38 /test
$
So, here /home/hello.py file placed in the container executed and displayed the output ‘Hello World’, since it was specified as default with CMD keyword.
[node1] (local) root@192.168.0.38 /test
$ docker run --name test2 pythonimage /home/a.py
Overriden Hello
[node1] (local) root@192.168.0.38 /test
$
Here, user specified another file to be run with python (default application for this container). So, the file specified with CMD got overridden and we obtained the output from /home/a.py.
3.1.6 - Creating Private Docker Registry
Building a Private Docker Registry
Tested Infrastructure
| Platform | Number of Instance | Reading Time |
|---|---|---|
| Play with Docker | 1 | 5 min |
Pre-requisite
- Create an account with DockerHub
- Open PWD Platform on your browser
- Click on Add New Instance on the left side of the screen to bring up Alpine OS instance on the right side
Create a directory to permanently store images.
$ mkdir -p /registry/data
Authenticate with DockerHub
$docker login
Start the registry container.
$ docker run -d \
  -p 5000:5000 \
  --name registry \
  -v /registry/data:/var/lib/registry \
  --restart always \
  registry:2
b1a641f8d710eee34405ad575050179f5a1262f1c845806cc3c2b435dea1648c
Display running containers.
$ docker ps
$ docker ps
CONTAINER ID        IMAGE               COMMAND                  CREATED             STATUS              PORTS
                    NAMES
3a056bf96c6d        registry:2          "/entrypoint.sh /etc…"   About an hour ago   Up About an hour    0.0.0
.0:5000->5000/tcp   registry
Pull Alpine 3.6 image from official repository.
$ docker pull alpine:3.6

stretch: Pulling from library/alpine
723254a2c089: Pull complete
Digest: sha256:0a5fcee6f52d5170f557ee2447d7a10a5bdcf715dd7f0250be0b678c556a501b
Status: Downloaded newer image for alpine:3.6
Tag local alpine 3.6 image with an additional tag - local repository address.
$ docker tag alpine:3.6 localhost:5000/alpine:3.6
Push image to the local repository.
[node1] (local) root@192.168.0.23 ~
$ docker push localhost:5000/alpine:3.6
The push refers to repository [localhost:5000/alpine:3.6]
90d1009ce6fe: Pushed
stretch: digest: sha256:38236c068c393272ad02db100e09cac36a5465149e2924a035ee60d6c60c38fe size: 529
[node1] (local) root@192.168.0.23 ~
Remove local images.
[node1] (local) root@192.168.0.23 ~
$ docker image remove alpine:3.6
Untagged: alpine:3.6
Untagged: alpine@sha256:df6ebd5e9c87d0d7381360209f3a05c62981b5c2a3ec94228da4082ba07c4f05
[node1] (local) root@192.168.0.23 ~
$ docker image remove localhost:5000/alpine:3.6
Untagged: localhost:5000/alpine:3.6
Untagged: localhost:5000/debian@sha256:38236c068c393272ad02db100e09cac36a5465149e2924a035ee60d6c60c38fe
Deleted: sha256:4879790bd60d439cfe39c063660eef7af525d5f6f1cbb701a14c7cfc11cbfcf7
Pull Alpine 3.6 image from local repository.
[node1] (local) root@192.168.0.23 ~
$ docker pull localhost:5000/alpine:3.6
stretch: Pulling from alpine
54f7e8ac135a: Pull complete
Digest: sha256:38236c068c393272ad02db100e09cac36a5465149e2924a035ee60d6c60c38fe
Status: Downloaded newer image for localhost:5000/alpine:3.6
List stored images.
[node1] (local) root@192.168.0.23 ~
$ docker image ls
REPOSITORY              TAG                 IMAGE ID            CREATED             SIZE
localhost:5000/alpine   3.6                 4879790bd60d        12 days ago         101MB
registry                2                   2e2f252f3c88        2 months ago        33.3MB
Shared local registry
Create a directory to permanently store images.
$ mkdir -p /srv/registry/data
Create a directory to permanently store certificates and authentication data.
$ mkdir -p /srv/registry/security
Store domain and intermediate certificates using /srv/registry/security/registry.crt file, private key using /srv/registry/security/registry.key file. Use valid certificate and do not waste time with self-signed one. This step is required do use basic authentication.
Install apache2-utils to use htpasswd utility.
[node1] (local) root@192.168.0.23 ~
$ apk add apache2-utils
OK: 302 MiB in 110 packages
Create initial username and password. The only supported password format is bcrypt.
$ : | sudo tee /srv/registry/security/htpasswd
[node1] (local) root@192.168.0.23 ~
$ echo "password" | sudo htpasswd -iB /srv/registry/security/htpasswd username
Adding password for user username
Adding password for user username
$
[node1] (local) root@192.168.0.23 ~
$ cat /srv/registry/security/htpasswd
username:$2y$05$q9R5FSNYpAppB4Vw/AGWb.RqMCGE8DmZ4q5HZC/1wC87oTWyvB9vy
[node1] (local) root@192.168.0.23 ~
$
Stop and Remove all old containers
$ docker stop $(docker ps -a -q)
3a056bf96c6d
[node1] (local) root@192.168.0.23 ~
$ docker rm -f $(docker ps -a -q)
3a056bf96c6d
Start the registry container.
[node1] (local) root@192.168.0.23 ~
$ docker run -d   -p 443:5000   --name registry   -v /srv/registry/data:/var/lib/registry   -v /srv/registry/security:/etc/security   -e REGISTRY_HTTP_TLS_CERTIFICATE=/etc/security/registry.crt   -e REGISTRY_HTTP_TLS_KEY=/etc/security/registry.key   -e REGISTRY_AUTH=htpasswd   -e REGISTRY_AUTH_HTPASSWD_PATH=/etc/security/htpasswd   -e REGISTRY_AUTH_HTPASSWD_REALM="Registry Realm"   --restart always   registry:2
e7755af8cbd70ea84ab77237a87cb97fd1abb18c7726fbc116c40f081d3b7098
[node1] (local) root@192.168.0.23 ~
Display running containers.
[node1] (local) root@192.168.0.23 ~
$ docker ps
CONTAINER ID        IMAGE               COMMAND                  CREATED              STATUS        PORTS               NAMES
e7755af8cbd7        registry:2          "/entrypoint.sh /etc…"   About a minute ago   Restarting (1) 22 seconds ago                       registry
[node1] (local) root@192.168.0.23 ~
Pull Alpine image from official repository.
$ docker pull alpine:3.6

stretch: Pulling from library/alpine
723254a2c089: Pull complete
Digest: sha256:0a5fcee6f52d5170f557ee2447d7a10a5bdcf715dd7f0250be0b678c556a501b
Status: Downloaded newer image for alpine:3.6
Tag local Alpine image with an additional tag - local repository address.
$ docker tag alpine:3.6 registry.collabnix.com/alpine:3.6
This time you need to provide login credentials to use local repository.
$ docker push registry.collabnix.com/alpine:3.6

e27a10675c56: Preparing
no basic auth credentials
$ docker pull registry.collabnix.com/alpine:3.6
Error response from daemon: Get https://registry.collabnix.com/v2/alpine/manifests/3.6: no basic auth credentials
Log in to the local registry.
$ docker login --username username registry.collabnix.com
Password: ********

Login Succeeded
Push image to the local repository.
$ docker push registry.collabnix.com/alpine:3.6
The push refers to repository [registry.collabnix.com/alpine]
e27a10675c56: Pushed
stretch: digest: sha256:02741df16aee1b81c4aaff4c48d75cc2c308bade918b22679df570c170feef7c size: 529
Remove local images.
$ docker image remove alpine:3.6

Untagged: alpine:3.6
Untagged: alpine@sha256:0a5fcee6f52d5170f557ee2447d7a10a5bdcf715dd7f0250be0b678c556a501b
$ docker image remove registry.collabnix.com/alpine:3.6
Untagged: registry.collabnix.com/alpine:3.6
Untagged: registry.sl.collabnix.com/alpine@sha256:02741df16aee1b81c4aaff4c48d75cc2c308bade918b22679df570c170feef7c
Deleted: sha256:da653cee0545dfbe3c1864ab3ce782805603356a9cc712acc7b3100d9932fa5e
Deleted: sha256:e27a10675c5656bafb7bfa9e4631e871499af0a5ddfda3cebc0ac401dfe19382
Pull Debian Stretch image from local repository.
$ docker pull registry.collabnix.com/alpine:3.6
stretch: Pulling from alpine
723254a2c089: Pull complete
Digest: sha256:02741df16aee1b81c4aaff4c48d75cc2c308bade918b22679df570c170feef7c
Status: Downloaded newer image for registry.collabnix.com/alpine:3.6
List stored images.
$ docker image ls
REPOSITORY TAG IMAGE ID CREATED SIZE
registry 2 d1fd7d86a825 4 weeks ago 33.3MB
registry.collabnix.com/alpine 3.6 da653cee0545 2 months ago 100MB
hello-world latest f2a91732366c 2 months ago
Test Your Knowledge
3.1.7 - Docker Volumes
Managing volumes through Docker CLI
Tested Infrastructure
| Platform | Number of Instance | Reading Time |
|---|---|---|
| Play with Docker | 1 | 5 min |
Pre-requisite
docker volume commands
Creating Volume called demo
docker volume create demo
Listing Docker Volumes
docker volume ls
Inspecting “demo” Docker Volume
docker inspect demo
Removing the “demo” Docker Volume
docker volume rm demo
Creating Volume Mount from docker run command & sharing same Volume Mounts among multiple containers
Tested Infrastructure
| Platform | Number of Instance | Reading Time |
|---|---|---|
| Play with Docker | 1 | 5 min |
Pre-requisite
Volumes can be shared across containers
Preparations
- Clean your docker host using the commands :
$ docker rm -f $(docker ps -a -q)
$ docker volume rm $(docker volume ls -q)
Task
-
The Task for this lab is to create a volume, call it my_volume.
-
you should than run a simple an thin container and attach a volume to it. use the image selaworkshops/busybox:latest and use any name to the mounted volume directory (e.g : data)
-
change something in the volume folder , e.g : add a file with some content.
-
create a second volume mounted to the same volume , make sure the file you created in step 3 exists !
Instructions
- Display existing volumes:
$ docker volume ls
- Create a new volume:
$ docker volume create my-volume
- Inspect the new volume to find the mountpoint (volume location):
$ docker volume inspect my-volume
[
{
"CreatedAt": "2018-06-13T20:36:15Z",
"Driver": "local",
"Labels": {},
"Mountpoint": "/var/lib/docker/volumes/my-volume/_data",
"Name": "my-volume",
"Options": {},
"Scope": "local"
}
]
- Let’s run a container and mount the created volume to the root:
$ docker run -it -v my-volume:/data --name my-container selaworkshops/busybox:latest
- Create a new file under /data:
$ cd /data
$ echo "hello" > hello.txt
$ ls
- Open other terminal instance and run other container with the same volume:
$ docker run -it -v my-volume:/data --name my-container-2 selaworkshops/busybox:latest
- Inspect the /data folder (the created file will be there):
$ cd data
$ ls
- Exit from both containers and delete them:
$ exit
$ docker rm -f my-container my-container-2
- Ensure the containers were deleted
$ docker ps -a
- Run a new container attaching the created volume:
$ docker run -it -v my-volume:/data --name new-container selaworkshops/busybox:latest
- Inspect the /data folder (the created file will be there):
$ cd data
$ ls
- Exit from the container and delete it:
$ exit
$ docker rm -f new-container
3.1.8 - Docker Networks
- Step 1 - The
docker networkcommand - Step 2 - List networks
- Step 3 - Inspect a network
- Step 4 - List network driver plugins
- Test Your Knowledge
Prerequisites
You will need all of the following to complete this lab:
- A Linux-based Docker Host running Docker 1.12 or higher
Step 1: The docker network command
The docker network command is the main command for configuring and managing container networks.
Run a simple docker network command from any of your lab machines.
$ docker network
Usage: docker network COMMAND
Manage Docker networks
Options:
--help Print usage
Commands:
connect Connect a container to a network
create Create a network
disconnect Disconnect a container from a network
inspect Display detailed information on one or more networks
ls List networks
rm Remove one or more networks
Run 'docker network COMMAND --help' for more information on a command.
The command output shows how to use the command as well as all of the docker network sub-commands. As you can see from the output, the docker network command allows you to create new networks, list existing networks, inspect networks, and remove networks. It also allows you to connect and disconnect containers from networks.
Step 2: List networks
Run a docker network ls command to view existing container networks on the current Docker host.
$ docker network ls
NETWORK ID NAME DRIVER SCOPE
1befe23acd58 bridge bridge local
726ead8f4e6b host host local
ef4896538cc7 none null local
The output above shows the container networks that are created as part of a standard installation of Docker.
New networks that you create will also show up in the output of the docker network ls command.
You can see that each network gets a unique ID and NAME. Each network is also associated with a single driver. Notice that the “bridge” network and the “host” network have the same name as their respective drivers.
Step 3: Inspect a network
The docker network inspect command is used to view network configuration details. These details include; name, ID, driver, IPAM driver, subnet info, connected containers, and more.
Use docker network inspect to view configuration details of the container networks on your Docker host. The command below shows the details of the network called bridge.
$ docker network inspect bridge
[
{
"Name": "bridge",
"Id": "1befe23acd58cbda7290c45f6d1f5c37a3b43de645d48de6c1ffebd985c8af4b",
"Scope": "local",
"Driver": "bridge",
"EnableIPv6": false,
"IPAM": {
"Driver": "default",
"Options": null,
"Config": [
{
"Subnet": "172.17.0.0/16",
"Gateway": "172.17.0.1"
}
]
},
"Internal": false,
"Containers": {},
"Options": {
"com.docker.network.bridge.default_bridge": "true",
"com.docker.network.bridge.enable_icc": "true",
"com.docker.network.bridge.enable_ip_masquerade": "true",
"com.docker.network.bridge.host_binding_ipv4": "0.0.0.0",
"com.docker.network.bridge.name": "docker0",
"com.docker.network.driver.mtu": "1500"
},
"Labels": {}
}
]
NOTE: The syntax of the
docker network inspectcommand isdocker network inspect <network>, where<network>can be either network name or network ID. In the example above we are showing the configuration details for the network called “bridge”. Do not confuse this with the “bridge” driver.
Step 4: List network driver plugins
The docker info command shows a lot of interesting information about a Docker installation.
Run a docker info command on any of your Docker hosts and locate the list of network plugins.
$ docker info
Containers: 0
Running: 0
Paused: 0
Stopped: 0
Images: 0
Server Version: 1.12.3
Storage Driver: aufs
<Snip>
Plugins:
Volume: local
Network: bridge host null overlay <<<<<<<<
Swarm: inactive
Runtimes: runc
<Snip>
The output above shows the bridge, host, null, and overlay drivers.
Bridge networking
In this lab you’ll learn how to build, manage, and use bridge networks.
You will complete the following steps as part of this lab.
- Step 1 - The default bridge network
- Step 2 - Connect a container to the default bridge network
- Step 3 - Test the network connectivity
- Step 4 - Configure NAT for external access
Prerequisites
You will need all of the following to complete this lab:
- A Linux-based Docker host running Docker 1.12 or higher
- The lab was built and tested using Ubuntu 16.04
Step 1: The default bridge network
Every clean installation of Docker comes with a pre-built network called bridge. Verify this with the docker network ls command.
$ docker network ls
NETWORK ID NAME DRIVER SCOPE
1befe23acd58 bridge bridge local
726ead8f4e6b host host local
ef4896538cc7 none null local
The output above shows that the bridge network is associated with the bridge driver. It’s important to note that the network and the driver are connected, but they are not the same. In this example the network and the driver have the same name - but they are not the same thing!
The output above also shows that the bridge network is scoped locally. This means that the network only exists on this Docker host. This is true of all networks using the bridge driver - the bridge driver provides single-host networking.
All networks created with the bridge driver are based on a Linux bridge (a.k.a. a virtual switch).
Install the brctl command and use it to list the Linux bridges on your Docker host.
# Install the brctl tools
$ apt-get install bridge-utils
<Snip>
# List the bridges on your Docker host
$ brctl show
bridge name bridge id STP enabled interfaces
docker0 8000.0242f17f89a6 no
The output above shows a single Linux bridge called docker0. This is the bridge that was automatically created for the bridge network. You can see that it has no interfaces currently connected to it.
You can also use the ip command to view details of the docker0 bridge.
$ ip a
<Snip>
3: docker0: <NO-CARRIER,BROADCAST,MULTICAST,UP> mtu 1500 qdisc noqueue state DOWN group default
link/ether 02:42:f1:7f:89:a6 brd ff:ff:ff:ff:ff:ff
inet 172.17.0.1/16 scope global docker0
valid_lft forever preferred_lft forever
inet6 fe80::42:f1ff:fe7f:89a6/64 scope link
valid_lft forever preferred_lft forever
Step 2: Connect a container
The bridge network is the default network for new containers. This means that unless you specify a different network, all new containers will be connected to the bridge network.
Create a new container.
$ docker run -dt ubuntu sleep infinity
6dd93d6cdc806df6c7812b6202f6096e43d9a013e56e5e638ee4bfb4ae8779ce
This command will create a new container based on the ubuntu:latest image and will run the sleep command to keep the container running in the background. As no network was specified on the docker run command, the container will be added to the bridge network.
Run the brctl show command again.
$ brctl show
bridge name bridge id STP enabled interfaces
docker0 8000.0242f17f89a6 no veth3a080f
Notice how the docker0 bridge now has an interface connected. This interface connects the docker0 bridge to the new container just created.
Inspect the bridge network again to see the new container attached to it.
$ docker network inspect bridge
<Snip>
"Containers": {
"6dd93d6cdc806df6c7812b6202f6096e43d9a013e56e5e638ee4bfb4ae8779ce": {
"Name": "reverent_dubinsky",
"EndpointID": "dda76da5577960b30492fdf1526c7dd7924725e5d654bed57b44e1a6e85e956c",
"MacAddress": "02:42:ac:11:00:02",
"IPv4Address": "172.17.0.2/16",
"IPv6Address": ""
}
},
<Snip>
Step 3: Test network connectivity
The output to the previous docker network inspect command shows the IP address of the new container. In the previous example it is “172.17.0.2” but yours might be different.
Ping the IP address of the container from the shell prompt of your Docker host. Remember to use the IP of the container in your environment.
$ ping 172.17.0.2
64 bytes from 172.17.0.2: icmp_seq=1 ttl=64 time=0.069 ms
64 bytes from 172.17.0.2: icmp_seq=2 ttl=64 time=0.052 ms
64 bytes from 172.17.0.2: icmp_seq=3 ttl=64 time=0.050 ms
64 bytes from 172.17.0.2: icmp_seq=4 ttl=64 time=0.049 ms
64 bytes from 172.17.0.2: icmp_seq=5 ttl=64 time=0.049 ms
^C
--- 172.17.0.2 ping statistics ---
5 packets transmitted, 5 received, 0% packet loss, time 3999ms
rtt min/avg/max/mdev = 0.049/0.053/0.069/0.012 ms
Press Ctrl-C to stop the ping. The replies above show that the Docker host can ping the container over the bridge network.
Log in to the container, install the ping
program and ping www.dockercon.com.
# Get the ID of the container started in the previous step.
$ docker ps
CONTAINER ID IMAGE COMMAND CREATED STATUS NAMES
6dd93d6cdc80 ubuntu "sleep infinity" 5 mins Up reverent_dubinsky
# Exec into the container
$ docker exec -it 6dd93d6cdc80 /bin/bash
# Update APT package lists and install the iputils-ping package
root@6dd93d6cdc80:/# apt-get update
<Snip>
apt-get install iputils-ping
Reading package lists... Done
<Snip>
# Ping www.dockercon.com from within the container
root@6dd93d6cdc80:/# ping www.dockercon.com
PING www.dockercon.com (104.239.220.248) 56(84) bytes of data.
64 bytes from 104.239.220.248: icmp_seq=1 ttl=39 time=93.9 ms
64 bytes from 104.239.220.248: icmp_seq=2 ttl=39 time=93.8 ms
64 bytes from 104.239.220.248: icmp_seq=3 ttl=39 time=93.8 ms
^C
--- www.dockercon.com ping statistics ---
3 packets transmitted, 3 received, 0% packet loss, time 2002ms
rtt min/avg/max/mdev = 93.878/93.895/93.928/0.251 ms
This shows that the new container can ping the internet and therefore has a valid and working network configuration.
Step 4: Configure NAT for external connectivity
In this step we’ll start a new NGINX container and map port 8080 on the Docker host to port 80 inside of the container. This means that traffic that hits the Docker host on port 8080 will be passed on to port 80 inside the container.
NOTE: If you start a new container from the official NGINX image without specifying a command to run, the container will run a basic web server on port 80.
Start a new container based off the official NGINX image.
$ docker run --name web1 -d -p 8080:80 nginx
Unable to find image 'nginx:latest' locally
latest: Pulling from library/nginx
386a066cd84a: Pull complete
7bdb4b002d7f: Pull complete
49b006ddea70: Pull complete
Digest: sha256:9038d5645fa5fcca445d12e1b8979c87f46ca42cfb17beb1e5e093785991a639
Status: Downloaded newer image for nginx:latest
b747d43fa277ec5da4e904b932db2a3fe4047991007c2d3649e3f0c615961038
Check that the container is running and view the port mapping.
$ docker ps
CONTAINER ID IMAGE COMMAND CREATED STATUS PORTS NAMES
b747d43fa277 nginx "nginx -g 'daemon off" 3 seconds ago Up 2 seconds 443/tcp, 0.0.0.0:8080->80/tcp web1
6dd93d6cdc80 ubuntu "sleep infinity" About an hour ago Up About an hour reverent_dubinsky
There are two containers listed in the output above. The top line shows the new web1 container running NGINX. Take note of the command the container is running as well as the port mapping - 0.0.0.0:8080->80/tcp maps port 8080 on all host interfaces to port 80 inside the web1 container. This port mapping is what effectively makes the containers web service accessible from external sources (via the Docker hosts IP address on port 8080).
Now that the container is running and mapped to a port on a host interface you can test connectivity to the NGINX web server.
To complete the following task you will need the IP address of your Docker host. This will need to be an IP address that you can reach (e.g. if your lab is in AWS this will need to be the instance’s Public IP).
Point your web browser to the IP and port 8080 of your Docker host. The following example shows a web browser pointed to 52.213.169.69:8080

If you try connecting to the same IP address on a different port number it will fail.
If for some reason you cannot open a session from a web broswer, you can connect from your Docker host using the curl command.
$ curl 127.0.0.1:8080
<!DOCTYPE html>
<html>
<head>
<title>Welcome to nginx!</title>
<Snip>
<p><em>Thank you for using nginx.</em></p>
</body>
</html>
If you try and curl the IP address on a different port number it will fail.
NOTE: The port mapping is actually port address translation (PAT).
Test Your Knowledge
3.2 - Docker for intermediate
3.2.1 - Advanced Docker networking
Advanced network configuration
introduces some of Docker’s advanced network configurations and options.
When Docker starts, it automatically creates a docker0 virtual bridge on the host. It is actually a bridge of Linux, which can be understood as a software switch. It will be forwarded between the network ports that are mounted to it.
At the same time, Docker randomly assigns an address in a private unoccupied private network segment (defined in RFC1918 ) to the docker0 interface. For example, the typical 172.17.42.1 mask of 255.255.0.0 . The network port in the container started after this will also automatically assign an address of the same network segment ( 172.17.0.0/16 ).
When creating a Docker container, a pair of veth pair interfaces are created (when the packet is sent to one interface, the other interface can also receive the same packet). The pair is terminated in the container, eth0 ; the other end is local and mounted to the docker0 bridge, with the name starting with veth (for example, vethAQI2QT ). In this way, the host can communicate with the container and the containers can communicate with each other. Docker created a virtual shared network between the host and all containers.
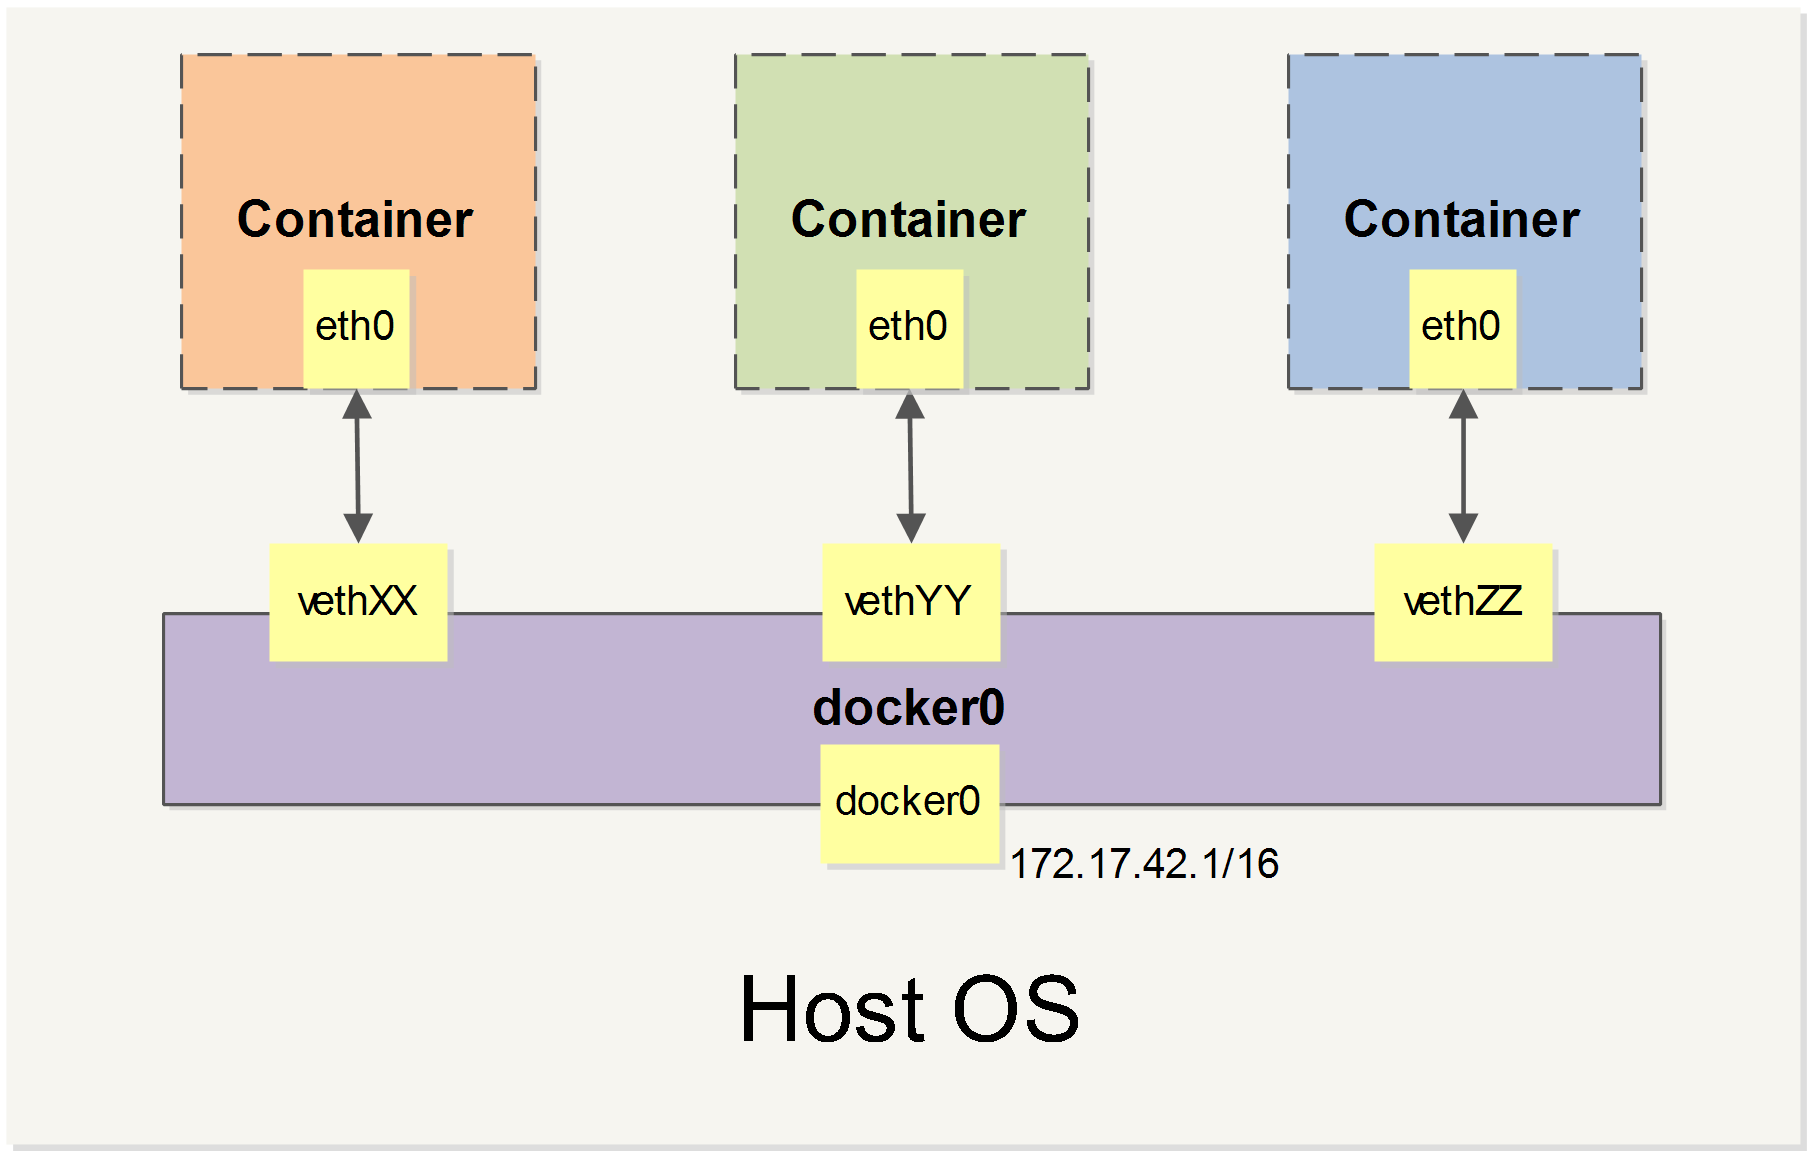
we will cover all of Docker’s network custom configurations in some scenarios. And adjust, complement, or even replace Docker’s default network configuration with Linux commands.
Configuring DNS
How to customize the host name and DNS of the configuration container? The secret is that Docker uses virtual files to mount three related configuration files for the container.
Use the mount command in the container to see the mount information:
$ mount /dev/disk/by-uuid/1fec...ebdf on /etc/hostname type ext4 ... /dev/disk/by-uuid/1fec...ebdf on /etc/hosts type ext4 ... tmpfs on /etc/resolv.conf type tmpfs ...
- This mechanism allows the DNS configuration of all Docker containers to be updated immediately after the host host’s DNS information is updated via the
/etc/resolv.conffile.
Configure DNS for all containers, or add the following to the /etc/docker/daemon.json file to set it up.
{ "dns" : [ "114.114.114.114" , "8.8.8.8" ] }
This way the container DNS is automatically configured to 114.114.114.114 and 8.8.8.8 each time it is started. Use the following command to prove that it has taken effect.
$ docker run -it --rm ubuntu:18.04 cat etc/resolv.conf nameserver 114.114.114.114 nameserver 8.8.8.8
If the user wants to manually specify the configuration of the container, you can add the following parameters when starting the container with the docker run command:
-h HOSTNAME or --hostname=HOSTNAME sets the hostname of the container, which will be written to /etc/hostname and/etc/hostscontainer. But it is not docker container ls , neither in the docker container ls nor in the other container’s /etc/hosts .
--dns=IP_ADDRESS Add the DNS server to the /etc/resolv.conf of the container and let the container use this server to resolve all hostnames that are not in /etc/hosts .
--dns-search=DOMAIN sets the search domain of the container. When the search domain is set to .example.com , when searching for a host named host, DNS not only searches for host but also searches for host.example.com .
Note: If the last two parameters are not specified when the container starts, Docker will default to configuring the container with /etc/resolv.conf on the host.
Disable networking for a container
Tested Infrastructure
| Platform | Number of Instance | Reading Time |
|---|---|---|
| Mac OS | 1 | 5 min |
Pre-requisite
- A linux system (here we have used macbook)
- Docker installed
If we want to disable the networking stack on a container, we can use the “–network none” flag when starting the container. Within the container, only the loopback device is created.
Steps to implement this
- Create a container
$ docker run --rm -dit --network none --name no-net-alpine alpine:latest ash
Unable to find image 'alpine:latest' locally
latest: Pulling from library/alpine
4fe2ade4980c: Pull complete
Digest: sha256:621c2f39f8133acb8e64023a94dbdf0d5ca81896102b9e57c0dc184cadaf5528
Status: Downloaded newer image for alpine:latest
b961be5a20f2795125b85818ea2522ebb173beb36ec43fe10ed78cbd9a1a5d9e
- Check the container’s network stack, by executing “ip link show” networking commands within the container. Notice that no eth0 was created.
$ docker exec no-net-alpine ip link show
1: lo: <LOOPBACK,UP,LOWER_UP> mtu 65536 qdisc noqueue state UNKNOWN qlen 1
link/loopback 00:00:00:00:00:00 brd 00:00:00:00:00:00
2: tunl0@NONE: <NOARP> mtu 1480 qdisc noop state DOWN qlen 1
link/ipip 0.0.0.0 brd 0.0.0.0
3: ip6tnl0@NONE: <NOARP> mtu 1452 qdisc noop state DOWN qlen 1
link/tunnel6 00:00:00:00:00:00:00:00:00:00:00:00:00:00:00:00 brd 00:00:00:00:00:00:00:00:00:00:00:00:00:00:00:00
- You can check that no routing table available in this container
$ docker exec no-net-alpine ip route
$
- Stop the container
$ docker stop no-net-alpine
no-net-alpine
- Container will be automatically removed while stop, because it was created with the –rm flag.
$ docker container rm no-net-alpine
Error: No such container: no-net-alpine
Without “–network none” option
If we do not use “–network none” then we can see below differences.
$ docker run --rm -dit --name no-net-alpine alpine:latest ash
8a90992643c7b75e8d4daaf6d55fd9961c264f8f1af49d3e9ed420b657706ef9
$ docker exec no-net-alpine ip link show
1: lo: <LOOPBACK,UP,LOWER_UP> mtu 65536 qdisc noqueue state UNKNOWN qlen 1
link/loopback 00:00:00:00:00:00 brd 00:00:00:00:00:00
2: tunl0@NONE: <NOARP> mtu 1480 qdisc noop state DOWN qlen 1
link/ipip 0.0.0.0 brd 0.0.0.0
3: ip6tnl0@NONE: <NOARP> mtu 1452 qdisc noop state DOWN qlen 1
link/tunnel6 00:00:00:00:00:00:00:00:00:00:00:00:00:00:00:00 brd 00:00:00:00:00:00:00:00:00:00:00:00:00:00:00:00
10: eth0@if11: <BROADCAST,MULTICAST,UP,LOWER_UP,M-DOWN> mtu 1500 qdisc noqueue state UP
link/ether 02:42:ac:11:00:02 brd ff:ff:ff:ff:ff:ff
You could see eth0 related info in networking command output.
Exposing a Container Port on the Host
Tested Infrastructure
| Platform | Number of Instance | Reading Time |
|---|---|---|
| Mac OS | 1 | 5 min |
Pre-requisite
- A linux system (here we have used macbook)
- Docker installed
To expose the container port on the host we use -p or –publish option. [-p host_port:container_port ]
$ docker run -dit --name my-apache-app -p 8080:80 -v "$PWD":/usr/local/apache2/htdocs/ httpd:2.4
7e14fd11385969433f3273c3af0c74f9b0d0afd5f8aa7492b9705712df421f14
Once the port exposed to host , try to reach the port via explorer or with curl commands. You should get proper output from the container
$ curl localhost:8080
<!DOCTYPE HTML PUBLIC "-//W3C//DTD HTML 3.2 Final//EN">
<html>
<head>
<title>Index of /</title>
</head>
<body>
<h1>Index of /</h1>
<ul></ul>
</body></html>
Finding IP address of Container
Tested Infrastructure
| Platform | Number of Instance | Reading Time |
|---|---|---|
| Mac OS | 1 | 5 min |
Pre-requisite
- A linux system (here we have used macbook)
- Docker installed
If you want to get the IP address of the container running on your system “docker inspect” with –format option will be helpful. Create a container and pass the container name or id to the “docker inspect” with –format or -f option.
$ docker run --rm -dit --name no-net-alpine alpine:latest ash
8a90992643c7b75e8d4daaf6d55fd9961c264f8f1af49d3e9ed420b657706ef9
$ docker inspect -f '{{range .NetworkSettings.Networks}}{{.IPAddress}}{{end}}' no-net-alpine
172.17.0.2
Verifying host-level settings that impact Docker networking
Docker relies on the host being capable of performing certain functions to make Docker networking work. Namely, your Linux host must be configured to allow IP forwarding. In addition, since the release of Docker 1.7, you may now choose to use hairpin Network Address Translation (NAT) rather than the default Docker user land proxy. In this recipe, we’ll review the requirement for the host to have IP forwarding enabled. We’ll also talk about NAT hairpin and discuss the host-level requirements for that option as well. In both cases, we’ll show Docker’s default behavior with regard to its settings as well as how you can alter them.
Tested Infrastructure
| Platform | Number of Instance | Reading Time |
|---|---|---|
| Ubuntu 18.04 | 1 | 5 min |
Pre-requisite
- Create an account with DockerHub
- Open PWD Platform on your browser
- Click on Add New Instance on the left side of the screen to bring up Alpine OS instance on the right side
Most Linux distributions default the IP forward value to disabled or 0. Fortunately for us, in a default configuration, Docker takes care of updating this setting to the correct value when the Docker service starts. For instance, let’s take a look at a freshly rebooted host that doesn’t have the Docker service enabled at boot time. If we check the value of the setting before starting Docker, we can see that it’s disabled. Starting the Docker engine automatically enables the setting for us:
user@docker1:~$ more /proc/sys/net/ipv4/ip_forward
0
user@docker1:~$ sudo systemctl start docker
user@docker1:~$ sysctl net.ipv4.ip_forward
net.ipv4.ip_forward = 1
Linking Containers in Docker
Tested Infrastructure
| Platform | Number of Instance | Reading Time |
|---|---|---|
| Mac OS | 1 | 5 min |
Pre-requisite
- A linux system (here we have used macbook)
- Docker installed
In order to connect together multiple docker containers or services running inside docker container, ‘–link’ flag can be used in order to securely connect and provide a channel to transfer information from one container to another. A simple application of using a Wordpress container linked to MySQL container, can explain this well
- Pull the latest MySql container
$ docker pull mysql:latest
latest: Pulling from library/mysql
a5a6f2f73cd8: Already exists
936836019e67: Pull complete
283fa4c95fb4: Pull complete
1f212fb371f9: Pull complete
e2ae0d063e89: Pull complete
5ed0ae805b65: Pull complete
0283dc49ef4e: Pull complete
a7e1170b4fdb: Pull complete
88918a9e4742: Pull complete
241282fa67c2: Pull complete
b0fecf619210: Pull complete
bebf9f901dcc: Pull complete
Digest: sha256:b7f7479f0a2e7a3f4ce008329572f3497075dc000d8b89bac3134b0fb0288de8
Status: Downloaded newer image for mysql:latest
- Run MySql Container in detach mode (MySQL 8 changed the password authentication method. We’re looking for the mysql_native_password plugin, hence “–default-authentication-plugin=mysql_native_password” option require)
$ docker run --name mysql01 -e MYSQL_ROOT_PASSWORD=Password1234 -d mysql --default-authentication-plugin=mysql_native_password
fdabd410a66e4b65ec959677c932ccad79542ee9081d86ad2cbd0e2fe0265f1d
- Pull Wordpress docker container
$ docker pull wordpress:latest
latest: Pulling from library/wordpress
a5a6f2f73cd8: Already exists
633e0d1cd2a3: Pull complete
fcdfdf7118ba: Pull complete
4e7dc76b1769: Pull complete
c425447c8835: Pull complete
75780b7b9977: Pull complete
33ed51bc30e8: Pull complete
7c4215700bc4: Pull complete
d4f613c1e621: Pull complete
de5465a3fde0: Pull complete
6d373ffaf200: Pull complete
991bff14f001: Pull complete
d0a8c1ecf326: Pull complete
aa3627a535bb: Pull complete
a36be75bb622: Pull complete
98ebddb8e6ca: Pull complete
ed6e19b74de1: Pull complete
18b9cc4a2286: Pull complete
dfe625c958ac: Pull complete
Digest: sha256:f431a0681072aff336acf7a3736a85266fe7b46de116f29a2ea767ff55ad8f54
Status: Downloaded newer image for wordpress:latest
- Run the wordpress container linking it to MySQL Container (will run the database container with name “mysql-wordpress” and will set root password for MySQL container)
$ docker run --name wordpress01 --link mysql01 -p 8080:80 -e WORDPRESS_DB_HOST=mysql01:3306 -e WORDPRESS_DB_USER=root -e WORDPRESS_DB_PASSWORD=Password1234 -e WORDPRESS_DB_NAME=wordpress -e WORDPRESS_TABLE_PREFIX=wp_ -d wordpress
83b1f3215b01e7640246eb945977052bbf64f500a5b7fa18bd5a27841b01289b
- Check the status of the Containers
$ docker ps
CONTAINER ID IMAGE COMMAND CREATED STATUS PORTS NAMES
83b1f3215b01 wordpress "docker-entrypoint.s…" 33 seconds ago Up 32 seconds 0.0.0.0:8080->80/tcp wordpress01
fdabd410a66e mysql "docker-entrypoint.s…" About a minute ago Up About a minute 3306/tcp, 33060/tcp mysql01
- As, we have linked both the container now wordpress container can be accessed from browser using the address http://localhost:8080 and setup of wordpress can be done easily.

Docker Quick Networking Guide
Below is a list of commands related to the Docker network.
Some of these command options are only configurable when the Docker service is started and will not take effect immediately.
-b BRIDGEor--bridge=BRIDGEspecifies the bridge to which the container is mounted--bip=CIDRcustom masker0 mask-H SOCKET...or--host=SOCKET...Channel for the Docker server to receive commands--icc=true|falseWhether communication between containers is supported--ip-forward=true|falsePlease see the communication between the containers below--iptables=true|falseyou allow Docker to add iptables rules?--mtu=BYTES MTUin the –mtu=BYTES container network
The following two command options can be specified either when starting the service or when starting the container. Specifying the Docker service when it is started will become the default value, and the default value of the setting can be overwritten when the docker run is executed later.
--dns=IP_ADDRESS...Use the specified DNS server--dns-search=DOMAIN...Specify the DNS search domain
Finally, these options are only used when the docker run executed because it is specific to the container’s properties.
-h HOSTNAMEor--hostname=HOSTNAMEconfiguration container hostname--link=CONTAINER_NAME:ALIASadds a connection to another container--net=bridge|none|container:NAME_or_ID|hostconfigures the bridge mode of the container-p SPEC or --publish=SPECmaps the container port to the host host-P or --publish-all=true|falsemaps all ports of the container to the host
Contributor - Sangam Biradar
3.2.2 - Docker compose
Docker compose
Docker compose is a tool built by docker to ease the task to creating and configring multiple containers in a development environment counter-part of docker-compose for prodcution environment is docker swarm. Docker compose takes as input a YAML configuration file and creates the resources (containers, networks, volumes etc.) by communicating with the docker daemon through docker api.
Compose file used in examples
version: '3'
services:
web:
build: .
image: web-client
depends_on:
- server
ports:
- "8080:8080"
server:
image: akshitgrover/helloworld
volumes:
- "/app" # Anonymous volume
- "data:/data" # Named volume
- "mydata:/data" # External volume
volumes:
data:
mydata:
external: true
Refer this for configuring your compose file.
CLI Cheatsheet
Build
Used to build services specified in docker-compose.yml file with build specification.
Refer this for more details.
Note: Images build will be tagged as {DIR}_{SERVICE} unless image name is specified in the service specification.
docker-compose build [OPTIONS] [SERVICE...]
OPTIONS:
--compress | Command line flag to compress the build context, Build context is nothing but a directory where docker-compose.yml file is located. As this directory can container a lot of files, sending build context to the container can take a lot of time thus compression is needed.
--force-rm | Remove any intermediate container while building.
--no-cache | Build images without using any cached layers from previoud builds.
--pull | Allways pull newer version of the base image.
-m, --memory | Set memory limit for the container used for building the image.
--parallel | Exploit go routines to parallely build images, As docker daemon is written in go.
--build-arg key=val | Pass any varaible to the dockerfile from the command line.
SERVICE:
If you want to build any particular services instead of every service specified in the compose file pass the name (same as in the compose file) as arguments to the command.
Example:
docker-compose build --compress # Will compress the build context of service web.
Bundle
Used to generate distributed application bundle (DAB) from the compose file.
Refer this for more details about DBA.
docker-compose bundle [OPTIONS]
OPTIONS:
--push-image | Push images to the register if any service has build specifcation.
-o, --output PATH | Output path for .dab file.
Config
Used to validate the compose file
NOTE: Run this command in direcotry where docker-compose.yml file is located.
docker-compose config
Up
Creates and starts the resources as per the specification the docker-compose.yml file.
docker-compose up [OPTIONS] [SERVICE...]
OPTIONS:
-d, --detach | Run containers in background.
--build | Always build images even if it exists.
--no-deps | Avoid creating any linked services.
--force-recreate | Force recreating containers even if specification is not changed.
--no-recreate | Do not recreate containers.
--no-build | Do not build any image even if it is missing.
--no-start | Just create the containers without starting them.
--scale SERVICE=NUM | Create multiple containers for a service.
-V, --renew-anon-volumes | Recreate anonymous volumes instead of getting data from previous ones.
Example:
docker-compose up -d # Will run service containers in background
docker-compose up web # Will start service web and server because of 'depends_on' field
docker-compose up server # will start server service only.
Down
Stop and clear any resources created while lifting docker-compose.
By default only containers and networks defined in the compose file are removed. Networks and Volumes with external = true and never removed.
docker-compose down [OPTIONS]
--rmi type | Remove images Type = all (Remove every image in the compose file), local (Remove images with no custom tag)
-v, --volumes | Remove named volumes except the external ones and also remove anonymous volumes
-t, --timeout TIMEOUT | Speficy shutdown time in seconds. (default = 10)
Example:
docker-compose down # Will delete all containers of both web and server and no volume will be removed
docker-compose down -v # Will also delete anonymous and data volumes.
Scale
Scale particular services
docker-compose scale [SERVICE=NUM...]
Example:
docker-compose scale server=3 web=2
Start
Start created containers.
docker-compose start [SERVICE...]
Example:
docker-compose start # Start containers for every service.
docker-compose start web # Start containers only for service web.
Stop
Stop running containers.
docker-compose stop [SERVICE...]
Example:
docker-compose stop # Stop containers for every service.
docker-compose stop web # Stop containers only for service web.
Docker compose with swarm secrets
Start securing your swarm services using the latest compose reference that allows to specify secrets in your application stack
Getting started
Make sure your daemon is in swarm mode or initialize it as follows:
docker swarm init --advertise-addr $(hostname -i)
Automatic provision
In this example we’ll let compose automatically create our secrets and provision them through compose with the defined secret file
Create a new secret and store it in a file:
echo "shh, this is a secret" > mysecret.txt
Use your secret file in your compose stack as follows:
echo 'version: '\'3.1\''
services:
test:
image: '\'alpine\''
command: '\'cat /run/secrets/my_secret \''
secrets:
- my_secret
secrets:
my_secret:
file: ./mysecret.txt
' > docker-compose.yml
Deploy your stack service:
docker stack deploy -c docker-compose.yml secret
Results in the below output:
Creating network secret_default
Creating secret secret_my_secret
Creating service secret_test
After your stack is deployed you can check your service output:
docker service logs -f secret_test
Results in the below output (below values after secret_test.1. may vary):
secret_test.1.lcygnppmzfdp@node1 | shhh, this is a secret
secret_test.1.mg1420w2i3x4@node1 | shhh, this is a secret
secret_test.1.8osraz8yxjrb@node1 | shhh, this is a secret
secret_test.1.byh5b9uik6db@node1 | shhh, this is a secret
. . .
Using existing secrets
Create a new secret using the docker CLI:
echo "some other secret" | docker secret create manual_secret -
Define your secret as external in your compose file so it’s not created while deploying the stack
echo 'version: '\'3.1\''
services:
test:
image: '\'alpine\''
command: '\'cat /run/secrets/manual_secret \''
secrets:
- manual_secret
secrets:
manual_secret:
external: true
' > external-compose.yml
Deploy your stack as you did in the automatic section:
docker stack deploy -c external-compose.yml external_secret
Validate your secret is there by checking the service logs
docker service logs -f external_secret_test
Contributors:
@marcosnils Akshit Grover
3.2.3 - First Look at Docker Application Packages?
A First Look at Docker Application Packages (“docker-app”)
Consider a scenario where you have separate development, test, and production environments for your Web application. Under development environment, your team might be spending time in building up Web application(say, WordPress), developing WP Plugins and templates, debugging the issue etc. When you are in development you’ll probably want to check your code changes in real-time. The usual way to do this is mounting a volume with your source code in the container that has the runtime of your application. But for production this works differently. Before you host your web application in production environment, you might want to turn-off the debug mode and host it under the right port so as to test your application usability and accessibility. In production you have a cluster with multiple nodes, and in most of the case volume is local to the node where your container (or service) is running, then you cannot mount the source code without complex stuff that involve code synchronization, signals, etc. In nutshell, this might require multiple Docker compose files for each environment and as your number of service applications increases, it becomes more cumbersome to manage those pieces of Compose files. Hence, we need a tool which can ease the way Compose files can be shareable across different environment seamlessly.
To solve this problem, Docker, Inc recently announced a new tool called “docker-app”(Application Packages) which makes “Compose files more reusable and shareable”. This tool not only makes Compose file shareable but provide us with simplified approach to share multi-service application (not just Docker Image) directly on Dockerhub.
Tested Infrastructure
| Platform | Number of Instance | Reading Time |
|---|---|---|
| Play with Docker | 5 | 5 min |
Pre-requisite
- Create an account with DockerHub
- Open PWD Platform on your browser
- Click on Spanner Sign on the left side of the screen to bring up template of 3 Managers & 2 Worker Nodes
Verifying 5 Node Swarm Mode Cluster
$ docker node ls
ID HOSTNAME STATUS AVAILABILITY MANAGER STATUS ENGINE VERSION
juld0kwbajyn11gx3bon9bsct * manager1 Ready Active Leader 18.03.1-ce
uu675q2209xotom4vys0el5jw manager2 Ready Active Reachable 18.03.1-ce
05jewa2brfkvgzklpvlze01rr manager3 Ready Active Reachable 18.03.1-ce
n3frm1rv4gn93his3511llm6r worker1 Ready Active 18.03.1-ce
50vsx5nvwx5rbkxob2ua1c6dr worker2 Ready Active 18.03.1-ce
Cloning the Repository
$ git clone https://github.com/ajeetraina/app
Cloning into 'app'...remote: Counting objects: 14147, done.
remote: Total 14147 (delta 0), reused 0 (delta 0), pack-reused 14147Receiving objects: 100% (14147/14147), 17.32 MiB | 18.43 MiB/s, done.
Resolving deltas: 100% (5152/5152), done.
Installing docker-app
wget https://github.com/docker/app/releases/download/v0.3.0/docker-app-linux.tar.gz
tar xf docker-app-linux.tar.gz
cp docker-app-linux /usr/local/bin/docker-app
OR
$ ./install.sh
Connecting to github.com (192.30.253.112:443)
Connecting to github-production-release-asset-2e65be.s3.amazonaws.com (52.216.227.152:443)
docker-app-linux.tar 100% |**************************************************************| 8780k 0:00:00 ETA
[manager1] (local) root@192.168.0.13 ~/app
$
Verify docker-app version
$ docker-app version
Version: v0.3.0
Git commit: fba6a09
Built: Fri Jun 29 13:09:30 2018
OS/Arch: linux/amd64
Experimental: off
Renderers: none
The docker-app tool comes with various options as shown below:
$ docker-app
Build and deploy Docker applications.
Usage:
docker-app [command]
Available Commands:
deploy Deploy or update an application
helm Generate a Helm chart
help Help about any command
init Start building a Docker application
inspect Shows metadata and settings for a given application
ls List applications.
merge Merge the application as a single file multi-document YAML
push Push the application to a registry
render Render the Compose file for the application
save Save the application as an image to the docker daemon(in preparation for push)
split Split a single-file application into multiple files
version Print version information
Flags:
--debug Enable debug mode
-h, --help help for docker-app
Use "docker-app [command] --help" for more information about a command.
[manager1] (local) root@192.168.0.48 ~/app
WordPress Application under dev & Prod environment
Under this demo, you will see that there is a folder called wordpress.dockerapp that contains three YAML documents:
- metadata
- the compose file
- settings for your application
You can create these files using the below command:
docker-app init --single-file wordpress
For more details, you can visit https://github.com/docker/app
Listing the Wordpress Application package related files/directories
$ ls
README.md install-wp with-secrets.yml
devel prod wordpress.dockerapp
Wordpress Application Package for Dev environment
$ docker-app render wordpress -f devel/dev-settings.yml
version: "3.6"
services:
mysql:
deploy:
mode: replicated
replicas: 1
endpoint_mode: dnsrr
environment:
MYSQL_DATABASE: wordpressdata
MYSQL_PASSWORD: wordpress
MYSQL_ROOT_PASSWORD: wordpress101
MYSQL_USER: wordpress
image: mysql:5.6
networks:
overlay: null
volumes:
- type: volume
source: db_data
target: /var/lib/mysql
wordpress:
depends_on:
- mysql
deploy:
mode: replicated
replicas: 1
endpoint_mode: vip
environment:
WORDPRESS_DB_HOST: mysql
WORDPRESS_DB_NAME: wordpressdata
WORDPRESS_DB_PASSWORD: wordpress
WORDPRESS_DB_USER: wordpress
WORDPRESS_DEBUG: "true"
image: wordpress
networks:
overlay: null
ports:
- mode: ingress
target: 80
published: 8082
protocol: tcp
networks:
overlay: {}
volumes:
db_data:
name: db_data
Wordpress Application Package for Prod
Under Prod environment, I have the following content under prod/prod-settings.yml as shown :
debug: false
wordpress:
port: 80
Post rendering, you should be able to see port:80 exposed as shown below in the snippet:
image: wordpress
networks:
overlay: null
ports:
- mode: ingress
target: 80
published: 80
protocol: tcp
networks:
overlay: {}
volumes:
db_data:
name: db_data
Inspect the WordPress App
$ docker-app inspect wordpress
wordpress 1.0.0
Maintained by: ajeetraina <ajeetraina@gmail.com>
Welcome to Collabnix
Setting Default
------- -------
debug true
mysql.database wordpressdata
mysql.image.version 5.6
mysql.rootpass wordpress101
mysql.scale.endpoint_mode dnsrr
mysql.scale.mode replicated
mysql.scale.replicas 1
mysql.user.name wordpress
mysql.user.password wordpress
volumes.db_data.name db_data
wordpress.port 8081
wordpress.scale.endpoint_mode vip
wordpress.scale.mode replicated
wordpress.scale.replicas 1
[manager1] (local) root@192.168.0.13 ~/app/examples/wordpress
$
Deploying the WordPress App
$ docker-app deploy wordpress
Creating network wordpress_overlay
Creating service wordpress_mysql
Creating service wordpress_wordpress
Switching to Dev Environ
$ docker-app deploy wordpress -f devel/dev-settings.yml

Switching to Prod Environ
$ docker-app deploy wordpress -f prod/prod-settings.yml

$ [manager1] (local) root@192.168.0.48 ~/app/examples/wordpress
$ docker-app deploy -f devel/dev-settings.yml
Updating service wordpress_wordpress (id: l95b4s6xi7q5mg7vj26lhzslb)
Updating service wordpress_mysql (id: lhr4h2uaer861zz1b04pst5sh)
[manager1] (local) root@192.168.0.48 ~/app/examples/wordpress
$ docker-app deploy -f prod/prod-settings.yml
Updating service wordpress_wordpress (id: l95b4s6xi7q5mg7vj26lhzslb)
Updating service wordpress_mysql (id: lhr4h2uaer861zz1b04pst5sh)
[manager1] (local) root@192.168.0.48 ~/app/examples/wordpress
$
Pushing Application Package to Dockerhub
$ docker login
Login with your Docker ID to push and pull images from Docker Hub. If you don't have a Docker ID, head over to
https://hub.docker.com to create one.
Username: ajeetraina
Password:
Login Succeeded
[manager1] (local) root@192.168.0.48 ~/app/examples/wordpress
$
Saving this Application Package as DOcker Image
$ [manager1] (local) root@192.168.0.48 ~/app/examples/wordpress
$ docker-app save wordpress
Saved application as image: wordpress.dockerapp:1.0.0
[manager1] (local) root@192.168.0.48 ~/app/examples/wordpress
$
Listing out the images
$ docker images
REPOSITORY TAG IMAGE ID CREATED SIZE
wordpress.dockerapp 1.0.0 c1ec4d18c16c 47 seconds ago 1.62kB
mysql 5.6 97fdbdd65c6a 3 days ago 256MB
[manager1] (local) root@192.168.0.48 ~/app/examples/wordpress
$
Listing out the services
$ docker stack services wordpress
ID NAME MODE REPLICAS IMAGE PORTS
l95b4s6xi7q5 wordpress_wordpress replicated 1/1 wordpress:latest *:80->80
/tcp
lhr4h2uaer86 wordpress_mysql replicated 1/1 mysql:5.6
[manager1] (local) root@192.168.0.48 ~/docker101/play-with-docker/visualizer
Using docker-app ls command to list out the application packages
$ docker-app ls
REPOSITORY TAG IMAGE ID CREATED SIZE
wordpress.dockerapp 1.0.1 299fb78857cb About a minute ago 1.62kB
wordpress.dockerapp 1.0.0 c1ec4d18c16c 16 minutes ago 1.62kB
Pushing it to Dockerhub
$ docker-app push --namespace ajeetraina --tag 1.0.1
The push refers to repository [docker.io/ajeetraina/wordpress.dockerapp]
51cfe2cfc2a8: Pushed
1.0.1: digest: sha256:14145fc6e743f09f92177a372b4a4851796ab6b8dc8fe49a0882fc5b5c1be4f9 size: 524
Say, you built WordPress application package and pushed it to Dockerhub. Now one of your colleague pull it on his development system.
Pulling it from Dockerhub
$ docker pull ajeetraina/wordpress.dockerapp:1.0.1
1.0.1: Pulling from ajeetraina/wordpress.dockerapp
a59931d48895: Pull complete
Digest: sha256:14145fc6e743f09f92177a372b4a4851796ab6b8dc8fe49a0882fc5b5c1be4f9
Status: Downloaded newer image for ajeetraina/wordpress.dockerapp:1.0.1
[manager3] (local) root@192.168.0.24 ~/app
$ docker images
REPOSITORY TAG IMAGE ID CREATED SIZE
ajeetraina/wordpress.dockerapp 1.0.1 299fb78857cb 8 minutes ago 1.62kB
[manager3] (local) root@192.168.0.24 ~/app
$
Deploying the Application in Easy Way
$ docker images
REPOSITORY TAG IMAGE ID CREATED SIZE
ajeetraina/wordpress.dockerapp 1.0.1 299fb78857cb 9 minutes ago 1.62kB
[manager3] (local) root@192.168.0.24 ~/app
$ docker-app deploy ajeetraina/wordpress
Creating network wordpress_overlay
Creating service wordpress_mysql
Creating service wordpress_wordpress
[manager3] (local) root@192.168.0.24 ~/app
$
Using docker-app merge option
Docker Team has introduced docker-app merge option under the new 0.3.0 release.
[manager1] (local) root@192.168.0.48 ~/app/examples/wordpress
$ docker-app merge -o mywordpress
[manager1] (local) root@192.168.0.48 ~/app/examples/wordpress
$ ls
README.md install-wp prod wordpress.dockerapp
devel mywordpress with-secrets.yml
$ cat mywordpress
version: 1.0.1
name: wordpress
description: "Welcome to Collabnix"
maintainers:
- name: ajeetraina
email: ajeetraina@gmail.com
targets:
swarm: true
kubernetes: true
--
version: "3.6"
services:
mysql:
image: mysql:${mysql.image.version}
environment:
MYSQL_ROOT_PASSWORD: ${mysql.rootpass}
MYSQL_DATABASE: ${mysql.database}
MYSQL_USER: ${mysql.user.name}
MYSQL_PASSWORD: ${mysql.user.password}
volumes:
- source: db_data
target: /var/lib/mysql
type: volume
networks:
- overlay
deploy:
mode: ${mysql.scale.mode}
replicas: ${mysql.scale.replicas}
endpoint_mode: ${mysql.scale.endpoint_mode}
wordpress:
image: wordpress
environment:
WORDPRESS_DB_USER: ${mysql.user.name}
WORDPRESS_DB_PASSWORD: ${mysql.user.password}
WORDPRESS_DB_NAME: ${mysql.database}
WORDPRESS_DB_HOST: mysql
WORDPRESS_DEBUG: ${debug}
ports:
- "${wordpress.port}:80"
networks:
- overlay
deploy:
mode: ${wordpress.scale.mode}
replicas: ${wordpress.scale.replicas}
endpoint_mode: ${wordpress.scale.endpoint_mode}
depends_on:
- mysql
volumes:
db_data:
name: ${volumes.db_data.name}
networks:
overlay:
--
debug: true
mysql:
image:
version: 5.6
rootpass: wordpress101
database: wordpressdata
user:
name: wordpress
password: wordpress
scale:
endpoint_mode: dnsrr
mode: replicated
replicas: 1
wordpress:
scale:
mode: replicated
replicas: 1
endpoint_mode: vip
port: 8081
volumes:
db_data:
name: db_data
Contributor
3.2.4 - Introduction to Docker Swarm
What is Docker Swarm?

Docker Swarm is a container orchestration tool built and managed by Docker, Inc. It is the native clustering tool for Docker. Swarm uses the standard Docker API, i.e., containers can be launched using normal docker run commands and Swarm will take care of selecting an appropriate host to run the container on. This also means that other tools that use the Docker API—such as Compose and bespoke scripts—can use Swarm without any changes and take advantage of running on a cluster rather than a single host.

But why do we need Container orchestration System?
Imagine that you had to run hundreds of containers. You can easily see that if they are running in a distributed mode, there are multiple features that you will need from a management angle to make sure that the cluster is up and running, is healthy and more.
Some of these necessary features include:
● Health Checks on the Containers
● Launching a fixed set of Containers for a particular Docker image
● Scaling the number of Containers up and down depending on the load
● Performing rolling update of software across containers
● and more…
Docker Swarm has capabilities to help us implement all those great features - all through simple CLIs.
Does Docker Swarm require 3rd Party tool to be installed?
Docker Swarm Mode comes integrated with Docker Platform. Starting 1.12, Docker Swarm Mode is rightly integrated which means that you don’t need to install anything outside to run Docker Swarm. Just initialize it and you can get started.
Does Docker Swarm work with Docker Machine & Docker Compose?
Yes, it works very well with the Docker command line tools like docker and docker-machine, and provides the basic ability to deploy a Docker container to a collection of machines running the Docker Engine. Docker Swarm does differ in scope, however, from what we saw when reviewing Amazon ECS.
How does Swarm Cluster look like?

The basic architecture of Swarm is fairly straightforward: each host runs a Swarm agent and one host runs a Swarm manager (on small test clusters this host may also run an agent). The manager is responsible for the orchestration and scheduling of containers on the hosts. Swarm can be run in a high-availability mode where one of etcd, Consul or ZooKeeper is used to handle fail-over to a back-up manager. There are several different methods for how hosts are found and added to a cluster, which is known as discovery in Swarm. By default, token based discovery is used, where the addresses of hosts are kept in a list stored on the Docker Hub.
A swarm is a group of machines that are running Docker and joined into a cluster. After that has happened, we continue to run the Docker commands we’re used to, but now they are executed on a cluster by a swarm manager. The machines in a swarm can be physical or virtual. After joining a swarm, they are referred to as nodes.
Swarm managers are the only machines in a swarm that can execute your commands, or authorize other machines to join the swarm as workers. Workers are just there to provide capacity and do not have the authority to tell any other machine what it can and cannot do.
Up until now, you have been using Docker in a single-host mode on your local machine. But Docker also can be switched into swarm mode, and that’s what enables the use of swarms. Enabling swarm mode instantly makes the current machine a swarm manager. From then on, Docker runs the commands you execute on the swarm you’re managing, rather than just on the current machine.
Swarm managers can use several strategies to run containers, such as “emptiest node” – which fills the least utilized machines with containers. Or “global”, which ensures that each machine gets exactly one instance of the specified container.
A swarm is made up of multiple nodes, which can be either physical or virtual machines. The basic concept is simple enough: run docker swarm init to enable swarm mode and make our current machine a swarm manager, then run docker swarm join on other machines to have them join the swarm as workers.
Next » Difference between Docker Swarm, Docker Swarm Mode and Swarmkit
Getting Started with Docker Swarm
To get started with Docker Swarm, you can use “Play with Docker”, aka PWD. It’s free of cost and open for all. You get maximum of 5 instances of Linux system to play around with Docker.
-
Open Play with Docker labs on your browser
-
Click on Icon near to Instance to choose 3 Managers & 2 Worker Nodes
-
Wait for few seconds to bring up 5-Node Swarm Cluster
We recommend you start with one of our Beginners Guides, and then move to intermediate and expert level tutorials that cover most of the features of Docker. For a comprehensive approach to understanding Docker, I have categorized it as shown below:
A Bonus… Docker Swarm Visualizer
Swarm Visualizer is a fancy tool which visualized the Swarm Cluster setup. It displays containers running on each node in the form of visuals. If you are conducting Docker workshop, it’s a perfect way to show your audience how the containers are placed under each node. Go..try it out..
Clone the Repository
git clone https://github.com/dockersamples/docker-swarm-visualizer
cd docker-swarm-visualizer
docker-compose up -d

To run in a docker swarm:
$ docker service create \
--name=viz \
--publish=8080:8080/tcp \
--constraint=node.role==manager \
--mount=type=bind,src=/var/run/docker.sock,dst=/var/run/docker.sock \
dockersamples/visualizer
Proceed » What is Docker Swarm
Understanding Difference between Docker Swarm(Classic), Swarm Mode & SwarmKit
Docker Swarm is an older (2014) Docker native orchestration tool. It is standalone from the Docker engine and serves to connect Docker engines together to form a cluster. It's then possible to connect to the Swarm and run containers on the cluster. Swarm has a few features:
- Allows us to specify a discovery service
- Some control over where containers are placed (using filters / constraints / distribution strategies, etc…)
- Exposes the same API as the Docker engine itself, allowing 3rd-party tools to interact seamlessly
Swarmkit is a new (2016) tool developed by the Docker team which provides functionality for running a cluster and distributing tasks to the machines in the cluster. Here are the main features:
- Distributed: SwarmKit uses the Raft Consensus Algorithm in order to coordinate and does not rely on a single point of failure to perform decisions.
- Secure: Node communication and membership within a Swarm are secure out of the box. SwarmKit uses mutual TLS for node authentication, role authorization and transport encryption, automating both certificate issuance and rotation.
- Simple: SwarmKit is operationally simple and minimizes infrastructure dependencies. It does not need an external database to operate.
Docker Swarm Mode (Version 1.12 >) uses Swarmkit libraries & functionality in order to make container orchestration over multiple hosts (a cluster) very simple & secure to operate. There is a new set of features (the main one being docker swarm) which are now built into Docker itself to allow us to initiate a new Swarm and deploy tasks to that cluster.
Docker Swarm is not being deprecated, and is still a viable method for Docker multi-host orchestration, but Docker Swarm Mode (which uses the Swarmkit libraries under the hood) is the recommended way to begin a new Docker project where orchestration over multiple hosts is required.
One of the big features in Docker 1.12 release is Swarm mode. Docker had Swarm available for Container orchestration from 1.6 release. Docker released Swarmkit as an opensource project for orchestrating distributed systems few weeks before Docker 1.12(RC) release.
"Swarm" refers to traditional Swarm functionality, "Swarm Mode" refers to new Swarm mode added in 1.12, "Swarmkit" refers to the plumbing open source orchestration project.
Swarm, Swarm Mode and Swarmkit
Following table compares Swarm and Swarm Mode :
| Swarm | Swarm Mode |
|---|---|
| Separate from Docker Engine and can run as Container | Integrated inside Docker engine |
| Needs external KV store like Consul | No need of separate external KV store |
| Service model not available | Service model is available. This provides features like scaling, rolling update, service discovery, load balancing and routing mesh |
| Communication not secure | Both control and data plane is secure |
| Integrated with machine and compose | Not yet integrated with machine and compose as of release 1.12. Will be integrated in the upcoming releases |
Following table compares Swarmkit and Swarm Mode:
| Swarmkit | Swarm Mode |
|---|---|
| Plumbing opensource project | Swarmkit used within Swarm Mode and tightly integrated with Docker Engine |
| Swarmkit needs to built and run separately | Docker 1.12 comes integrated with Swarm Mode |
| No service discovery, load balancing and routing mesh | Service discovery, load balancing and routing mesh available |
| Use swarmctl CLI | Use regular Docker CLI |
Swarmkit has primitives to handle orchestration features like node management, discovery, security and scheduling.
How Docker Swarm Mode works?
Let us first understand what is Swarm Mode and what are its key concepts.
In 1.12, Docker introduced Swarm Mode. Swarm Mode enables the ability to deploy containers across multiple Docker hosts, using overlay networks for service discovery with a built-in load balancer for scaling the services.
Swarm Mode is managed as part of the Docker CLI, making it a seamless experience to the Docker ecosystem.
Key Concepts
Docker Swarm Mode introduces three new concepts which we’ll explore in this scenario.
Node:
A Node is an instance of the Docker Engine connected to the Swarm. Nodes are either managers or workers. Managers schedules which containers to run where. Workers execute the tasks. By default, Managers are also workers.
Services:
A service is a high-level concept relating to a collection of tasks to be executed by workers. An example of a service is an HTTP Server running as a Docker Container on three nodes.
Load Balancing:
Docker includes a load balancer to process requests across all containers in the service.
Step 1 - Initialise Swarm Mode
Turn single host Docker host into a Multi-host Docker Swarm Mode. Becomes Manager By default, Docker works as an isolated single-node. All containers are only deployed onto the engine. Swarm Mode turns it into a multi-host cluster-aware engine.
The first node to initialise the Swarm Mode becomes the manager. As new nodes join the cluster, they can adjust their roles between managers or workers. You should run 3-5 managers in a production environment to ensure high availability.
Create Swarm Mode Cluster
Swarm Mode is built into the Docker CLI. You can find an overview the possibility commands via docker swarm –help
The most important one is how to initialise Swarm Mode. Initialisation is done via init.
docker swarm init
After running the command, the Docker Engine knows how to work with a cluster and becomes the manager. The results of an initialisation is a token used to add additional nodes in a secure fashion. Keep this token safe and secure for future use when scaling your cluster.
In the next step, we will add more nodes and deploy containers across these hosts.
Step 2 - Join Cluster
With Swarm Mode enabled, it is possible to add additional nodes and issues commands across all of them. If nodes happen to disappear, for example, because of a crash, the containers which were running on those hosts will be automatically rescheduled onto other available nodes. The rescheduling ensures you do not lose capacity and provides high-availability.
On each additional node, you wish to add to the cluster, use the Docker CLI to join the existing group. Joining is done by pointing the other host to a current manager of the cluster. In this case, the first host.
Docker now uses an additional port, 2377, for managing the Swarm. The port should be blocked from public access and only accessed by trusted users and nodes. We recommend using VPNs or private networks to secure access.
Task
The first task is to obtain the token required to add a worker to the cluster. For demonstration purposes, we’ll ask the manager what the token is via swarm join-token. In production, this token should be stored securely and only accessible by trusted individuals.
token=$(docker -H 172.17.0.57:2345 swarm join-token -q worker) && echo $token
On the second host, join the cluster by requesting access via the manager. The token is provided as an additional parameter.
docker swarm join 172.17.0.57:2377 --token $token
By default, the manager will automatically accept new nodes being added to the cluster. You can view all nodes in the cluster using docker node ls
Lab01 - Create Overlay Network
Swarm Mode also introduces an improved networking model. In previous versions, Docker required the use of an external key-value store, such as Consul, to ensure consistency across the network. The need for consensus and KV has now been incorporated internally into Docker and no longer depends on external services.
The improved networking approach follows the same syntax as previously. The overlay network is used to enable containers on different hosts to communicate. Under the covers, this is a Virtual Extensible LAN (VXLAN), designed for large scale cloud based deployments.
Task
The following command will create a new overlay network called skynet. All containers registered to this network can communicate with each other, regardless of which node they are deployed onto.
docker network create -d overlay collabnet
Lab02 - Deploy Service
By default, Docker uses a spread replication model for deciding which containers should run on which hosts. The spread approach ensures that containers are deployed across the cluster evenly. This means that if one of the nodes is removed from the cluster, the instances would be already running on the other nodes. There workload on the removed node would be rescheduled across the remaining available nodes.
A new concept of Services is used to run containers across the cluster. This is a higher-level concept than containers. A service allows you to define how applications should be deployed at scale. By updating the service, Docker updates the container required in a managed way.
Task
In this case, we are deploying the Docker Image katacoda/docker-http-server. We are defining a friendly name of a service called http and that it should be attached to the newly created skynet network.
For ensuring replication and availability, we are running two instances, of replicas, of the container across our cluster.
Finally, we load balance these two containers together on port 80. Sending an HTTP request to any of the nodes in the cluster will process the request by one of the containers within the cluster. The node which accepted the request might not be the node where the container responds. Instead, Docker load-balances requests across all available containers.
docker service create --name http --network collabnet --replicas 2 -p 80:80 ajeetraina/hellowhale
You can view the services running on the cluster using the CLI command docker service ls
As containers are started you will see them using the ps command. You should see one instance of the container on each host.
List containers on the first host -
docker ps
List containers on the second host -
docker ps
If we issue an HTTP request to the public port, it will be processed by the two containers
curl your_machine_ip:80
Lab03 - Inspecting State
The Service concept allows you to inspect the health and state of your cluster and the running applications.
Task
You can view the list of all the tasks associated with a service across the cluster. In this case, each task is a container,
docker service ps http
You can view the details and configuration of a service via
docker service inspect --pretty http
On each node, you can ask what tasks it is currently running. Self refers to the manager node Leader:
docker node ps self
Using the ID of a node you can query individual hosts
docker node ps $(docker node ls -q | head -n1)
In the next step, we will scale the service to run more instances of the container.
Lab04 - Scale Service
A Service allows us to scale how many instances of a task is running across the cluster. As it understands how to launch containers and which containers are running, it can easily start, or remove, containers as required. At the moment the scaling is manual. However, the API could be hooked up to an external system such as a metrics dashboard.
Task
At present, we have two load-balanced containers running, which are processing our requests curl docker
The command below will scale our http service to be running across five containers.
docker service scale http=5
docker service scale http=5
http scaled to 5
overall progress: 5 out of 5 tasks
1/5: running [==================================================>]
2/5: running [==================================================>]
3/5: running [==================================================>]
4/5: running [==================================================>]
5/5: running [==================================================>]
verify: Waiting 4 seconds to verify that tasks are stable...
verify: Service converged
[manager1] (local) root@192.168.0.4 ~
$
[manager1] (local) root@192.168.0.4 ~
On each host, you will see additional nodes being started docker ps
The load balancer will automatically be updated. Requests will now be processed across the new containers. Try issuing more commands via
curl your_machine_ip:80
Try scaling the service down to see the result.
docker service scale http=2
Next » Lab05 - Deploy Applications Components as Docker Services
Lab #05 - Deploy the application components as Docker services
Our sleep application is becoming very popular on the internet (due to hitting Reddit and HN). People just love it. So, you are going to have to scale your application to meet peak demand. You will have to do this across multiple hosts for high availability too. We will use the concept of Services to scale our application easily and manage many containers as a single entity.
Services were a new concept in Docker 1.12. They work with swarms and are intended for long-running containers.
Let’s deploy sleep as a Service across our Docker Swarm.
$ docker service create --name sleep-app ubuntu sleep infinity
k70j90k9cp5n2bxsq72tjdmxs
overall progress: 1 out of 1 tasks
1/1: running
verify: Service converged
Verify that the service create has been received by the Swarm manager.
$ docker service ls
ID NAME MODE REPLICAS IMAGE
PORTS
k70j90k9cp5n sleep-app replicated 1/1 ubuntu:latest
The state of the service may change a couple times until it is running. The image is being downloaded from Docker Store to the other engines in the Swarm. Once the image is downloaded the container goes into a running state on one of the three nodes.
At this point it may not seem that we have done anything very differently than just running a docker run. We have again deployed a single container on a single host. The difference here is that the container has been scheduled on a swarm cluster.
Well done. You have deployed the sleep-app to your new Swarm using Docker services.
Scaling the Application
Demand is crazy! Everybody loves your sleep app! It’s time to scale out.
One of the great things about services is that you can scale them up and down to meet demand. In this step you’ll scale the service up and then back down.
You will perform the following procedure from node1.
Scale the number of containers in the sleep-app service to 7 with the docker service update –replicas 7 sleep-app command. Replicas is the term we use to describe identical containers providing the same service.
$ docker service update --replicas 7 sleep-app
sleep-app
overall progress: 7 out of 7 tasks
1/7: running
2/7: running
3/7: running
4/7: running
5/7: running
6/7: running
7/7: running
verify: Service converged
$ docker service ls
ID NAME MODE REPLICAS IMAGE PORTS
k70j90k9cp5n sleep-app replicated 7/7 ubuntu:latest
The Swarm manager schedules so that there are 7 sleep-app containers in the cluster. These will be scheduled evenly across the Swarm members.
We are going to use the docker service ps sleep-app command. If you do this quick enough after using the –replicas option you can see the containers come up in real time.
$ docker service ps sleep-app
ID NAME IMAGE NODE DESIRED STATE CURRENT STATE ERROR PORTS
bv6ofc6x6moq sleep-app.1 ubuntu:latest manager1 Running Running 6 minutes ago
5gj1ql7sjt14 sleep-app.2 ubuntu:latest manager2 Running Running about a minute ago
p01z0tchepwa sleep-app.3 ubuntu:latest worker2 Running Running about a minute ago
x3kwnjcwxnb0 sleep-app.4 ubuntu:latest worker2 Running Running about a minute ago
c98vxyeefmru sleep-app.5 ubuntu:latest manager1 Running Running about a minute ago
kwmey288bkhp sleep-app.6 ubuntu:latest manager3 Running Running about a minute ago
vu78hp6bhauq sleep-app.7 ubuntu:latest worker1 Running Running about a minute ago
Notice that there are now 7 containers listed. It may take a few seconds for the new containers in the service to all show as RUNNING. The NODE column tells us on which node a container is running.
Scale the service back down to just four containers with the docker service update –replicas 4 sleep-app command.
$ docker service update --replicas 4 sleep-app
sleep-app
overall progress: 4 out of 4 tasks
1/4: running
2/4: running
3/4: running
4/4: running
verify: Service converged
[manager1] (local) root@192.168.0.9 ~/dockerlabs/intermediate/swarm
$ docker service ps sleep-app
ID NAME IMAGE NODE DESIRED STATE CURRENT STATE ERROR PORTS
bv6ofc6x6moq sleep-app.1 ubuntu:latest manager1 Running Running 7 minutes ago
5gj1ql7sjt14 sleep-app.2 ubuntu:latest manager2 Running Running 2 minutes ago
p01z0tchepwa sleep-app.3 ubuntu:latest worker2 Running Running 2 minutes ago
kwmey288bkhp sleep-app.6 ubuntu:latest manager3 Running Running 2 minutes ago
You have successfully scaled a swarm service up and down.
Next » Lab06 - Drain a Node and Reschedule the Containers
Lab06 - Drain a node and reschedule the containers
Your sleep-app has been doing amazing after hitting Reddit and HN. It’s now number 1 on the App Store! You have scaled up during the holidays and down during the slow season. Now you are doing maintenance on one of your servers so you will need to gracefully take a server out of the swarm without interrupting service to your customers.
Take a look at the status of your nodes again by running docker node ls on node1.
$ docker node ls
ID HOSTNAME STATUS AVAILABILITY MANAGER STATUS ENGINE VERSION
swfk8vsyfe4z2zbtianz5gh2p * manager1 Ready Active Leader 18.09.3
sgyr3vxu1n99vyce9al67alwt manager2 Ready Active Reachable 18.09.3
ud3ghz1zlrmn3fbv9j930ldja manager3 Ready Active Reachable 18.09.3
v57fk367d1lw4e1ufis3jwa2h worker1 Ready Active 18.09.3
uinkvr56fq7zb711ycbifhf4f worker2 Ready Active 18.09.3
You will be taking worker2 out of service for maintenance.
Let’s see the containers that you have running on worker2.
We are going to take the ID for worker2 and run docker node update –availability drain worker2. We are using the worker2 host ID as input into our drain command. Replace yournodeid with the id of worker2.
$ docker node update --availability drain worker2
worker2
$ docker node ls
ID HOSTNAME STATUS AVAILABILITY MANAGER STATUS ENGINE VERSION
swfk8vsyfe4z2zbtianz5gh2p * manager1 Ready Active Leader 18.09.3
sgyr3vxu1n99vyce9al67alwt manager2 Ready Active Reachable 18.09.3
ud3ghz1zlrmn3fbv9j930ldja manager3 Ready Active Reachable 18.09.3
v57fk367d1lw4e1ufis3jwa2h worker1 Ready Active 18.09.3
uinkvr56fq7zb711ycbifhf4f worker2 Ready Drain
Node worker2 is now in the Drain state.
Switch back to node2 and see what is running there by running docker ps.
$ docker ps
CONTAINER ID IMAGE COMMAND CREATED STATUS PORTS NAMES
worker2 does not have any containers running on it.
Lastly, check the service again on node1 to make sure that the container were rescheduled. You should see all four containers running on the remaining two nodes.
$ docker service ps sleep-app
ID NAME IMAGE NODE DESIRED STATE CURRENT STATE ERROR PORTS
bv6ofc6x6moq sleep-app.1 ubuntu:latest manager1 Running Running 18 minutes ago
5gj1ql7sjt14 sleep-app.2 ubuntu:latest manager2 Running Running 12 minutes ago
5aqy7jv9ojmn sleep-app.3 ubuntu:latest worker1 Running Running 3 minutes ago
p01z0tchepwa \_ sleep-app.3 ubuntu:latest worker2 Shutdown Shutdown 3 minutes ago
kwmey288bkhp sleep-app.6 ubuntu:latest manager3 Running Running 12 minutes ago
[manager1] (local) root@192.168.0.9 ~/dockerlabs/intermediate/swarm
$ docker node inspect --pretty worker2
ID: uinkvr56fq7zb711ycbifhf4f
Hostname: worker2
Joined at: 2019-03-08 15:12:03.102015148 +0000 utc
Status:
State: Ready
Availability: Drain
Address: 192.168.0.10
Platform:
Operating System: linux
Architecture: x86_64
Resources:
CPUs: 8
Memory: 31.4GiB
Plugins:
Log: awslogs, fluentd, gcplogs, gelf, journald, json-file, local, logentries, splunk
, syslog
Network: bridge, host, ipvlan, macvlan, null, overlay
Volume: local
Engine Version: 18.09.3
TLS Info:
TrustRoot:
-----BEGIN CERTIFICATE-----
MIIBajCCARCgAwIBAgIUcfR/4dysEv9qsbuPTFuIn00WbmowCgYIKoZIzj0EAwIw
EzERMA8GA1UEAxMIc3dhcm0tY2EwHhcNMTkwMzA4MTUwNzAwWhcNMzkwMzAzMTUw
NzAwWjATMREwDwYDVQQDEwhzd2FybS1jYTBZMBMGByqGSM49AgEGCCqGSM49AwEH
A0IABPo7tm+Vxk+CIw9AJEGTlyW/JPotQuVqrbvi34fuK6Ak4cWYU6T1WSiJMHI0
nEGS/1zFIWQzJY0WQbT8eMaqX4ijQjBAMA4GA1UdDwEB/wQEAwIBBjAPBgNVHRMB
Af8EBTADAQH/MB0GA1UdDgQWBBQ6OEYmo8HUfpFnSxJDHWkjf/wWmTAKBggqhkjO
PQQDAgNIADBFAiBy39e7JLpHBH0bONWU8rQZPmY2dtkfHjPOUQNLFBdlkAIhAIpD
Lb6ZrhbEJDcIhlnozKRcPSJi7RWy4/16THIUJdpM
-----END CERTIFICATE-----
Issuer Subject: MBMxETAPBgNVBAMTCHN3YXJtLWNh
Issuer Public Key: MFkwEwYHKoZIzj0CAQYIKoZIzj0DAQcDQgAE+ju2b5XGT4IjD0AkQZOXJb8k+i1C5Wqtu+Lfh+4roCThxZhTpPVZKIkwcjScQZL/XMUhZDMljRZBtPx4xqpfiA==
Run docker node update –availability active
$ docker node update --availability active worker2
worker2
[manager1] (local) root@192.168.0.9 ~/dockerlabs/intermediate/swarm
$ docker node inspect --pretty worker2
ID: uinkvr56fq7zb711ycbifhf4f
Hostname: worker2
Joined at: 2019-03-08 15:12:03.102015148 +0000 utc
Status:
State: Ready
Availability: Active
Address: 192.168.0.10
Platform:
Operating System: linux
Architecture: x86_64
Resources:
CPUs: 8
Memory: 31.4GiB
Plugins:
Log: awslogs, fluentd, gcplogs, gelf, journald, json-file, local, logentries, splunk, syslog
Network: bridge, host, ipvlan, macvlan, null, overlay
Volume: local
Engine Version: 18.09.3
TLS Info:
TrustRoot:
-----BEGIN CERTIFICATE-----
MIIBajCCARCgAwIBAgIUcfR/4dysEv9qsbuPTFuIn00WbmowCgYIKoZIzj0EAwIw
EzERMA8GA1UEAxMIc3dhcm0tY2EwHhcNMTkwMzA4MTUwNzAwWhcNMzkwMzAzMTUw
NzAwWjATMREwDwYDVQQDEwhzd2FybS1jYTBZMBMGByqGSM49AgEGCCqGSM49AwEH
A0IABPo7tm+Vxk+CIw9AJEGTlyW/JPotQuVqrbvi34fuK6Ak4cWYU6T1WSiJMHI0
nEGS/1zFIWQzJY0WQbT8eMaqX4ijQjBAMA4GA1UdDwEB/wQEAwIBBjAPBgNVHRMB
Af8EBTADAQH/MB0GA1UdDgQWBBQ6OEYmo8HUfpFnSxJDHWkjf/wWmTAKBggqhkjO
PQQDAgNIADBFAiBy39e7JLpHBH0bONWU8rQZPmY2dtkfHjPOUQNLFBdlkAIhAIpD
Lb6ZrhbEJDcIhlnozKRcPSJi7RWy4/16THIUJdpM
-----END CERTIFICATE-----
Issuer Subject: MBMxETAPBgNVBAMTCHN3YXJtLWNh
Issuer Public Key: MFkwEwYHKoZIzj0CAQYIKoZIzj0DAQcDQgAE+ju2b5XGT4IjD0AkQZOXJb8k+i1C5Wqtu+Lfh+4roCThxZhTpPVZKIkwcjScQZL/XMUhZDMljRZBtPx4xqpfiA==
Lab07 - Cleaning Up
Execute the docker service rm sleep-app command on manager1 to remove the service called sleep-app.
$ docker service rm sleep-app
sleep-app
[manager1] (local) root@192.168.0.9 ~/dockerlabs/intermediate/swarm
$ docker service ls
ID NAME MODE REPLICAS IMAGE PORTS
Execute the docker ps command on node1 to get a list of running containers.
docker ps
CONTAINER ID IMAGE COMMAND CREATED STATUS PORTS NAMES
044bea1c2277 ubuntu "sleep infinity" 17 minutes ago 17 minutes ag distracted_mayer
You can use the docker kill
docker kill yourcontainerid
Finally, let’s remove node1, node2, and node3 from the Swarm. We can use the docker swarm leave –force command to do that.
Lets run docker swarm leave –force on all the nodes to leave swarm cluster.
docker swarm leave --force
Congratulations! You’ve completed this lab. You now know how to build a swarm, deploy applications as collections of services, and scale individual services up and down.
Running Cron Jobs container on Docker Swarm Cluster
A Docker Swarm consists of multiple Docker hosts which run in swarm mode and act as managers (to manage membership and delegation) and workers (which run swarm services). When you create a service, you define its optimal state (number of replicas, network and storage resources available to it, ports the service exposes to the outside world, and more). Docker works to maintain that desired state. For instance, if a worker node becomes unavailable, Docker schedules that node’s tasks on other nodes. A task is a running container which is part of a swarm service and managed by a swarm manager, as opposed to a standalone container.
Let us talk a bit more about Services…
A Swarm service is a 1st class citizen and is the definition of the tasks to execute on the manager or worker nodes. It is the central structure of the swarm system and the primary root of user interaction with the swarm. When one create a service, you specify which container image to use and which commands to execute inside running containers.Swarm mode allows users to specify a group of homogenous containers which are meant to be kept running with the docker service CLI. Its ever running process.This abstraction which is undoubtedly powerful, may not be the right fit for containers which are intended to eventually terminate or only run periodically. Hence, one might need to run some containers for specific period of time and terminate it acccordingly.
Let us consider few example:
- You are a System Administrator who wishes to allow users to submit long-running compiler jobs on a Swarm cluster
- A website which needs to process all user uploaded images into thumbnails of various sizes
- An operator who wishes to periodically run docker rmi $(docker images –filter dangling=true -q) on each machine
Today Docker Swarm doesn’t come with this feature by default. But there are various workaround to make it work. Under this tutorial, we will show you how to run on-off cron-job on 5-Node Swarm Mode Cluster.
Tested Infrastructure
| Platform | Number of Instance | Reading Time |
|---|---|---|
| Play with Docker | 5 | 5 min |
Pre-requisite
- Create an account with DockerHub
- Open PWD Platform on your browser
- Click on Spanner on the left side of the screen to bring up 5-Node Swarm Mode Cluster
Verifying 5-Node Swarm Mode Cluster
$ docker node ls
ID HOSTNAME STATUS AVAILABILITY MANAGER STATUS
ENGINE VERSION
y2ewcgx27qs4qmny9840zj92p * manager1 Ready Active Leader
18.06.1-ce
qog23yabu33mpucu9st4ibvp5 manager2 Ready Active Reachable
18.06.1-ce
tq0ed0p2gk5n46ak4i1yek9yc manager3 Ready Active Reachable
18.06.1-ce
tmbcma9d3zm8jcx965ucqu2mf worker1 Ready Active
18.06.1-ce
dhht9gr8lhbeilrbz195ffhrn worker2 Ready Active
18.06.1-ce
Cloning the Repository
git clone https://github.com/crazy-max/swarm-cronjob
cd swarm-cronjob/.res/example
Bring up Swarm Cronjob
docker stack deploy -c swarm_cronjob.yml swarm_cronjob
Listing Docker Services
$ docker service ls
ID NAME MODE REPLICAS IMAGE
PORTS
qsmd3x69jds1 myswarm_app replicated 1/1 crazymax/swarm-cronjob:latest
Visualizing the Swarm Cluster running Cronjob container
git clone https://github.com/collabnix/dockerlabs
cd dockerlabs/intermediate/swarm/visualizer/
docker-compose up -d

Example #1: Running Date container every 5 seconds

Edit date.yml file to change cronjob from * to */5 to run every 5 seconds as shown:
$ cd .res/example/
$ cat date.yml
version: "3.2"
services: test: image: busybox command: date deploy:
labels:
- "swarm.cronjob.enable=true"
- "swarm.cronjob.schedule=*/5 * * * *"
- "swarm.cronjob.skip-running=false"
replicas: 0
restart_policy:
condition: none
[manager1] (local) roo
Bringing up App Stack
docker stack deploy -c date.yml date

Locking docker swarm
Docker introduced native swarm support in Docker v1.12
Docker swarm uses raft consensus algorithm to maintain consensus between the nodes of a swarm cluster. Docker engine maintains raft logs which in turn holds the data of cluster configuration, status of nodes and other sensitive data.
Docker v1.13 introduced the concept of secrets, With secrets a developer could encrypt the sensitive data and give access of decrypted data to particular swarm services using swarm stack configuration.
In v1.13, Docker also encrypts the raft logs at rest and stores the encryption key in /var/lib/docker/swarm/certificates directory in each swarm manager of the cluster. If a malicious user has access to any of the manager nodes, He can easily get the encrption key, decrypt the logs and get hands on sensitive data available in the raft logs (Secrets are also stored in the raft logs).
To bypass this possibilty of disaster and protect the encryption key, Docker introduced swarm autolock feature which allows us to take the ownership of the keys.
Note:
If you enable autolock feature, Whenever your manager node restarts you have to manually supply the key in order for the manager node to decrypt the logs.
Enabling autolock feature
There are various ways enable autolock feature.
While initializing the swarm
docker swarm init --autolock

Store the swarm unlock key in a safe place.
If swarm is already initialized
docker swarm update --autolock=true

Disabling autolock feature
If you want to disable autolock feature and the swarm is already initilized, Use the command mentioned below.
docker swarm update --autolock=false

Retrieving unlock key
If you lost the unlock key and you still have quorum of managers in the cluster, You can retrieve the unlock key by using the following command on the manager.
docker swarm unlock-key

Note: Unlock key can only be retrieved on a unlocked manager.
Unlocking a swarm
If a swarm is locked (When a manager node restarts) one has to manaually unlock the swarm using the unlock key.
docker swarm unlock

Certain scenarios
-
If a manager node is restarted it will be locked by default and has to be unlocked using the swarm unlock key.
-
If a manager node is restarted and you don’t have the unlock key but quorom of managers is maintined in the cluster. Then unlock key can be retrieved using the command mentioned above on any of the unlocked managers.
-
If a manager node is restarted and you don’t have the unlock key and quorum is also lost. Then there is no option bu for the manager is leave the swarm and join bas a new manager.
Contributor
3.2.5 - Multistage build
Building Dockerfiles in Multistage Build
Before Multistage Build
Keeping the image size small is one of the most difficult aspects of creating images.Every Dockerfile command adds a layer to the image, therefore before adding the next layer, remember to remove any artifacts you don’t need.Traditionally, writing an extremely effective Dockerfile required using shell tricks and other logic to keep the layers as compact as possible and to make sure that each layer only included the items it required from the previous layer and nothing else.
In reality, it was rather typical to use one Dockerfile for development (which included everything required to build your application) and a slimmed-down one for production (which only included your application and precisely what was required to run it).The “builder pattern” has been applied to this.It is not ideal to keep two Dockerfiles up to date.
The example that follows uses a simple React application that is first developed and then has its static content served by a Nginx virtual server.The two Dockerfiles that were utilized to produce the optimized image are listed below.You’ll also see a shell script that illustrates the Docker CLI instructions that must be executed to achieve this result.
Here’s an example of a Dockerfile.build, Dockerfile.main and Dockerfile which adhere to the builder pattern above:
Dockerfile.build
FROM node:alpine3.15
WORKDIR /app
COPY package*.json ./
RUN npm install
COPY . .
RUN npm run build
Dockerfile.main
FROM nginx
EXPOSE 3000
COPY ./nginx/default.conf /etc/nginx/conf.d/default.conf
COPY /app/build /usr/share/nginx/html
Build.sh
#!/bin/sh
echo Building myimage/react:build
docker build -t myimage:build . -f Dockerfile.build
docker create --name extract myimage:build
docker cp extract:/app/build ./app
docker rm -f extract
echo Building myimage/react:latest
docker build --no-cache -t myimage/react:latest . -f Dockerfile.main
How to Use Multistage Builds in Docker
In Docker Engine 17.05, multi-stage build syntax was included. You use numerous FROM statements in your Dockerfile while performing multi-stage builds.Each FROM command can start a new stage of the build and may use a different base.Artifacts can be copied selectively from one stage to another, allowing you to remove anything unwanted from the final image.Let’s modify the Dockerfile from the preceding section to use multi-stage builds to demonstrate how this works.
Dockerfile
FROM node:alpine3.15 as build
WORKDIR /app
COPY package*.json ./
RUN npm install
COPY . .
RUN npm run build
FROM nginx
EXPOSE 3000
COPY ./nginx/default.conf /etc/nginx/conf.d/default.conf
COPY --from=build /app/build /usr/share/nginx/html
Here only one Dockerfile is required.Additionally, you don’t require a separate build script.Simply run docker build .
There are two FROM commands in this Dockerfile, and each one represents a different build step.In this phase, the application is created and stored in the directory that the WORKDIR command specifies.The Nginx image is first pulled from Docker Hub to begin the second stage.The revised virtual server configuration is then copied to replace the stock Nginx configuration.then, the image created by the prior stage is utilised to copy only the production-related application code using the COPY -from command.
The stages are not named by default; instead, you refer to them by their integer number, which starts at 0 for the first FROM command.However, you can give your stages names by following the FROM instruction with an AS <NAME>.Here we used build as a name.By naming the stages and using the names in the COPY command, this example enhances the prior one.This means that the COPY remains intact even if the instructions in your Dockerfile are later rearranged.
Repurpose an earlier stage as a new stage.
The FROM command allows you to continue where a previous stage ended by referring to it.For instance:
FROM alpine:latest AS builder
...
...
FROM builder AS build1
...
...
FROM builder AS build2
...
...
Use an external image as a “stage”
When using multi-stage builds, you are not limited to copying from stages you created earlier in your Dockerfile. You can use the COPY --from instruction to copy from a separate image, either using the local image name, a tag available locally or on a Docker registry, or a tag ID. The Docker client pulls the image if necessary and copies the artifact from there. The syntax is:
COPY --from=sampleapp:latest home/user/app/config.json app/config.json
Demonstrating Multi-Stage Builds
For demonstration, Let us consider a nodejs project and build a binary out of it. When you execute this binary, it will call a NASA api which returns some interesting facts about today’s date.
Before: docker images

Currently we have two images which I pulled from dockerhub:
alpine (~4Mb)- Lightest version of linux osalpine-node (~70Mb)- alpine + Node/Npm and other dependency.
File structure

-
Dockerfile:- On stage 0 (alias:
builder), we have aalpine-nodeOS which hasnodeandnpmbuilt in it. Its size is~70Mb. This stage will create binary (named asnasa: Line 6) in the currentWORKDIRi.eapp/. - On stage 1, we have
alpineOS. After that, we install some necessary dependencies. InLine 14, we copiednasabinary from previous stage (builder) to current stage. So, we just copied binary and leaving all heavyalpine-nodeOS and other dependencies likenpm(node package manager) etc as binary already have required dependecies (like nodejs) built in it.
- On stage 0 (alias:
-
app/: It’s just a simple node application. It does ahttpscall and fetches data using nasa api. It hasindex.jsandpackage.json. I have usedpkgto build the node binary.
After: docker images

multistage:1.0.0 (56b102754f6d) is the final required image which we built. Its size is ~45Mb. Almost 1/4th of the intermediate image(13bac50ebc1a) built on stage 0. And almost half of alpine-node image.
So, this was a simple example to showcase multi-stage builds feature. For images having multi step (like 10-15 FROM statement), you will find this feature very useful.
3.2.6 - What happens when Containers are Launched?
What happens when Containers are Launched?
Here is basically what happens when a container is launched:
-
A container is created from a container image. Images are tarballs with a JSON configuration file attached. Images are often nested: for example this Libresonic image is built on top of a Tomcat image that depends (eventually) on a base Debian image. This allows for content deduplication because that Debian image (or any intermediate step) may be the basis for other containers. A container image is typically created with a command like docker build.
-
If necessary, the runtime downloads the image from somewhere, usually some “container registry” that exposes the metadata and the files for download over a simple HTTP-based protocol. It used to be only Docker Hub, but now everyone has their own registry: for example, Red Hat has one for its OpenShift project, Microsoft has one for Azure, and GitLab has one for its continuous integration platform. A registry is the server that docker pull or push talks with, for example.
-
The runtime extracts that layered image onto a copy-on-write (CoW) filesystem. This is usually done using an overlay filesystem, where all the container layers overlay each other to create a merged filesystem. This step is not generally directly accessible from the command line but happens behind the scenes when the runtime creates a container.
-
Finally, the runtime actually executes the container, which means telling the kernel to assign resource limits, create isolation layers (for processes, networking, and filesystems), and so on, using a cocktail of mechanisms like control groups (cgroups), namespaces, capabilities, seccomp, AppArmor, SELinux, and whatnot. For Docker, docker run is what creates and runs the container, but underneath it actually calls the runc command.
Those concepts were first elaborated in Docker’s Standard Container manifesto which was eventually removed from Docker, but other standardization efforts followed. The Open Container Initiative (OCI) now specifies most of the above under a few specifications:
- the Image Specification (often referred to as “OCI 1.0 images”) which defines the content of container images
- the Runtime Specification (often referred to as CRI 1.0 or Container Runtime Interface) describes the “configuration, execution environment, and lifecycle of a container”
- the Container Network Interface (CNI) specifies how to configure network interfaces inside containers, though it was standardized under the Cloud Native Computing Foundation (CNCF) umbrella, not the OCI
Implementation of those standards varies among the different projects. For example, Docker is generally compatible with the standards except for the image format. Docker has its own image format that predates standardization and it has promised to convert to the new specification soon. Implementation of the runtime interface also differs as not everything Docker does is standardized, as we shall see.
The Docker and rkt story
Since Docker was the first to popularize containers, it seems fair to start there. Originally, Docker used LXC but its isolation layers were incomplete, so Docker wrote libcontainer, which eventually became runc. Container popularity exploded and Docker became the de facto standard to deploy containers. When it came out in 2014, Kubernetes naturally used Docker, as Docker was the only runtime available at the time. But Docker is an ambitious company and kept on developing new features on its own. Docker Compose, for example, reached 1.0 at the same time as Kubernetes and there is some overlap between the two projects. While there are ways to make the two tools interoperate using tools such as Kompose, Docker is often seen as a big project doing too many things. This situation led CoreOS to release a simpler, standalone runtime in the form of rkt, that was explained this way:
Docker now is building tools for launching cloud servers, systems for clustering, and a wide range of functions: building images, running images, uploading, downloading, and eventually even overlay networking, all compiled into one monolithic binary running primarily as root on your server. The standard container manifesto was removed. We should stop talking about Docker containers, and start talking about the Docker Platform. It is not becoming the simple composable building block we had envisioned.
One of the innovations of rkt was to standardize image formats through the appc specification, something we covered back in 2015. CoreOS doesn’t yet have a fully standard implementation of the runtime interfaces: at the time of writing, rkt’s Kubernetes compatibility layer (rktlet), doesn’t pass all of Kubernetes integration tests and is still under development. Indeed, according to Brandon Philips, CTO of CoreOS, in an email exchange:
rkt has initial support for OCI image-spec, but it is incomplete in places. OCI support is less important at the moment as the support for OCI is still emerging in container registries and is notably absent from Kubernetes. OCI runtime-spec is not used, consumed, nor handled by rkt. This is because rkt execution is based on pod semantics, while runtime-spec only covers single container execution.
However, according to Dan Walsh, head of the container team at Red Hat, in an email interview, CoreOS’s efforts were vital to the standardization of the container space within the Kubernetes ecosystem: “Without CoreOS we probably would not have CNI, and CRI and would be still fighting about OCI. The CoreOS effort is under-appreciated in the market.” Indeed, according to Philips, the “CNI project and specifications originated from rkt, and were later spun off and moved to CNCF. CNI is still widely used by rkt today, both internally and for user-provided configuration.” At this point, however, CoreOS seems to be gearing up toward building its Kubernetes platform (Tectonic) and image distribution service (Quay) rather than competing in the runtime layer.
CRI-O: the minimal runtime
Seeing those new standards, some Red Hat folks figured they could make a simpler runtime that would only do what Kubernetes needed. That “skunkworks” project was eventually called CRI-O and implements a minimal CRI interface. During a talk at KubeCon Austin 2017, Walsh explained that “CRI-O is designed to be simpler than other solutions, following the Unix philosophy of doing one thing and doing it well, with reusable components.”
Started in late 2016 by Red Hat for its OpenShift platform, the project also benefits from support by Intel and SUSE, according to Mrunal Patel, lead CRI-O developer at Red Hat who hosted the talk. CRI-O is compatible with the CRI (runtime) specification and the OCI and Docker image formats. It can also verify image GPG signatures. It uses the CNI package for networking and supports CNI plugins, which OpenShift uses for its software-defined networking layer. It supports multiple CoW filesystems, like the commonly used overlay and aufs, but also the less common Btrfs.
One of CRI-O’s most notable features, however is that it supports mixed workloads between “trusted” and “untrusted” containers. For example, CRI-O can use Clear Containers for stronger isolation promises, which is useful in multi-tenant configurations or to run untrusted code. It is currently unclear how that functionality will trickle up into Kubernetes, which currently considers all backends to be the same.
CRI-O has an interesting architecture (see the diagram below from the talk slides [PDF]). It reuses basic components like runc to start containers, and software libraries like containers/image and containers/storage, created for the skopeo project, to pull container images and create container filesystems. A separate library called oci-runtime-tool prepares the container configuration. CRI-O introduces a new daemon to handle containers called conmon. According to Patel, the program was “written in C for stability and performance” and takes care of monitoring, logging, TTY allocation, and miscellaneous hazards like out-of-memory conditions.
CRI-O architecture
The conmon daemon is needed here to do all of the things that systemd doesn’t (want to) do. But even though CRI-O doesn’t use systemd directly to manage containers, it assigns containers to systemd-compatible cgroups, so that regular systemd tools like systemctl have visibility into the container resources. Since conmon (and not the CRI daemon) is the parent process of the container, it also allows parts of CRI-O to be restarted without stopping containers, which promises smoother upgrades. This is a problem for Docker deployments right now, where a Docker upgrade requires restarting all of the containers. This is usually not much trouble for Kubernetes clusters, however, because it is easy to roll out upgrades progressively by moving containers around.
CRI-O is the first implementation of the OCI standards suite that passes all Kubernetes integration tests (apart from Docker itself). Patel demonstrated those capabilities by showing a Kubernetes cluster backed by CRI-O, in what seemed to be a routine demonstration of cluster functionalities. Dan Walsh explained CRI-O’s approach in a blog post that explains how CRI-O interacts with Kubernetes:
Our number 1 goal for CRI-O, unlike other container runtimes, is to never break Kubernetes. Providing a stable and rock-solid container runtime for Kubernetes is CRI-O’s only mission in life.
According to Patel, performance is comparable to a normal Docker-based deployment, but the team is working on optimizing performance to go beyond that. Debian and RPM packages are available and deployment tools like minikube, or kubeadm also support switching to the CRI-O runtime. On existing clusters, switching runtimes is straightforward: just a single environment variable changes the runtime socket, which is what Kubernetes uses to communicate with the runtime.
CRI-O 1.0 was released in October 2017 with support for Kubernetes 1.7. Since then, CRI-O 1.8 and 1.9 were released to follow the Kubernetes 1.8 and 1.9 releases (and sync version numbers). Patel considers CRI-O to be production-ready and it is already available in beta in OpenShift 3.7, released in November 2017. Red Hat will mark it as stable in the upcoming OpenShift 3.9 release and is looking at using it by default with OpenShift 3.10, while keeping Docker as a fallback. Next steps include integrating the new Kata Containers virtual-machine-based runtime, kube-spawn support, and more storage backends like NFS or GlusterFS. The team also discussed how it could support casync or libtorrent to optimize synchronization of images between nodes.
containerd: Docker’s runtime gets an API While Red Hat was working on its implementation of OCI, Docker was also working on the standard, which led to the creation of another runtime, called containerd. The new daemon is a refactoring of internal Docker components to combine the OCI-specific bits like execution, storage, and network interface management. It was already featured in the 1.12 Docker release, but wasn’t completed until the containerd 1.0 release announced at KubeCon, which will be part of the upcoming Docker 17.12 (Docker has moved to version numbers based on year and month). And while we call containerd a “runtime”, it doesn’t directly implement the CRI interface, which is covered by another daemon called cri-containerd. So containerd needs more daemons than CRI-O for Kubernetes (five, versus three for CRI-O). Also, at the time of writing, the cri-containerd component is marked as beta but containerd itself is already used in numerous production environments through Docker, of course.
During the Node special interest group (SIG) meeting at KubeCon, Stephen Day described [Speaker Deck] containerd as “designed as a tight core of decoupled components”. Unlike CRI-O, however, containerd supports workloads outside the Kubernetes ecosystem through a Go API. The API is not considered stable yet, although containerd defines a clear release process for making changes to the API and command-line tools. Like CRI-O, containerd is feature complete and passes all Kubernetes tests, but it does not interoperate with systemd’s cgroups.
Next step for the project is to develop more tests and improve performance like memory usage and latency. Containerd developers are also working hard on improving stability. They want to provide Debian and RPM packages for easier installation, and integrate it with minikube and kops as well. There are also plans to integrate Kata Containers more smoothly: runc can already be replaced by Kata for basic integration but cri-containerd integration is not implemented yet.
Interoperability and defaults All of those options are causing a certain amount of confusion in the community. At KubeCon, which runtime to use was a recurring question to speakers. Kubernetes will likely change from Docker to a different runtime, because it doesn’t need all the features Docker provides, and there are concerns that the switch could cause compatibility issues because the new runtimes do not implement exactly the same interface as Docker. Log files, for example, are different in the CRI standard. Some programs also monitor the Docker socket directly, which has some non-standard behaviors that the new runtimes may implement differently, or not at all. All of this could cause some breakage when switching to a different runtime.
The question of which runtime Kubernetes will switch to (if it changes) is also open, which leads to some competition between the runtimes. There was a slight controversy related to that question at KubeCon because CRI-O wasn’t mentioned during the CNCF keynote, something Vincent Batts, a senior engineer at Red Hat, mentioned on Twitter:
It is bonkers that CRI implementations containerd and rktlet are covered in KubeCon keynote, but zero mention of CRI-O, which is a Kubernetes project that’s been 1.0 and actually used in production.
When I prompted him for details about this at KubeCon, Batts explained that:
Healthy competition is good, the problem is unhealthy competition. The CNCF should be better stewards of the projects under their umbrella and shouldn’t fold under pressure to promote certain projects over others.
Batts explained further that Red Hat “may be at a tipping point where some apps could start being deployed as containers instead of RPMs” citing “security concerns (namely with [security] advisory tracking, which is lacking in containers as a packaging format) as the main blocker for such transitions”. With Project Atomic, Red Hat seems to be pivoting toward containers, so the stakes are high for the Linux distribution.
When I talked to CNCF’s COO Chris Aniszczyk at KubeCon, he explained that the CNCF “current policy is to prioritize the marketing of top-level projects”:
Projects like CRIO and Helm are part of Kubernetes in some fashion and therefore part of CNCF, we just don’t market them as heavily as our top level projects which have passed the CNCF TOC [Technical Oversight Committee] approval bar.
Aniszczyk added that “we want to help, we’ve heard the feedback and plan to address things in 2018”, suggesting that one solution could be that CRI-O applies to graduate to a top-level project in CNCF.
During a container runtimes press meeting, Philips explained that the community would decide, through consensus, which runtime Kubernetes would run by default. He compared runtimes to web browsers and suggested that OCI specifications for containers be compared to the HTML5 and Javascript standards: those are evolving standards that get pushed by the different implementations. He argued that this competition is healthy and means more innovation.
A lot of the people involved in writing those new runtimes were originally Docker contributors: Patel was the initial maintainer of the original OCI implementation that led to runc, while Philips was also a core Docker contributor before starting the rkt project. Those people actively collaborate, along with Docker developers, on standardizing those interfaces and all want to see Kubernetes stabilize and improve. The goal, according to Patrick Chazenon from Docker Inc., is to “make container runtimes boring and stable to have people innovate on top of it”. The developers present at the press meeting were happy and proud of what they have accomplished: they have managed to create a single, interoperable specification for containers, and that specification is expanding.
Consolidation and standardization will continue in 2018 The current big topic in container standardization is not runtimes as much as image distribution (i.e. container registries), which is likely to standardize, again, in a specification built around Docker’s distribution system. There is also work needed to follow the Linux kernel changes, for example cgroups v2.
The reality is that each runtime has its own advantages: containerd has an API so it can be used to build customized platforms, while CRI-O is a simpler runtime specifically targeting Kubernetes. Docker and rkt are on another level, providing more than simply the runtime: they also provide ways of building containers or pushing to registries, for example.
Right now, most public cloud infrastructure still uses Docker as a runtime. In fact, even CoreOS uses Docker instead of rkt in its Tectonic platform. According to Philips, this is because “there is a substantial integration ecosystem around Docker Engine that our customers rely on and it is the most well-tested option across all existing Kubernetes products.” Philips says that CoreOS may consider supporting alternate runtimes for Tectonic, “if alternative container runtimes provide significant improvements to Kubernetes users”:
At this point containerd and CRI-O are both very young projects due to the significant amount of new code each project developed this year. Further, they need to reach the maturity of third-party integrations across the ecosystem from logging, monitoring, security, and much more.
Philips further explained CoreOS’s position in this blog post:
So far the primary benefits of the CRI for the Kubernetes community have been better code organization and improved code coverage in the Kubelet itself, resulting in a code base that’s both higher quality and more thoroughly tested than ever before. For nearly all deployments, however, we expect the Kubernetes community will continue to use Docker Engine in the near term.
During the discussion in the press meeting, Patel likewise said that “we don’t want Kubernetes users to know what the runtime is”. Indeed, as long as it works, users shouldn’t care. Besides, OpenShift, Tectonic, and other platforms abstract runtime decisions away and pick their own best default matching their users' requirements. The question of which runtime Kubernetes chooses by default is therefore not really a concern for those developers, who prefer working on building consensus on standard specifications. In a world of conflict, seeing those developers working together cordially was definitely a breath of fresh air.
Reference: https://lwn.net/Articles/741897/
3.3 - Using Jenkins
Continuous Integration (CI) is a development practice that requires developers to integrate code into a shared repository several times a day. Each check-in is then verified by an automated build, allowing teams to detect problems early. CI doesn’t get rid of bugs, but it does make them dramatically easier to find and remove.
CI/CD merges development with testing, allowing developers to build code collaboratively, submit it the master branch, and checked for issues. This allows developers to not only build their code, but also test their code in any environment type and as often as possible to catch bugs early in the applications development lifecycle. Since Docker can integrate with tools like Jenkins and GitHub, developers can submit code in GitHub, test the code and automatically trigger a build using Jenkins, and once the image is complete, images can be added to Docker registries. This streamlines the process, saves time on build and set up processes, all while allowing developers to run tests in parallel and automate them so that they can continue to work on other projects while tests are being run.
A Typical CI workflow look like:

- Developer pushes a commit to GitHub
- GitHub uses a webhook to notify Jenkins of the update
- Jenkins pulls the GitHub repository, including the Dockerfile describing the image, as well as the application and test code.
- Jenkins builds a Docker image on the Jenkins slave node
- Jenkins instantiates the Docker container on the slave node, and executes the appropriate tests
- If the tests are successful the image is then pushed up to Dockerhub or Docker Trusted Registry.
Under these series of blog post, I will help you get started with Continuous Integration with Jenkins, Docker & GitHub under $0. I will be using Play with Docker platform which comes for free for the general public.
Let’s get started..
Go to your browser and type – https://labs.play-with-docker.com/

Open up a “New Instance” on the left hand side of the screen.

Cloning the Repository
Let us start with a simple HTML webpage application. I have a sample GITHUB repository already created for you which contains Dockerfile and Jenkinsfile under the root of the repository as shown below:

$ git clone https://github.com/ajeetraina/webpage
What is Jenkinsfile & Jenkins Pipeline?
A Jenkinsfile is a text file that contains the definition of a Jenkins Pipeline and is checked into source control.
Jenkins Pipeline (or simply “Pipeline”) is a suite of plugins which supports implementing and integrating continuous delivery pipelines into Jenkins. It provides an extensible set of tools for modeling simple-to-complex delivery pipelines “as code”. The definition of a Jenkins Pipeline is typically written into a text file (called a Jenkinsfile) which in turn is checked into a project’s source control repository. I have created a sample Jenkinsfile which clones the repository, builds the Docker Image, test it and then push it to Dockerhub automatically using Jenkins.
node {
def app
stage('Clone repository') {
/* Let's make sure we have the repository cloned to our workspace */
checkout scm
}
stage('Build image') {
/* This builds the actual image; synonymous to
* docker build on the command line */
app = docker.build("ajeetraina/webpage")
}
stage('Test image') {
/* Ideally, we would run a test framework against our image.
* Just an example */
app.inside {
sh 'echo "Tests passed"'
}
}
stage('Push image') {
/* Finally, we'll push the image with two tags:
* First, the incremental build number from Jenkins
* Second, the 'latest' tag.
* Pushing multiple tags is cheap, as all the layers are reused. */
docker.withRegistry('https://registry.hub.docker.com', 'dockerhub') {
app.push("${env.BUILD_NUMBER}")
app.push("latest")
}
}
}
In the above Jenkinsfile, there are various stages like cloning the SCM, build, test and pushing the Docker image. You will need to change it to your respective GITHUB repo if you want to try to build your own Docker image.
Let us quickly setup Jenkins on PWD platform and believe me it’s just a matter of a single docker-compose CLI. Before we proceed, ensure that the below permission is granted so as to get Docker plugin to work flawlessly –
$chmod 666 /var/run/docker.sock
It’s time to clone the repository:
$ git clone https://github.com/ajeetraina/jenkins
Cloning into ‘jenkins’…
remote: Counting objects: 18, done.
remote: Compressing objects: 100% (16/16), done.
remote: Total 18 (delta 2), reused 0 (delta 0), pack-reused 0
Unpacking objects: 100% (18/18), done.
[node1] (local) root@192.168.0.53 ~/webpage
$ cd jenkins
[node1] (local) root@192.168.0.53 ~/webpage/jenkins
$docker-compose up

Copy the password of the jenkins starting with “5ee571..” as shown in the above screenshot.
Click on 8080 port which appear on the top of the screen and this will redirect you to Jenkins page.

Once you add the Administrator password which we copied earlier, then it will ask to install plugins. Choose “Install Suggested Plugins” on the left hand side as shown below:


Go back to Jenkins dashboard and click “New Item”. Supply any name(i.e demo-webpage) and select “Pipeline” as type of the project.

This will show up a page with Build Triggers as one of the option. Select “Pipeline script from SCM” and choose GIT under SCM. This will allow you to enter your GITHUB URL which in my case is https://github.com/ajeetraina/webpage. This will automatically add Jenkinsfile under Script Path. Click on “Apply” and then Save.

Click on “Build Now” option on the left side of the Jenkins screen. This traverse through the build pipeline i.e cloning the repository, building Docker Image , testing it and pushing it to your Dockerhub account as shown below:

Once you click on “Build Now” you will see that it initiates the build pipeline.

Jenkins Pipeline Stages View:

Click on “Console Output” to show detailed build process as shown below:

A Quick View of Stage View:

Till now, we have a new Docker Image pushed to Dockerhub automatically. Let’s go ahead and verify it by bringing up webpage container in the separate instance window as shown below:

Here you see…a static HTML page appears running on port 80. This was built as part of Jenkins pipeline.

In order to trigger this pipeline every 15 minutes, you can go back to Jenkins page for specific job and then choose “Build Periodically” under Configure page as shown below:

3.4 - Using Jenkins 2

Containerising your application is like shoving your app and all its dependencies into a box. Except the box is infinitely replicable. Whatever happens in the box, stays in the box - unless you explicitly take something out or put something in. And when it breaks, you’ll just throw it away and get a new one.
Containers make your app easy to run on different computers - ideally, the same image should be used to run containers in every environment stage from development to production.
This project is your guide for building a Docker image, and then setting up Jenkins 2 to build and publish the image automatically, whenever you commit changes to your code repository.
Requirements
To run through this guide, you will need the following:
1. To build and run the Docker image locally: Mac OS X or Linux, and Docker installed.
2. To set up Jenkins to build the image automatically: Access to a Jenkins 2.x installation.
Our application
For this guide, we’ll be using a very basic example: a Hello World server written with Node. We’ll also need a package.json, which tells Node some basic things about our application. To be able to build a Docker image with our app, we’ll need a Dockerfile. You can think of it as a blueprint for Docker: it tells Docker what the contents and parameters of our image should be.
Docker images are often based on other images. For this exercise, we are basing our image on the official Node Docker image. This makes our job easy, and our Dockerfile very short. The grunt work of installing Node and its dependencies in the image is already done in our base image; we’ll just need to include our application.
The Dockerfile is best stored with the code - this way any changes to it are versioned along with the actual application code.
Follow the instructions given below
1. Copy all files in your project folder.
2. Run npm install to install any dependencies for app (if we had any).
3. Specify npm start as the command Docker runs when the container starts.
Building the image locally
To build the image on your own computer, navigate to the project directory (the one with your application code and the Dockerfile), and run docker build:
docker build . -t getintodevops-hellonode:1
This instructs Docker to build the Dockerfile in the current directory with the tag getintodevops-hellonode:1. You will see Docker execute all the actions we specified in the Dockerfile
Running the image locally
If the above build command ran without errors, congratulations: your first Docker image is ready!
Let’s make sure the image works as expected by running it:
docker run -it -p 8000:8000 getintodevops-hellonode:1
The above command tells Docker to run the image interactively with a pseudo-tty, and map the port 8000 in the container to port 8000 in your machine.
You should now be able to check if the server responds in your local port 8000:
curl http://127.0.0.1:8000
Assuming it does, you can quit the docker run command with CTRL + C.
Building the image in Jenkins
Now that we know our Docker image can be built, we’ll want to do it automatically every time there is a change to the application code.
For this, we’ll use Jenkins. Jenkins is an automation server often used to build and deploy applications.
Note: this guide assumes you are running Jenkins 2.0 or newer, with the Docker Pipeline plugin and Docker installed.
If you don’t have access to a Jenkins installation, refer to https://wiki.jenkins-ci.org/display/JENKINS/Installing+Jenkins.
Pipelines as code: The Jenkinsfile
Just like Dockerfiles, I’m a firm believer in storing Jenkins pipeline configuration as code in a Jenkinsfile along with the application code.
It generally makes sense to have everything in the same repository; the application code, what the build artifact should look like (Dockerfile), and how said artifact is created automatically (Jenkinsfile).
Let’s think about our pipeline for a second. We can identify four stages:

Simple pipeline
We’ll need to tell Jenkins what our stages are, and what to do in each one of them. For this we’ll write a Jenkins Pipeline specification in a Jenkinsfile.
Configuring Docker Hub with Jenkins
To store the Docker image resulting from our build, we’ll be using Docker Hub. You can sign up for a free account at https://hub.docker.com.
We’ll need to give Jenkins access to push the image to Docker Hub. For this, we’ll create Credentials in Jenkins, and refer to them in the Jenkinsfile.
As you might have noticed in the above Jenkinsfile, we’re using docker.withRegistry to wrap the app.push commands - this instructs Jenkins to log in to a specified registry with the specified credential id (docker-hub-credentials).
On the Jenkins front page, click on Credentials -> System -> Global credentials -> Add Credentials.
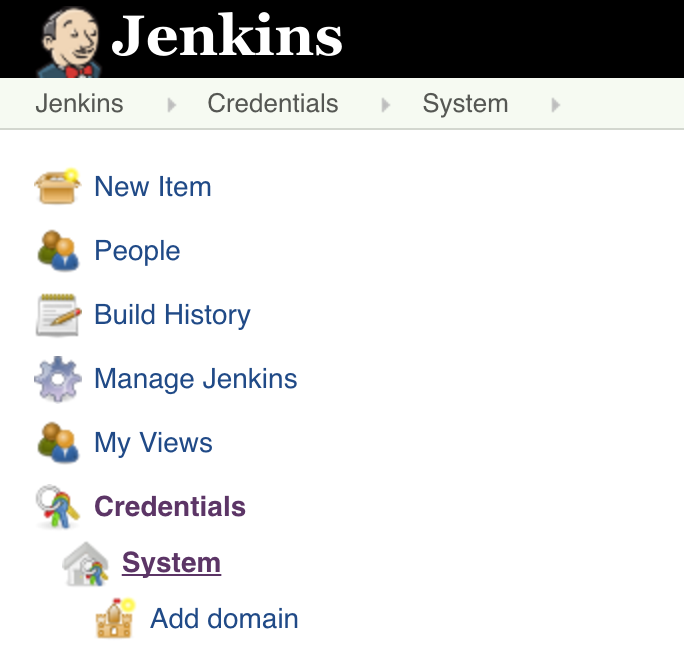
Add your Docker Hub credentials as the type Username with password, with the ID docker-hub-credentials
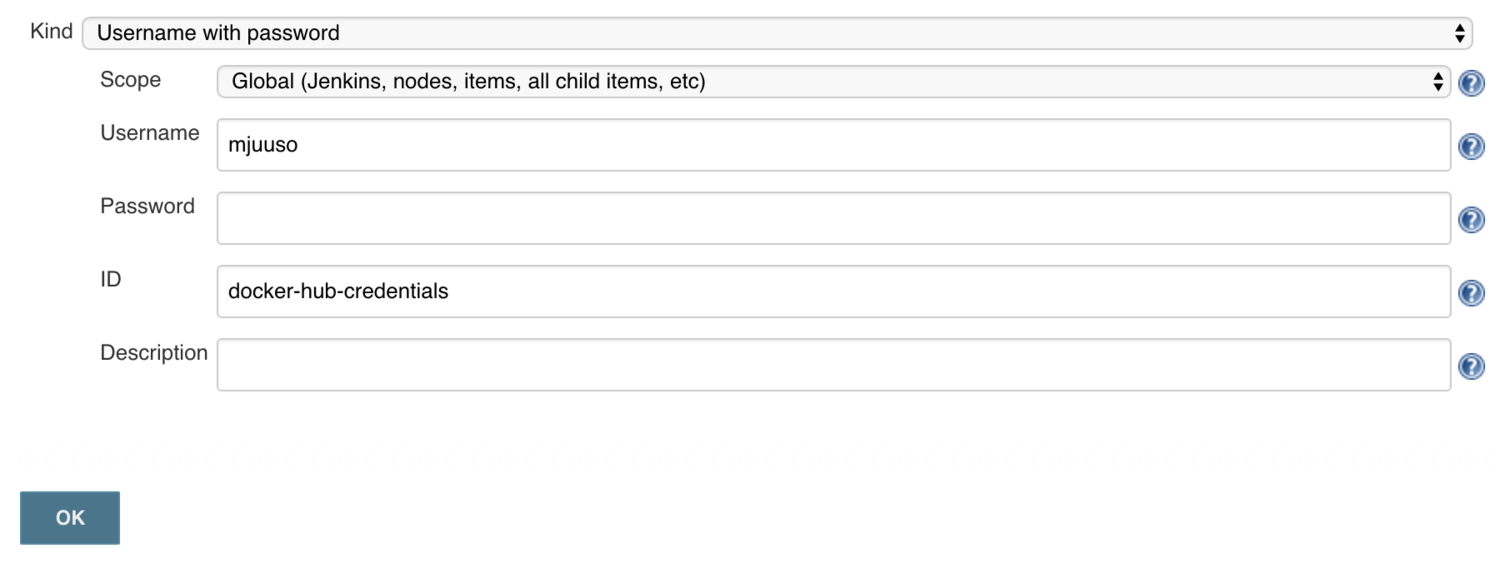
Creating a job in Jenkins
The final thing we need to tell Jenkins is how to find our repository. We’ll create a Pipeline job, and point Jenkins to use a Jenkinsfile in our repository.
Here are the steps:
Click on New Item on the Jenkins front page.
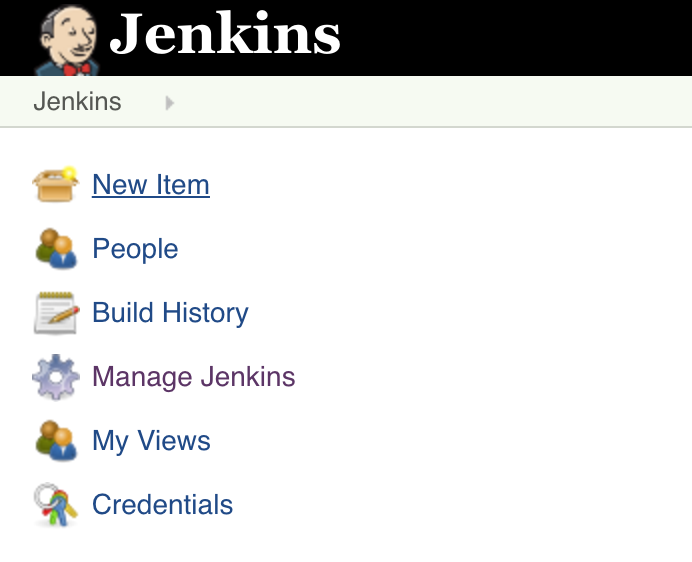
Type a name for your project, and select Pipeline as the project type.
Select Poll SCM and enter a polling schedule. The example here, H/5 * * * * will poll the Git repository every five minutes.
3.5 - DockerTools
DockerTools was built with a purpose. It is being used by Collabnix Slack community internally to target the most popular tools and technique and coming up with the best practices around these tools.
Follow the Collabnix Twitter account for updates on new list additions.
Have Questions? Join us over Slack and get chance to be a part of 6400+ DevOps enthusiasts.
Image Slim
DockerSlim - Minify and Secure Docker containers
Minicon - Minimization of the filesystem for containers
Watchtower - A process for automating Docker container base image updates
Image Build Toolkit
BuildKit - Toolkit for converting source code to build artifacts in an efficient, expressive and repeatable manner
Dive - Tool for exploring each layer in a docker image
Docker-Squash - Squashing helps with organizing images in logical layers.
Image Security
TerraScan -Detect compliance and security violations across Infrastructure as Code to mitigate risk before provisioning cloud native infrastructure.
Clair - Vulnerability Static Analysis for Containers
Trivy - Vulnerability Scanner for Containers and other Artifacts, Suitable for CI - Aqua Security
DeepSource - Static Analysis for DockerFiles
DockerScan - A Docker analysis & hacking tools
DockerHub
DockerHub Scraper - Scraping DockerHub
Docker Volume
Flocker - Data Volume Manager for your Dockerized applications.
Runtime Security
Tracee - Linux Runtime Security and Forensics using eBPF
Container Management
Portainer - Making Docker management easy. https://www.portainer.io
Drone - continuous delivery system built on container technology
Machine Learning
Paddle Serving - A flexible, high-performance carrier for machine learning models
Development
Conan Docker - accelerating the development and Continuous Integration of C and C++ projects.
Networking
Libnetwork - Docker libnetwork plugin for Calico http://www.projectcalico.org
Libnetwork - networking for containers
Caddy Gen - Automated Caddy reverse proxy for docker containers
Swarm
Orbiter - Autoscaler for Docker Swarm
Maintainer
Contributor
Last Updated: 1 March 2022
4 - Grafana
Grafana is an open-source data visualization and monitoring platform that provides a powerful and flexible way to display and analyze data. It is designed to work with a wide range of data sources, including time-series databases, cloud-based data sources, and on-premises databases, and provides a rich set of features for visualizing, exploring, and alerting on your data.
Grafana is popular for several reasons:
Customizability:
Grafana provides a wide range of customization options for visualizing and displaying your data. This includes a range of pre-built dashboards and panels, as well as the ability to create custom dashboards and panels.
Integration with multiple data sources:
Grafana integrates with a wide range of data sources, making it easy to bring together data from multiple sources and display it in a single dashboard. This allows you to gain a comprehensive view of your data and get a better understanding of your system performance and behavior.
Alerting:
Grafana provides robust alerting capabilities, allowing you to set up alerts based on specific conditions or thresholds. This can help you quickly identify and respond to problems before they become critical.
User-friendly interface:
Grafana provides a user-friendly interface that makes it easy to visualize, explore, and monitor your data. This makes it accessible to users of all skill levels, from developers and data analysts to business users.
Large community and ecosystem:
Grafana has a large and active community of users, developers, and partners, which provides a wealth of resources and support for the platform. This includes a range of plugins and integrations, as well as a vibrant user community that provides support and guidance.
These are just a few of the reasons why Grafana is so popular. Its combination of powerful features, flexibility, and ease of use make it a popular choice for data visualization and monitoring in a wide range of use cases, from system monitoring and performance analysis to business intelligence and dashboarding.
4.1 - Running Grafana in a Docker Container
Heading
Edit this template to create your new page.
- Give it a good name, ending in
.md- e.g.getting-started.md - Edit the “front matter” section at the top of the page (weight controls how its ordered amongst other pages in the same directory; lowest number first).
- Add a good commit message at the bottom of the page (<80 characters; use the extended description field for more detail).
- Create a new branch so you can preview your new file and request a review via Pull Request.
4.2 - How to Run Grafana in a Docker container
Running Grafana in a Docker container is a straightforward process that can be done using the following steps:
- Pull the Grafana Docker image: To get started, you’ll need to pull the Grafana Docker image from the Docker Hub repository. This can be done using the following command: bash
docker pull grafana/grafana
- Start the Docker container: Once the image is pulled, you can start a new Docker container using the following command: bash
docker run -d -p 3000:3000 grafana/grafana
The -d option runs the container in the background, and the -p 3000:3000 option maps the Grafana server port (3000) to the host machine.
-
Access the Grafana web interface: After starting the Docker container, you can access the Grafana web interface by navigating to http://localhost:3000 in your web browser.
-
Log in to Grafana: The first time you access the Grafana web interface, you’ll need to log in using the default username (admin) and password (admin). You can then change these credentials in the Grafana settings.
-
Configure data sources: Once logged in, you can add and configure data sources for Grafana to connect to. This can be done using the “Data Sources” menu in the Grafana web interface.
-
Create dashboards: You can create dashboards to visualize and analyze your data by using the “Dashboards” menu in the Grafana web interface.
That’s it! You should now have Grafana running in a Docker container, and be able to access the Grafana web interface to start visualizing and analyzing your data.
Note: If you are running Grafana in a production environment, you should consider using a more secure setup, such as using a reverse proxy and securing access to the Grafana web interface using SSL/TLS. Additionally, you should also ensure that you are using the latest version of Grafana and keep it up to date to ensure that you have access to the latest security updates and features.
5 - Prometheus
~
~
6 - Ansible
7 - Terraform
~
~
8 - Java
8.1 - Recommended Agenda
| Description | Timing |
|---|---|
| Welcome | 8:45 AM to 9:00 AM |
| Setting up Infrastructure | 9:00 AM to 9:30 AM |
| Basics of Docker | 9:30 AM to 10:30 AM |
| Building a Docker Image | 10:30 AM to 11:30 AM |
| Coffee/Tea Break | 11:30 AM to 11:45 AM |
| Multi-container Application using Docker Compose | 11:45 AM to 1:00 PM |
| Lunch | 1:00 PM to 2:00 PM |
| Deploy Application using Docker Swarm Mode | 2:00 PM to 2:30 PM |
| Docker & Netbeans | 2:30 PM to 3:30 PM |
| Coffee/Tea Break | 3:30 PM to 3:45 PM |
| Docker & IntelliJ | 3:45 PM to 4:45 PM |
8.2 - Pre-requisite
Setting up Infrastructure - 30 min
Setup a Docker Environment
This section describes the hardware and software needed for this workshop, and how to configure them. This workshop is designed for a BYOL (Bring Your Own Laptop) style hands-on-lab.
Hardware & Software
- Memory: At least 4 GB+, strongly preferred 8 GB
- Operating System: Mac OS X (10.15.7+), Windows 10 Pro+ 64-bit, Ubuntu 20.04+, CentOS 7/8+.
NOTE: An older version of the operating system may be used. The installation instructions would differ slightly in that case and are explained in the next section.
Install Docker
Docker runs natively on Mac, Windows and Linux.
| S.No. | OS Environment | Link to Follow |
|---|---|---|
| 1 | MacOS | Link |
| 2 | Windows | Link |
| 3 | Linux | Link |
Most of the labs tutorials have been tested on Docker Desktop for Mac.
NOTE: Docker requires a fairly recent operating system version.
Download Images
This tutorial uses a few Docker images and software. Let’s download them before we start the tutorial.
Download the file from docker-compose-pull-images.yml and use the following command to pull the required images:
curl -O https://raw.githubusercontent.com/docker/labs/master/developer-tools/java/scripts/docker-compose-pull-images.yml
docker-compose -f docker-compose-pull-images.yml pull --parallel
NOTE: For Linux, docker-compose and docker commands need sudo access.
So prefix all commands with sudo.
Other Software
The software in this section is specific to certain parts of the workshop. Install them only if you plan to attempt them.
| S.No. | Name of Software | Link to Follow |
|---|---|---|
| 1 | Git | Link |
- Download and install Java IDE of your choice:
| S.No. | Name of Software | Link to Follow |
|---|---|---|
| 1 | NetBeans 12.2 Java SE version |
Link |
| 2 | IntelliJ IDEA Community or Ultimate | Link |
| 3 | Eclipse IDE for Java EE Developers | Link |
| 4 | Apache Maven 3.6.3 | Link |
| 5 | JDK 15 for Linux x64 | Link |
8.3 - Basics of Docker
Basics of Docker
This section introduces the basic terminology of Docker.
Docker is a platform for developers and sysadmins to build, ship, and run applications. Docker lets you quickly assemble applications from components and eliminates the friction that can come when shipping code. Docker lets you test and deploy your code into production as fast as possible.
Docker simplifies software delivery by making it easy to build and share images that contain your application’s entire environment, or application operating system.
What does it mean by an application operating system ?
Your application typically requires specific versions for your operating system, application server, JDK, and database server, may require to tune the configuration files, and similarly multiple other dependencies. The application may need binding to specific ports and certain amount of memory. The components and configuration together required to run your application is what is referred to as application operating system.
You can certainly provide an installation script that will download and install these components. Docker simplifies this process by allowing to create an image that contains your application and infrastructure together, managed as one component. These images are then used to create Docker containers which run on the container virtualization platform, provided by Docker.
Main Components of Docker System
Docker has three main components:
- Images are the build component of Docker and are the read-only templates defining an application operating system.
- Containers are the run component of Docker and created from images. Containers can be run, started, stopped, moved, and deleted.
- Images are stored, shared, and managed in a registry and are the distribution component of Docker.
- DockerHub is a publicly available registry and is available at http://hub.docker.com.
In order for these three components to work together, the Docker Daemon (or Docker Engine) runs on a host machine and does the heavy lifting of building, running, and distributing Docker containers. In addition, the Client is a Docker binary which accepts commands from the user and communicates back and forth with the Engine.

The Client communicates with the Engine that is either co-located on the same host or on a different host. Client uses the pull command to request the Engine to pull an image from the registry. The Engine then downloads the image from Docker Store, or whichever registry is configured. Multiple images can be downloaded from the registry and installed on the Engine. Client uses the run run the container.
Docker Image
We’ve already seen that Docker images are read-only templates from which Docker containers are launched. Each image consists of a series of layers. Docker makes use of union file systems to combine these layers into a single image. Union file systems allow files and directories of separate file systems, known as branches, to be transparently overlaid, forming a single coherent file system.
One of the reasons Docker is so lightweight is because of these layers. When you change a Docker image—for example, update an application to a new version— a new layer gets built. Thus, rather than replacing the whole image or entirely rebuilding, as you may do with a virtual machine, only that layer is added or updated. Now you don’t need to distribute a whole new image, just the update, making distributing Docker images faster and simpler.
Every image starts from a base image, for example ubuntu, a base Ubuntu image, or fedora, a base Fedora image. You can also use images of your own as the basis for a new image, for example if you have a base Apache image you could use this as the base of all your web application images.
NOTE: By default, Docker obtains these base images from Docker Store.
Docker images are then built from these base images using a simple, descriptive set of steps we call instructions. Each instruction creates a new layer in our image. Instructions include actions like:
. Run a command . Add a file or directory . Create an environment variable . Run a process when launching a container
These instructions are stored in a file called a Dockerfile. Docker reads this Dockerfile when you request a build of an image, executes the instructions, and returns a final image.
Docker Container
A container consists of an operating system, user-added files, and meta-data. As we’ve seen, each container is built from an image. That image tells Docker what the container holds, what process to run when the container is launched, and a variety of other configuration data. The Docker image is read-only. When Docker runs a container from an image, it adds a read-write layer on top of the image (using a union file system as we saw earlier) in which your application can then run.
Docker Engine
Docker Host is created as part of installing Docker on your machine. Once your Docker host has been created, it then allows you to manage images and containers. For example, the image can be downloaded and containers can be started, stopped and restarted.
Docker Client
The client communicates with the Docker Host and let’s you work with images and containers.
Check if your client is working using the following command:
docker -v
It shows the output:
Docker version 20.10.2, build 2291f61
NOTE: The exact version may differ based upon how recently the installation was performed.
The exact version of Client and Server can be seen using docker version command. This shows the output as:
docker version
Client: Docker Engine - Community
Cloud integration: 1.0.7
Version: 20.10.2
API version: 1.41
Go version: go1.13.15
Git commit: 2291f61
Built: Mon Dec 28 16:12:42 2020
OS/Arch: darwin/amd64
Context: default
Experimental: true
Server: Docker Engine - Community
Engine:
Version: 20.10.2
API version: 1.41 (minimum version 1.12)
Go version: go1.13.15
Git commit: 8891c58
Built: Mon Dec 28 16:15:28 2020
OS/Arch: linux/amd64
Experimental: true
containerd:
Version: 1.4.3
GitCommit: 269548fa27e0089a8b8278fc4fc781d7f65a939b
runc:
Version: 1.0.0-rc92
GitCommit: ff819c7e9184c13b7c2607fe6c30ae19403a7aff
docker-init:
Version: 0.19.0
GitCommit: de40ad0
ajeetraina@Ajeets-MacBook-Pro realtime-sensor-jetson %
The complete set of commands can be seen using docker --help.
Test Your Knowledge
| S. No. | Question. | Response |
|---|---|---|
| 1 | What is difference between Docker Image and Docker Container? | |
| 2 | Where are all Docker images stored? | |
| 3 | Is DockerHub a public or private Docker registry? | |
| 4 | What is the main role of Docker Engine? |
8.4 - Building and Running a Docker Container
Build a Docker Image
This section explains how to create a Docker image.
Dockerfile
Docker build images by reading instructions from a Dockerfile. A Dockerfile is a text document that contains all the commands a user could call on the command line to assemble an image. docker image build command uses this file and executes all the commands in succession to create an image.
build command is also passed a context that is used during image creation. This context can be a path on your local filesystem or a URL to a Git repository.
Dockerfile is usually called Dockerfile. The complete list of commands that can be specified in this file are explained at https://docs.docker.com/reference/builder/. The common commands are listed below:
Common commands for Dockerfile
| Command | Purpose | Example |
|---|---|---|
| FROM | First non-comment instruction in Dockerfile | FROM ubuntu |
| COPY | Copies mulitple source files from the context to the file system of the container at the specified path | COPY .bash_profile /home |
| ENV | Sets the environment variable | ENV HOSTNAME=test |
| RUN | Executes a command | RUN apt-get update |
| CMD | Defaults for an executing container | CMD ["/bin/echo", "hello world"] |
| EXPOSE | Informs the network ports that the container will listen on | EXPOSE 8093 |
| ================== |
Create your first image
Create a new directory hellodocker.
In that directory, create a new text file Dockerfile. Use the following contents:
FROM ubuntu:latest
CMD ["/bin/echo", "hello world"]
This image uses ubuntu as the base image. CMD command defines the command that needs to run. It provides a different entry point of /bin/echo and gives the argument “hello world”.
Build the image using the command:
docker image build . -t helloworld
. in this command is the context for the command docker image build. -t adds a tag to the image.
The following output is shown:
Sending build context to Docker daemon 2.048kB
Step 1/2 : FROM ubuntu:latest
latest: Pulling from library/ubuntu
9fb6c798fa41: Pull complete
3b61febd4aef: Pull complete
9d99b9777eb0: Pull complete
d010c8cf75d7: Pull complete
7fac07fb303e: Pull complete
Digest: sha256:31371c117d65387be2640b8254464102c36c4e23d2abe1f6f4667e47716483f1
Status: Downloaded newer image for ubuntu:latest
---> 2d696327ab2e
Step 2/2 : CMD /bin/echo hello world
---> Running in 9356a508590c
---> e61f88f3a0f7
Removing intermediate container 9356a508590c
Successfully built e61f88f3a0f7
Successfully tagged helloworld:latest
List the images available using docker image ls:
REPOSITORY TAG IMAGE ID CREATED SIZE
helloworld latest e61f88f3a0f7 3 minutes ago 122MB
ubuntu latest 2d696327ab2e 4 days ago 122MB
Other images may be shown as well but we are interested in these two images for now.
Run the container using the command:
docker container run helloworld
to see the output:
hello world
If you do not see the expected output, check your Dockerfile that the content exactly matches as shown above. Build the image again and now run it.
Change the base image from ubuntu to busybox in Dockerfile. Build the image again:
docker image build -t helloworld:2 .
and view the images using docker image ls command:
REPOSITORY TAG IMAGE ID CREATED SIZE
helloworld 2 7fbedda27c66 3 seconds ago 1.13MB
helloworld latest e61f88f3a0f7 5 minutes ago 122MB
ubuntu latest 2d696327ab2e 4 days ago 122MB
busybox latest 54511612f1c4 9 days ago 1.13MB
helloworld:2 is the format that allows to specify the image name and assign a tag/version to it separated by :.
Create a simple Java application
Create a new Java project:
Ensure that you have maven package installed in your system
brew install maven
mvn archetype:generate -DgroupId=org.examples.java -DartifactId=helloworld -DinteractiveMode=false
Wait for 40 seconds till you get the below results:
Downloaded from central: https://repo.maven.apache.org/maven2/org/apache/maven/archetypes/maven-archetype-quickstart/1.0/maven-archetype-quickstart-1.0.jar (4.3 kB at 17 kB/s)
[INFO] ----------------------------------------------------------------------------
[INFO] Using following parameters for creating project from Old (1.x) Archetype: maven-archetype-quickstart:1.0
[INFO] ----------------------------------------------------------------------------
[INFO] Parameter: basedir, Value: /Users/ajeetraina/dockercommunity/jdk15
[INFO] Parameter: package, Value: org.examples.java
[INFO] Parameter: groupId, Value: org.examples.java
[INFO] Parameter: artifactId, Value: helloworld
[INFO] Parameter: packageName, Value: org.examples.java
[INFO] Parameter: version, Value: 1.0-SNAPSHOT
[INFO] project created from Old (1.x) Archetype in dir: /Users/ajeetraina/dockercommunity/jdk15/helloworld
[INFO] ------------------------------------------------------------------------
[INFO] BUILD SUCCESS
[INFO] ------------------------------------------------------------------------
[INFO] Total time: 01:11 min
[INFO] Finished at: 2021-01-30T03:18:41+05:30
Build the project:
cd helloworld
mvn package
Run the Java class:
java -cp target/helloworld-1.0-SNAPSHOT.jar org.examples.java.App
This shows the output:
Hello World!
Let’s package this application as a Docker image.
Java Docker image
Run the OpenJDK container in an interactive manner:
$ docker container run -it openjdk
Unable to find image 'openjdk:latest' locally
latest: Pulling from library/openjdk
a73adebe9317: Pull complete
8b73bcd34cfe: Pull complete
1227243b28c4: Pull complete
Digest: sha256:7ada0d840136690ac1099ce3172fb02787bbed83462597e0e2c9472a0a63dea5
Status: Downloaded newer image for openjdk:latest
Jan 29, 2021 12:24:47 PM java.util.prefs.FileSystemPreferences$1 run
INFO: Created user preferences directory.
| Welcome to JShell -- Version 15.0.2
| For an introduction type: /help intro
This will open a terminal in the container. Check the version of Java:
root@8d0af9da5258:/# java --version
openjdk 15.0.2 2021-01-19
OpenJDK Runtime Environment (build 15.0.2+7-27)
OpenJDK 64-Bit Server VM (build 15.0.2+7-27, mixed mode, sharing)
A different JDK version may be shown in your case.
Exit out of the container by typing exit in the container shell.
Package and run Java application as Docker image
Create a new Dockerfile in helloworld directory and use the following content:
FROM openjdk:latest
COPY target/helloworld-1.0-SNAPSHOT.jar /usr/src/helloworld-1.0-SNAPSHOT.jar
CMD java -cp /usr/src/helloworld-1.0-SNAPSHOT.jar org.examples.java.App
Build the image:
docker image build -t hello-java:latest .
Run the image:
docker container run hello-java:latest
This displays the output:
Hello World!
This shows the exactly same output that was printed when the Java class was invoked using Java CLI.
Package and run Java Application using Docker Maven Plugin
Docker Maven Plugin allows you to manage Docker images and containers using Maven. It comes with predefined goals:
| S. No | Goal | Description |
|---|---|---|
| 1 | docker:build |
Build images |
| 2 | docker:start |
Create and start containers |
| 3 | docker:stop |
Stop and destroy containers |
| 4 | docker:push |
Push images to a registry |
| 5 | docker:remove |
Remove images from local docker host |
| 6 | docker:logs |
Show container logs |
| ================== |
Clone the sample code from https://github.com/arun-gupta/docker-java-sample/.
Create the Docker image:
mvn -f docker-java-sample/pom.xml package -Pdocker
This will show an output like:
[INFO] Copying files to /Users/argu/workspaces/docker-java-sample/target/docker/hellojava/build/maven
[INFO] Building tar: /Users/argu/workspaces/docker-java-sample/target/docker/hellojava/tmp/docker-build.tar
[INFO] DOCKER> [hellojava:latest]: Created docker-build.tar in 87 milliseconds
[INFO] DOCKER> [hellojava:latest]: Built image sha256:6f815
[INFO] ------------------------------------------------------------------------
[INFO] BUILD SUCCESS
[INFO] ------------------------------------------------------------------------
The list of images can be checked using the command docker image ls | grep hello-java:
hello-java latest ea64a9f5011e 5 seconds ago 643 MB
Run the Docker container:
mvn -f docker-java-sample/pom.xml install -Pdocker
This will show an output like:
[INFO] DOCKER> [hellojava:latest]: Start container 30a08791eedb
30a087> Hello World!
[INFO] DOCKER> [hellojava:latest]: Waited on log out 'Hello World!' 510 ms
This is similar output when running the Java application using java CLI or the Docker container using docker container run command.
The container is running in the foreground. Use Ctrl + C to interrupt the container and return back to terminal.
Only one change was required in the project to enable Docker packaging and running. A Maven profile is added in pom.xml:
<profiles>
<profile>
<id>docker</id>
<build>
<plugins>
<plugin>
<groupId>io.fabric8</groupId>
<artifactId>docker-maven-plugin</artifactId>
<version>0.22.1</version>
<configuration>
<images>
<image>
<name>hello-java</name>
<build>
<from>openjdk:latest</from>
<assembly>
<descriptorRef>artifact</descriptorRef>
</assembly>
<cmd>java -cp maven/${project.name}-${project.version}.jar org.examples.java.App</cmd>
</build>
<run>
<wait>
<log>Hello World!</log>
</wait>
</run>
</image>
</images>
</configuration>
<executions>
<execution>
<id>docker:build</id>
<phase>package</phase>
<goals>
<goal>build</goal>
</goals>
</execution>
<execution>
<id>docker:start</id>
<phase>install</phase>
<goals>
<goal>start</goal>
<goal>logs</goal>
</goals>
</execution>
</executions>
</plugin>
</plugins>
</build>
</profile>
</profiles>
Dockerfile Command Design Patterns
Difference between CMD and ENTRYPOINT
TL;DR CMD will work for most of the cases.
Default entry point for a container is /bin/sh, the default shell.
Running a container as docker container run -it ubuntu uses that command and starts the default shell. The output is shown as:
docker container run -it ubuntu
root@88976ddee107:/#
ENTRYPOINT allows to override the entry point to some other command, and even customize it. For example, a container can be started as:
docker container run -it --entrypoint=/bin/cat ubuntu /etc/passwd
root:x:0:0:root:/root:/bin/bash
daemon:x:1:1:daemon:/usr/sbin:/usr/sbin/nologin
bin:x:2:2:bin:/bin:/usr/sbin/nologin
sys:x:3:3:sys:/dev:/usr/sbin/nologin
. . .
This command overrides the entry point to the container to /bin/cat. The argument(s) passed to the CLI are used by the entry point.
Difference between ADD and COPY
TL;DR COPY will work for most of the cases.
ADD has all capabilities of COPY and has the following additional features:
. Allows tar file auto-extraction in the image, for example, ADD app.tar.gz /opt/var/myapp.
. Allows files to be downloaded from a remote URL. However, the downloaded files will become part of the image. This causes the image size to bloat. So its recommended to use curl or wget to download the archive explicitly, extract, and remove the archive.
Import and export images
Docker images can be saved using image save command to a .tar file:
docker image save helloworld > helloworld.tar
These tar files can then be imported using load command:
docker image load -i helloworld.tar
Run a Docker Container
The first step in running an application using Docker is to run a container. If you can think of an open source software, there is a very high likelihood that there will be a Docker image available for it at https://store.docker.com[Docker Store]. Docker client can simply run the container by giving the image name. The client will check if the image already exists on Docker Host. If it exists then it’ll run the container, otherwise the host will first download the image.
Pull Image
Let’s check if any images are available:
docker image ls
At first, this list is empty. If you’ve already downloaded the images as specified in the setup chapter, then all the images will be shown here.
List of images can be seen again using the docker image ls command. This will show the following output:
REPOSITORY TAG IMAGE ID CREATED SIZE
hellojava latest 8d76bf5691c4 32 minutes ago 740MB
hello-java latest 93b1180c5d91 36 minutes ago 740MB
helloworld 2 7fbedda27c66 41 minutes ago 1.13MB
helloworld latest e61f88f3a0f7 About an hour ago 122MB
mysql latest b4e78b89bcf3 3 days ago 412MB
ubuntu latest 2d696327ab2e 4 days ago 122MB
jboss/wildfly latest 9adbdb00cded 8 days ago 592MB
openjdk latest 6077adce18ea 8 days ago 740MB
busybox latest 54511612f1c4 9 days ago 1.13MB
tailtarget/hadoop 2.7.2 ee6b539c886e 6 months ago 1.15GB
tailtarget/jenkins 2.32.3 71a7d9bcfe2b 6 months ago 859MB
arungupta/couchbase travel 7929a80707db 7 months ago 583MB
arungupta/couchbase-javaee travel 2bb52abaad5f 7 months ago 595MB
arungupta/javaee7-hol latest da5c9d4f85ca 2 years ago 582MB
More details about the image can be obtained using docker image history jboss/wildfly command:
IMAGE CREATED CREATED BY SIZE COMMENT
9adbdb00cded 8 days ago /bin/sh -c #(nop) CMD ["/opt/jboss/wildfl... 0B
<missing> 8 days ago /bin/sh -c #(nop) EXPOSE 8080/tcp 0B
<missing> 8 days ago /bin/sh -c #(nop) USER [jboss] 0B
<missing> 8 days ago /bin/sh -c #(nop) ENV LAUNCH_JBOSS_IN_BAC... 0B
<missing> 8 days ago /bin/sh -c cd $HOME && curl -O https:/... 163MB
<missing> 8 days ago /bin/sh -c #(nop) USER [root] 0B
<missing> 8 days ago /bin/sh -c #(nop) ENV JBOSS_HOME=/opt/jbo... 0B
<missing> 8 days ago /bin/sh -c #(nop) ENV WILDFLY_SHA1=9ee3c0... 0B
<missing> 8 days ago /bin/sh -c #(nop) ENV WILDFLY_VERSION=10.... 0B
<missing> 8 days ago /bin/sh -c #(nop) ENV JAVA_HOME=/usr/lib/... 0B
<missing> 8 days ago /bin/sh -c #(nop) USER [jboss] 0B
<missing> 8 days ago /bin/sh -c yum -y install java-1.8.0-openj... 204MB
<missing> 8 days ago /bin/sh -c #(nop) USER [root] 0B
<missing> 8 days ago /bin/sh -c #(nop) MAINTAINER Marek Goldma... 0B
<missing> 8 days ago /bin/sh -c #(nop) USER [jboss] 0B
<missing> 8 days ago /bin/sh -c #(nop) WORKDIR /opt/jboss 0B
<missing> 8 days ago /bin/sh -c groupadd -r jboss -g 1000 && us... 296kB
<missing> 8 days ago /bin/sh -c yum update -y && yum -y install... 28.7MB
<missing> 8 days ago /bin/sh -c #(nop) MAINTAINER Marek Goldma... 0B
<missing> 8 days ago /bin/sh -c #(nop) CMD ["/bin/bash"] 0B
<missing> 8 days ago /bin/sh -c #(nop) LABEL name=CentOS Base ... 0B
<missing> 8 days ago /bin/sh -c #(nop) ADD file:1ed4d1a29d09a63... 197MB
Run Container
Interactively
Run WildFly container in an interactive mode.
docker container run -it jboss/wildfly
This will show the output as:
=========================================================================
JBoss Bootstrap Environment
JBOSS_HOME: /opt/jboss/wildfly
JAVA: /usr/lib/jvm/java/bin/java
. . .
00:26:27,455 INFO [org.jboss.as] (Controller Boot Thread) WFLYSRV0060: Http management interface listening on http://127.0.0.1:9990/management
00:26:27,456 INFO [org.jboss.as] (Controller Boot Thread) WFLYSRV0051: Admin console listening on http://127.0.0.1:9990
00:26:27,457 INFO [org.jboss.as] (Controller Boot Thread) WFLYSRV0025: WildFly Full 10.1.0.Final (WildFly Core 2.2.0.Final) started in 3796ms - Started 331 of 577 services (393 services are lazy, passive or on-demand)
This shows that the server started correctly, congratulations!
By default, Docker runs in the foreground. -i allows to interact with the STDIN and -t attach a TTY to the process. Switches can be combined together and used as -it.
Hit Ctrl+C to stop the container.
Detached container
Restart the container in detached mode:
docker container run -d jboss/wildfly
254418caddb1e260e8489f872f51af4422bc4801d17746967d9777f565714600
-d, instead of -it, runs the container in detached mode.
The output is the unique id assigned to the container. Logs of the container can be seen using the command docker container logs <CONTAINER_ID>, where <CONTAINER_ID> is the id of the container.
Status of the container can be checked using the docker container ls command:
CONTAINER ID IMAGE COMMAND CREATED STATUS PORTS NAMES
254418caddb1 jboss/wildfly "/opt/jboss/wildfl..." 2 minutes ago Up 2 minutes 8080/tcp gifted_haibt
Also try docker container ls -a to see all the containers on this machine.
With default port
If you want the container to accept incoming connections, you will need to provide special options when invoking docker run. The container, we just started, can’t be accessed by our browser. We need to stop it again and restart with different options.
docker container stop `docker container ps | grep wildfly | awk '{print $1}'`
Restart the container as:
docker container run -d -P --name wildfly jboss/wildfly
-P map any exposed ports inside the image to a random port on Docker host. In addition, --name option is used to give this container a name. This name can then later be used to get more details about the container or stop it. This can be verified using docker container ls command:
CONTAINER ID IMAGE COMMAND CREATED STATUS PORTS NAMES
89fbfbceeb56 jboss/wildfly "/opt/jboss/wildfl..." 9 seconds ago Up 8 seconds 0.0.0.0:32768->8080/tcp wildfly
The port mapping is shown in the PORTS column. Access WildFly server at http://localhost:32768. Make sure to use the correct port number as shown in your case.
NOTE: Exact port number may be different in your case.
The page would look like:
![My Image)(wildfly-first-run-default-page.png)
With specified port
Stop and remove the previously running container as:
docker container stop wildfly
docker container rm wildfly
Alternatively, docker container rm -f wildfly can be used to stop and remove the container in one command. Be careful with this command because -f uses SIGKILL to kill the container.
Restart the container as:
docker container run -d -p 8080:8080 --name wildfly jboss/wildfly
The format is -p hostPort:containerPort. This option maps a port on the host to a port in the container. This allows us to access the container on the specified port on the host.
Now we’re ready to test http://localhost:8080. This works with the exposed port, as expected.
Let’s stop and remove the container as:
docker container stop wildfly
docker container rm wildfly
Deploy a WAR file to application server
Now that your application server is running, lets see how to deploy a WAR file to it.
Create a new directory hellojavaee. Create a new text file and name it Dockerfile. Use the following contents:
FROM jboss/wildfly:latest
RUN curl -L https://github.com/javaee-samples/javaee7-simple-sample/releases/download/v1.10/javaee7-simple-sample-1.10.war -o /opt/jboss/wildfly/standalone/deployments/javaee-simple-sample.war
Create an image:
docker image build -t javaee-sample .
Start the container:
docker container run -d -p 8080:8080 --name wildfly javaee-sample
Access the endpoint:
curl http://localhost:8080/javaee-simple-sample/resources/persons
See the output:
<persons>
<person>
<name>
Penny
</name>
</person>
<person>
<name>
Leonard
</name>
</person>
<person>
<name>
Sheldon
</name>
</person>
<person>
<name>
Amy
</name>
</person>
<person>
<name>
Howard
</name>
</person>
<person>
<name>
Bernadette
</name>
</person>
<person>
<name>
Raj
</name>
</person>
<person>
<name>
Priya
</name>
</person>
</persons>
Optional: brew install XML-Coreutils will install XML formatting utility on Mac. This output can then be piped to xml-fmt to display a formatted result.
Stop container
Stop a specific container by id or name:
docker container stop <CONTAINER ID>
docker container stop <NAME>
Stop all running containers:
docker container stop $(docker container ps -q)
Stop only the exited containers:
docker container ps -a -f "exited=-1"
Remove container
Remove a specific container by id or name:
docker container rm <CONTAINER_ID>
docker container rm <NAME>
Remove containers meeting a regular expression
docker container ps -a | grep wildfly | awk '{print $1}' | xargs docker container rm
Remove all containers, without any criteria
docker container rm $(docker container ps -aq)
Additional ways to find port mapping
The exact mapped port can also be found using docker port command:
docker container port <CONTAINER_ID> or <NAME>
This shows the output as:
8080/tcp -> 0.0.0.0:8080
Port mapping can be also be found using docker inspect command:
docker container inspect --format='{{(index (index .NetworkSettings.Ports "8080/tcp") 0).HostPort}}' <CONTAINER ID>
Build and Run a Docker Container with JDK 15
This chapter explains how to create a Docker image with JDK 15.
Create a Docker Image using JDK 15
Create a new directory, for example docker-jdk15.
In that directory, create a new text file jdk-15-debian-slim.Dockerfile.
Use the following contents:
# A JDK 15 with Debian slim
FROM buildpack-deps:buster-scm
RUN set -eux; \
apt-get update; \
apt-get install -y --no-install-recommends \
bzip2 \
unzip \
xz-utils \
\
# utilities for keeping Debian and OpenJDK CA certificates in sync
ca-certificates p11-kit \
\
# jlink --strip-debug on 13+ needs objcopy: https://github.com/docker-library/openjdk/issues/351
# Error: java.io.IOException: Cannot run program "objcopy": error=2, No such file or directory
binutils \
# java.lang.UnsatisfiedLinkError: /usr/local/openjdk-11/lib/libfontmanager.so: libfreetype.so.6: cannot open shared object file: No such file or directory
# java.lang.NoClassDefFoundError: Could not initialize class sun.awt.X11FontManager
# https://github.com/docker-library/openjdk/pull/235#issuecomment-424466077
fontconfig libfreetype6 \
; \
rm -rf /var/lib/apt/lists/*
# Default to UTF-8 file.encoding
ENV LANG C.UTF-8
ENV JAVA_HOME /usr/local/openjdk-15
ENV PATH $JAVA_HOME/bin:$PATH
# backwards compatibility shim
RUN { echo '#/bin/sh'; echo 'echo "$JAVA_HOME"'; } > /usr/local/bin/docker-java-home && chmod +x /usr/local/bin/docker-java-home && [ "$JAVA_HOME" = "$(docker-java-home)" ]
# https://jdk.java.net/
# >
# > Java Development Kit builds, from Oracle
# >
ENV JAVA_VERSION 15.0.2
RUN set -eux; \
\
arch="$(dpkg --print-architecture)"; \
# this "case" statement is generated via "update.sh"
case "$arch" in \
# arm64v8
arm64 | aarch64) \
downloadUrl=https://download.java.net/java/GA/jdk15.0.2/0d1cfde4252546c6931946de8db48ee2/7/GPL/openjdk-15.0.2_linux-aarch64_bin.tar.gz; \
downloadSha256=3958f01858f9290c48c23e7804a0af3624e8eca6749b085c425df4c4f2f7dcbc; \
;; \
# amd64
amd64 | i386:x86-64) \
downloadUrl=https://download.java.net/java/GA/jdk15.0.2/0d1cfde4252546c6931946de8db48ee2/7/GPL/openjdk-15.0.2_linux-x64_bin.tar.gz; \
downloadSha256=91ac6fc353b6bf39d995572b700e37a20e119a87034eeb939a6f24356fbcd207; \
;; \
# fallback
*) echo >&2 "error: unsupported architecture: '$arch'"; exit 1 ;; \
esac; \
\
wget -O openjdk.tgz "$downloadUrl" --progress=dot:giga; \
echo "$downloadSha256 *openjdk.tgz" | sha256sum --strict --check -; \
\
mkdir -p "$JAVA_HOME"; \
tar --extract \
--file openjdk.tgz \
--directory "$JAVA_HOME" \
--strip-components 1 \
--no-same-owner \
; \
rm openjdk.tgz; \
\
# update "cacerts" bundle to use Debian's CA certificates (and make sure it stays up-to-date with changes to Debian's store)
# see https://github.com/docker-library/openjdk/issues/327
# http://rabexc.org/posts/certificates-not-working-java#comment-4099504075
# https://salsa.debian.org/java-team/ca-certificates-java/blob/3e51a84e9104823319abeb31f880580e46f45a98/debian/jks-keystore.hook.in
# https://git.alpinelinux.org/aports/tree/community/java-cacerts/APKBUILD?id=761af65f38b4570093461e6546dcf6b179d2b624#n29
{ \
echo '#!/usr/bin/env bash'; \
echo 'set -Eeuo pipefail'; \
echo 'if ! [ -d "$JAVA_HOME" ]; then echo >&2 "error: missing JAVA_HOME environment variable"; exit 1; fi'; \
# 8-jdk uses "$JAVA_HOME/jre/lib/security/cacerts" and 8-jre and 11+ uses "$JAVA_HOME/lib/security/cacerts" directly (no "jre" directory)
echo 'cacertsFile=; for f in "$JAVA_HOME/lib/security/cacerts" "$JAVA_HOME/jre/lib/security/cacerts"; do if [ -e "$f" ]; then cacertsFile="$f"; break; fi; done'; \
echo 'if [ -z "$cacertsFile" ] || ! [ -f "$cacertsFile" ]; then echo >&2 "error: failed to find cacerts file in $JAVA_HOME"; exit 1; fi'; \
echo 'trust extract --overwrite --format=java-cacerts --filter=ca-anchors --purpose=server-auth "$cacertsFile"'; \
} > /etc/ca-certificates/update.d/docker-openjdk; \
chmod +x /etc/ca-certificates/update.d/docker-openjdk; \
/etc/ca-certificates/update.d/docker-openjdk; \
\
# https://github.com/docker-library/openjdk/issues/331#issuecomment-498834472
find "$JAVA_HOME/lib" -name '*.so' -exec dirname '{}' ';' | sort -u > /etc/ld.so.conf.d/docker-openjdk.conf; \
ldconfig; \
\
# https://github.com/docker-library/openjdk/issues/212#issuecomment-420979840
# https://openjdk.java.net/jeps/341
java -Xshare:dump; \
\
# basic smoke test
fileEncoding="$(echo 'System.out.println(System.getProperty("file.encoding"))' | jshell -s -)"; [ "$fileEncoding" = 'UTF-8' ]; rm -rf ~/.java; \
javac --version; \
java --version
# "jshell" is an interactive REPL for Java (see https://en.wikipedia.org/wiki/JShell)
CMD ["jshell"]
This image uses debian slim as the base image and installs the OpenJDK build
of JDK for linux x64
The image is configured by default to run jshell the Java REPL. Read more JShell at link:https://docs.oracle.com/javase/9/jshell/introduction-jshell.htm[Introduction to JShell].
Build the image using the command:
docker image build -t jdk-15-debian-slim -f jdk-9-debian-slim.Dockerfile .
List the images available using docker image ls:
REPOSITORY TAG IMAGE ID CREATED SIZE
jdk-15-debian-slim latest 0b9c1935cd20 9 hours ago 669MB
debian stable-slim d30525fb4ed2 4 days ago 55.3MB
Run the container using the command:
docker container run -m=200M -it --rm jdk-15-debian-slim
to see the output:
Jan 29, 2021 9:08:17 PM java.util.prefs.FileSystemPreferences$1 run
INFO: Created user preferences directory.
| Welcome to JShell -- Version 15.0.2
| For an introduction type: /help intro
jshell>
Query the available memory of the Java process by typing the following expression into the Java REPL:
Runtime.getRuntime().maxMemory() / (1 « 20)
to see the output:
jshell> Runtime.getRuntime().maxMemory() / (1 << 20)
$1 ==> 96
Notice that the Java process is honoring memory constraints (see the --memory
of docker container run) and will not allocate memory beyond that specified for the
container.
Type Ctrl + D to exit out of jshell.
To list all the Java modules distributed with JDK 15 run the following command:
docker container run -m=200M -it --rm jdk-9-debian-slim java --list-modules
This will show an output:
docker container run -m=200M -it --rm jdk-15-debian-slim java --list-modules
java.base@15.0.2
java.compiler@15.0.2
java.datatransfer@15.0.2
java.desktop@15.0.2
java.instrument@15.0.2
java.logging@15.0.2
java.management@15.0.2
java.management.rmi@15.0.2
java.naming@15.0.2
java.net.http@15.0.2
java.prefs@15.0.2
java.rmi@15.0.2
java.scripting@15.0.2
...
jdk.internal.vm.ci@15.0.2
jdk.internal.vm.compiler@15.0.2
jdk.internal.vm.compiler.management@15.0.2
jdk.jartool@15.0.2
jdk.javadoc@15.0.2
jdk.jcmd@15.0.2
jdk.jconsole@15.0.2
jdk.jdeps@15.0.2
jdk.jdi@15.0.2
jdk.jdwp.agent@15.0.2
jdk.jfr@15.0.2
jdk.jlink@15.0.2
jdk.jshell@15.0.2
jdk.jsobject@15.0.2
jdk.jstatd@15.0.2
...
..
In total there should be 69 modules:
$ docker container run -m=200M -it --rm jdk-9-debian-slim java --list-modules | wc -l
69
Create a Docker Image using JDK 15 and Alpine Linux
Instead of debian as the base image it is possible to use Alpine Linux
with an early access build of JDK 15 that is compatible with the muslc library
shipped with Alpine Linux.
Create a new text file jdk-15-alpine.Dockerfile.
Use the following contents:
# A JDK 15 with Alpine Linux
FROM alpine:3.12
RUN apk add --no-cache java-cacerts
ENV JAVA_HOME /opt/openjdk-16
ENV PATH $JAVA_HOME/bin:$PATH
# https://jdk.java.net/
# >
# > Java Development Kit builds, from Oracle
# >
ENV JAVA_VERSION 16-ea+32
# "For Alpine Linux, builds are produced on a reduced schedule and may not be in sync with the other platforms."
RUN set -eux; \
\
arch="$(apk --print-arch)"; \
# this "case" statement is generated via "update.sh"
case "$arch" in \
# amd64
x86_64) \
downloadUrl=https://download.java.net/java/early_access/alpine/32/binaries/openjdk-16-ea+32_linux-x64-musl_bin.tar.gz; \
downloadSha256=f9ec3071fdea08ca5be7b149d6c2f2689814e3ee86ee15b7981f5eed76280985; \
;; \
# fallback
*) echo >&2 "error: unsupported architecture: '$arch'"; exit 1 ;; \
esac; \
\
wget -O openjdk.tgz "$downloadUrl"; \
echo "$downloadSha256 *openjdk.tgz" | sha256sum -c -; \
\
mkdir -p "$JAVA_HOME"; \
tar --extract \
--file openjdk.tgz \
--directory "$JAVA_HOME" \
--strip-components 1 \
--no-same-owner \
; \
rm openjdk.tgz; \
\
# see "java-cacerts" package installed above (which maintains "/etc/ssl/certs/java/cacerts" for us)
rm -rf "$JAVA_HOME/lib/security/cacerts"; \
ln -sT /etc/ssl/certs/java/cacerts "$JAVA_HOME/lib/security/cacerts"; \
\
# https://github.com/docker-library/openjdk/issues/212#issuecomment-420979840
# https://openjdk.java.net/jeps/341
java -Xshare:dump; \
\
# basic smoke test
fileEncoding="$(echo 'System.out.println(System.getProperty("file.encoding"))' | jshell -s -)"; [ "$fileEncoding" = 'UTF-8' ]; rm -rf ~/.java; \
javac --version; \
java --version
# "jshell" is an interactive REPL for Java (see https://en.wikipedia.org/wiki/JShell)
CMD ["jshell"]
This image uses alpine 3.12 as the base image and installs the OpenJDK build
of JDK for Alpine Linux x64.
The image is configured in the same manner as for the debian-based image.
Build the image using the command:
docker image build -t jdk-15-alpine -f jdk-15-alpine.Dockerfile .
List the images available using docker image ls:
REPOSITORY TAG IMAGE ID CREATED SIZE
jdk-15-debian-slim latest 0b9c1935cd20 9 hours ago 669MB
jdk-15-alpine latest 5d4557f836aa 6 minutes ago 324MB
debian stable-slim d30525fb4ed2 4 days ago 55.3MB
alpine 3.6 7328f6f8b418 3 months ago 3.97MB
Notice the difference in image sizes. Alpine Linux by design has been carefully crafted to produce a minimal running OS image.
8.5 - Multi-Container Application using Docker Compose
What is Docker Compose
Docker Compose is a tool for defining and running complex applications with Docker. With Compose, you define a multi-container application in a single file, then spin your application up in a single command which does everything that needs to be done to get it running.
An application using Docker containers will typically consist of multiple containers. With Docker Compose, there is no need to write shell scripts to start your containers. All the containers are defined in a configuration file using services, and then docker-compose script is used to start, stop, and restart the application and all the services in that application, and all the containers within that service. The complete list of commands is:
| Command | Purpose |
|---|---|
build |
Build or rebuild services |
help |
Get help on a command |
kill |
Kill containers |
logs |
View output from containers |
port |
Print the public port for a port binding |
ps |
List containers |
pull |
Pulls service images |
restart |
Restart services |
rm |
Remove stopped containers |
run |
Run a one-off command |
scale |
Set number of containers for a service |
start |
Start services |
stop |
Stop services |
up |
Create and start containers |
| `migrate-to-labels Recreate containers to add labels | |
| ==== |
The application used in this section is a Java EE application talking to a database. The application publishes a REST endpoint that can be invoked using `curl. It is deployed using http://wildfly-swarm.io/[WildFly Swarm] that communicates to MySQL database.
WildFly Swarm and MySQL will be running in two separate containers, and thus making this a multi-container application.
Configuration file
The entry point to Docker Compose is a Compose file, usually called docker-compose.yml. Create a new directory javaee. In that directory, create a new file docker-compose.yml in it. Use the following contents:
version: '3.3'
services:
db:
container_name: db
image: mysql:8
environment:
MYSQL_DATABASE: employees
MYSQL_USER: mysql
MYSQL_PASSWORD: mysql
MYSQL_ROOT_PASSWORD: supersecret
ports:
- 3306:3306
web:
image: arungupta/docker-javaee:dockerconeu17
ports:
- 8080:8080
- 9990:9990
depends_on:
- db
In this Compose file:
- Two services in this Compose are defined by the name
dbandwebattributes - Image name for each service defined using
imageattribute - The
mysql:8image starts the MySQL server. environmentattribute defines environment variables to initialize MySQL server.MYSQL_DATABASEallows you to specify the name of a database to be created on image startup.MYSQL_USERandMYSQL_PASSWORDare used in conjunction to create a new user and to set that user’s password. This user will be granted superuser permissions for the database specified by theMYSQL_DATABASEvariable.MYSQL_ROOT_PASSWORDis mandatory and specifies the password that will be set for the MySQL root superuser account.
- Java EE application uses the
dbservice as specified in theconnection-urlas specified at https://github.com/arun-gupta/docker-javaee/blob/master/employees/src/main/resources/project-defaults.yml/. - The
arungupta/docker-javaee:dockerconeu17image starts WildFly Swarm application server. It consists of the Java EE application built from https://github.com/arun-gupta/docker-javaee. Clone that project if you want to build your own image. - Port forwarding is achieved using
portsattribute. depends_onattribute allows to express dependency between services. In this case, MySQL will be started before WildFly. Application-level health check are still user’s responsibility.
Start application
All services in the application can be started, in detached mode, by giving the command:
docker-compose up -d
An alternate Compose file name can be specified using -f option.
An alternate directory where the compose file exists can be specified using -p option.
This shows the output as:
docker-compose up -d
Creating network "javaee_default" with the default driver
Creating db ...
Creating db ... done
Creating javaee_web_1 ...
Creating javaee_web_1 ... done
The output may differ slightly if the images are downloaded as well.
Started services can be verified using the command docker-compose ps:
Name Command State Ports
------------------------------------------------------------------------------------------------------
db docker-entrypoint.sh mysqld Up 0.0.0.0:3306->3306/tcp
javaee_web_1 /bin/sh -c java -jar /opt/ ... Up 0.0.0.0:8080->8080/tcp, 0.0.0.0:9990->9990/tcp
This provides a consolidated view of all the services, and containers within each of them.
Alternatively, the containers in this application, and any additional containers running on this Docker host can be verified by using the usual docker container ls command:
Name Command State Ports
------------------------------------------------------------------------------------------------------
db docker-entrypoint.sh mysqld Up 0.0.0.0:3306->3306/tcp
javaee_web_1 /bin/sh -c java -jar /opt/ ... Up 0.0.0.0:8080->8080/tcp, 0.0.0.0:9990->9990/tcp
javaee $ docker container ls
CONTAINER ID IMAGE COMMAND CREATED STATUS PORTS NAMES
e862a5eb9484 arungupta/docker-javaee:dockerconeu17 "/bin/sh -c 'java ..." 38 seconds ago Up 36 seconds 0.0.0.0:8080->8080/tcp, 0.0.0.0:9990->9990/tcp javaee_web_1
08792c20c066 mysql:8 "docker-entrypoint..." 39 seconds ago Up 37 seconds 0.0.0.0:3306->3306/tcp db
Service logs can be seen using docker-compose logs command, and looks like:
Attaching to dockerjavaee_web_1, db
web_1 | 23:54:21,584 INFO [org.jboss.msc] (main) JBoss MSC version 1.2.6.Final
web_1 | 23:54:21,688 INFO [org.jboss.as] (MSC service thread 1-8) WFLYSRV0049: WildFly Core 2.0.10.Final "Kenny" starting
web_1 | 2017-10-06 23:54:22,687 INFO [org.wildfly.extension.io] (ServerService Thread Pool -- 20) WFLYIO001: Worker 'default' has auto-configured to 8 core threads with 64 task threads based on your 4 available processors
. . .
web_1 | 2017-10-06 23:54:23,259 INFO [org.jboss.as.connector.subsystems.datasources] (MSC service thread 1-3) WFLYJCA0001: Bound data source [java:jboss/datasources/ExampleDS]
web_1 | 2017-10-06 23:54:24,962 INFO [org.jboss.as] (Controller Boot Thread) WFLYSRV0025: WildFly Core 2.0.10.Final "Kenny" started in 3406ms - Started 112 of 124 services (21 services are lazy, passive or on-demand)
web_1 | 2017-10-06 23:54:25,020 INFO [org.wildfly.extension.undertow] (MSC service thread 1-4) WFLYUT0006: Undertow HTTP listener default listening on 0.0.0.0:8080
web_1 | 2017-10-06 23:54:26,146 INFO [org.wildfly.swarm.runtime.deployer] (main) deploying docker-javaee.war
web_1 | 2017-10-06 23:54:26,169 INFO [org.jboss.as.server.deployment] (MSC service thread 1-3) WFLYSRV0027: Starting deployment of "docker-javaee.war" (runtime-name: "docker-javaee.war")
web_1 | 2017-10-06 23:54:27,748 INFO [org.jboss.as.jpa] (MSC service thread 1-2) WFLYJPA0002: Read persistence.xml for MyPU
web_1 | 2017-10-06 23:54:27,887 WARN [org.jboss.as.dependency.private] (MSC service thread 1-7) WFLYSRV0018: Deployment "deployment.docker-javaee.war" is using a private module ("org.jboss.jts:main") which may be changed or removed in future versions without notice.
. . .
web_1 | 2017-10-06 23:54:29,128 INFO [stdout] (ServerService Thread Pool -- 4) Hibernate: create table EMPLOYEE_SCHEMA (id integer not null, name varchar(40), primary key (id))
web_1 | 2017-10-06 23:54:29,132 INFO [stdout] (ServerService Thread Pool -- 4) Hibernate: INSERT INTO EMPLOYEE_SCHEMA(ID, NAME) VALUES (1, 'Penny')
web_1 | 2017-10-06 23:54:29,133 INFO [stdout] (ServerService Thread Pool -- 4) Hibernate: INSERT INTO EMPLOYEE_SCHEMA(ID, NAME) VALUES (2, 'Sheldon')
web_1 | 2017-10-06 23:54:29,133 INFO [stdout] (ServerService Thread Pool -- 4) Hibernate: INSERT INTO EMPLOYEE_SCHEMA(ID, NAME) VALUES (3, 'Amy')
web_1 | 2017-10-06 23:54:29,133 INFO [stdout] (ServerService Thread Pool -- 4) Hibernate: INSERT INTO EMPLOYEE_SCHEMA(ID, NAME) VALUES (4, 'Leonard')
. . .
web_1 | 2017-10-06 23:54:30,050 INFO [org.wildfly.extension.undertow] (ServerService Thread Pool -- 4) WFLYUT0021: Registered web context: /
web_1 | 2017-10-06 23:54:30,518 INFO [org.jboss.as.server] (main) WFLYSRV0010: Deployed "docker-javaee.war" (runtime-name : "docker-javaee.war")
web_1 | 2017-10-06 23:56:01,766 INFO [stdout] (default task-1) Hibernate: select employee0_.id as id1_0_, employee0_.name as name2_0_ from EMPLOYEE_SCHEMA employee0_
db | Initializing database
. . .
db |
db |
db | MySQL init process done. Ready for start up.
db |
. . .
db | 2017-10-06T23:54:29.434423Z 0 [Note] /usr/sbin/mysqld: ready for connections. Version: '8.0.3-rc-log' socket: '/var/run/mysqld/mysqld.sock' port: 3306 MySQL Community Server (GPL)
db | 2017-10-06T23:54:30.281973Z 0 [Note] InnoDB: Buffer pool(s) load completed at 171006 23:54:30
depends_on attribute in the Compose definition file ensures the container start up order. But application-level start up needs to be ensured by the applications running inside container. In our case, this can be achieved by WildFly Swarm using swarm.datasources.data-sources.KEY.stale-connection-checker-class-name as defined at https://reference.wildfly-swarm.io/fractions/datasources.html.
Verify application
Now that the WildFly Swarm and MySQL have been configured, let’s access the application. You need to specify IP address of the host where WildFly is running (localhost in our case).
The endpoint can be accessed in this case as:
curl -v http://localhost:8080/resources/employees
The output is shown as:
curl -v http://localhost:8080/resources/employees
* Trying ::1...
* TCP_NODELAY set
* Connected to localhost (::1) port 8080 (#0)
> GET /resources/employees HTTP/1.1
> Host: localhost:8080
> User-Agent: curl/7.51.0
> Accept: */*
>
< HTTP/1.1 200 OK
< Connection: keep-alive
< Content-Type: application/xml
< Content-Length: 478
< Date: Sat, 07 Oct 2017 00:05:41 GMT
<
* Curl_http_done: called premature == 0
* Connection #0 to host localhost left intact
<?xml version="1.0" encoding="UTF-8" standalone="yes"?><collection><employee><id>1</id><name>Penny</name></employee><employee><id>2</id><name>Sheldon</name></employee><employee><id>3</id><name>Amy</name></employee><employee><id>4</id><name>Leonard</name></employee><employee><id>5</id><name>Bernadette</name></employee><employee><id>6</id><name>Raj</name></employee><employee><id>7</id><name>Howard</name></employee><employee><id>8</id><name>Priya</name></employee></collection>
This shows the result from querying the database.
A single resource can be obtained:
curl -v http://localhost:8080/resources/employees/1
It shows the output:
curl -v http://localhost:8080/resources/employees/1
* Trying ::1...
* TCP_NODELAY set
* Connected to localhost (::1) port 8080 (#0)
> GET /resources/employees/1 HTTP/1.1
> Host: localhost:8080
> User-Agent: curl/7.51.0
> Accept: */*
>
< HTTP/1.1 200 OK
< Connection: keep-alive
< Content-Type: application/xml
< Content-Length: 104
< Date: Sat, 07 Oct 2017 00:06:33 GMT
<
* Curl_http_done: called premature == 0
* Connection #0 to host localhost left intact
<?xml version="1.0" encoding="UTF-8" standalone="yes"?><employee><id>1</id><name>Penny</name></employee>
Shutdown application
Shutdown the application using docker-compose down:
Stopping javaee_web_1 ... done
Stopping db ... done
Removing javaee_web_1 ... done
Removing db ... done
Removing network javaee_default
This stops the container in each service and removes all the services. It also deletes any networks that were created as part of this application.
8.6 - Deploy Application using Docker Swarm Mode
- Initialize Swarm
- Multi-container application
- Verify service and containers in application
- Access application
- Stop application
- Remove application completely
Deploy application using Swarm mode
Docker Engine includes swarm mode for natively managing a cluster of Docker Engines. The Docker CLI can be used to create a swarm, deploy application services to a swarm, and manage swarm behavior. Complete details are available at: https://docs.docker.com/engine/swarm/. It’s important to understand the https://docs.docker.com/engine/swarm/key-concepts/[Swarm mode key concepts] before starting with this chapter.
Swarm is typically a cluster of multiple Docker Engines. But for simplicity we’ll run a single node Swarm.
This section will deploy an application that will provide a CRUD/REST interface on a data bucket in https://www.mysql.com/[MySQL]. This is achieved by using a Java EE application deployed on http://wildfly.org[WildFly] to access the database.
Initialize Swarm
Initialize Swarm mode using the following command:
docker swarm init
This starts a Swarm Manager. By default, a manager node is also a worker but can be configured to be a manager-only.
Find some information about this one-node cluster using the command docker info
Containers: 0
Running: 0
Paused: 0
Stopped: 0
Images: 17
Server Version: 17.09.0-ce
Storage Driver: overlay2
Backing Filesystem: extfs
Supports d_type: true
Native Overlay Diff: true
Logging Driver: json-file
Cgroup Driver: cgroupfs
Plugins:
Volume: local
Network: bridge host ipvlan macvlan null overlay
Log: awslogs fluentd gcplogs gelf journald json-file logentries splunk syslog
Swarm: active
NodeID: p9a1tqcjh58ro9ucgtqxa2wgq
Is Manager: true
ClusterID: r3xdxly8zv82e4kg38krd0vog
Managers: 1
Nodes: 1
Orchestration:
Task History Retention Limit: 5
Raft:
Snapshot Interval: 10000
Number of Old Snapshots to Retain: 0
Heartbeat Tick: 1
Election Tick: 3
Dispatcher:
Heartbeat Period: 5 seconds
CA Configuration:
Expiry Duration: 3 months
Force Rotate: 0
Autolock Managers: false
Root Rotation In Progress: false
Node Address: 192.168.65.2
Manager Addresses:
192.168.65.2:2377
Runtimes: runc
Default Runtime: runc
Init Binary: docker-init
containerd version: 06b9cb35161009dcb7123345749fef02f7cea8e0
runc version: 3f2f8b84a77f73d38244dd690525642a72156c64
init version: 949e6fa
Security Options:
seccomp
Profile: default
Kernel Version: 4.9.49-moby
Operating System: Alpine Linux v3.5
OSType: linux
Architecture: x86_64
CPUs: 4
Total Memory: 1.952GiB
Name: moby
ID: TJSZ:O44Y:PWGZ:ZWZM:SA73:2UHI:VVKV:KLAH:5NPO:AXQZ:XWZD:6IRJ
Docker Root Dir: /var/lib/docker
Debug Mode (client): false
Debug Mode (server): true
File Descriptors: 35
Goroutines: 142
System Time: 2017-10-05T20:57:14.037442426Z
EventsListeners: 1
Registry: https://index.docker.io/v1/
Experimental: true
Insecure Registries:
127.0.0.0/8
Live Restore Enabled: false
This cluster has 1 node, and that is a manager. By default, the manager node is also a worker node. This means the containers can run on this node.
Multi-container application
This section describes how to deploy a multi-container application using Docker Compose to Swarm mode use Docker CLI.
Create a new directory and cd to it:
mkdir webapp
cd webapp
Create a new Compose definition docker-compose.yml using this link:ch05-compose.adoc#configuration-file[ configuration file].
This application can be started as:
docker stack deploy --compose-file=docker-compose.yml webapp
This shows the output as:
Ignoring deprecated options:
container_name: Setting the container name is not supported.
Creating network webapp_default
Creating service webapp_db
Creating service webapp_web
WildFly Swarm and MySQL services are started on this node. Each service has a single container. If the Swarm mode is enabled on multiple nodes then the containers will be distributed across them.
A new overlay network is created. This can be verified using the command docker network ls. This network allows multiple containers on different hosts to communicate with each other.
Verify service and containers in application
Verify that the WildFly and MySQL services are running using docker service ls:
ID NAME MODE REPLICAS IMAGE PORTS
j21lwelj529f webapp_db replicated 1/1 mysql:8 *:3306->3306/tcp
m0m44axt35cg webapp_web replicated 1/1 arungupta/docker-javaee:dockerconeu17 *:8080->8080/tcp,*:9990->9990/tcp
More details about the service can be obtained using docker service inspect webapp_web:
[
{
"ID": "m0m44axt35cgjetcjwzls7u9r",
"Version": {
"Index": 22
},
"CreatedAt": "2017-10-07T00:17:44.038961419Z",
"UpdatedAt": "2017-10-07T00:17:44.040746062Z",
"Spec": {
"Name": "webapp_web",
"Labels": {
"com.docker.stack.image": "arungupta/docker-javaee:dockerconeu17",
"com.docker.stack.namespace": "webapp"
},
"TaskTemplate": {
"ContainerSpec": {
"Image": "arungupta/docker-javaee:dockerconeu17@sha256:6a403c35d2ab4442f029849207068eadd8180c67e2166478bc3294adbf578251",
"Labels": {
"com.docker.stack.namespace": "webapp"
},
"Privileges": {
"CredentialSpec": null,
"SELinuxContext": null
},
"StopGracePeriod": 10000000000,
"DNSConfig": {}
},
"Resources": {},
"RestartPolicy": {
"Condition": "any",
"Delay": 5000000000,
"MaxAttempts": 0
},
"Placement": {
"Platforms": [
{
"Architecture": "amd64",
"OS": "linux"
}
]
},
"Networks": [
{
"Target": "bwnp1nvkkga68dirhp1ue7qey",
"Aliases": [
"web"
]
}
],
"ForceUpdate": 0,
"Runtime": "container"
},
"Mode": {
"Replicated": {
"Replicas": 1
}
},
"UpdateConfig": {
"Parallelism": 1,
"FailureAction": "pause",
"Monitor": 5000000000,
"MaxFailureRatio": 0,
"Order": "stop-first"
},
"RollbackConfig": {
"Parallelism": 1,
"FailureAction": "pause",
"Monitor": 5000000000,
"MaxFailureRatio": 0,
"Order": "stop-first"
},
"EndpointSpec": {
"Mode": "vip",
"Ports": [
{
"Protocol": "tcp",
"TargetPort": 8080,
"PublishedPort": 8080,
"PublishMode": "ingress"
},
{
"Protocol": "tcp",
"TargetPort": 9990,
"PublishedPort": 9990,
"PublishMode": "ingress"
}
]
}
},
"Endpoint": {
"Spec": {
"Mode": "vip",
"Ports": [
{
"Protocol": "tcp",
"TargetPort": 8080,
"PublishedPort": 8080,
"PublishMode": "ingress"
},
{
"Protocol": "tcp",
"TargetPort": 9990,
"PublishedPort": 9990,
"PublishMode": "ingress"
}
]
},
"Ports": [
{
"Protocol": "tcp",
"TargetPort": 8080,
"PublishedPort": 8080,
"PublishMode": "ingress"
},
{
"Protocol": "tcp",
"TargetPort": 9990,
"PublishedPort": 9990,
"PublishMode": "ingress"
}
],
"VirtualIPs": [
{
"NetworkID": "vysfza7wgjepdlutuwuigbws1",
"Addr": "10.255.0.5/16"
},
{
"NetworkID": "bwnp1nvkkga68dirhp1ue7qey",
"Addr": "10.0.0.4/24"
}
]
}
}
]
Logs for the service can be seen using docker service logs -f webapp_web:
webapp_web.1.lf3y5k7pkpt9@moby | 00:17:47,296 INFO [org.jboss.msc] (main) JBoss MSC version 1.2.6.Final
webapp_web.1.lf3y5k7pkpt9@moby | 00:17:47,404 INFO [org.jboss.as] (MSC service thread 1-8) WFLYSRV0049: WildFly Core 2.0.10.Final "Kenny" starting
webapp_web.1.lf3y5k7pkpt9@moby | 2017-10-07 00:17:48,636 INFO [org.wildfly.extension.io] (ServerService Thread Pool -- 20) WFLYIO001: Worker 'default' has auto-configured to 8 core threads with 64 task threads based on your 4 available processors
. . .
webapp_web.1.lf3y5k7pkpt9@moby | 2017-10-07 00:17:56,619 INFO [org.jboss.resteasy.resteasy_jaxrs.i18n] (ServerService Thread Pool -- 12) RESTEASY002225: Deploying javax.ws.rs.core.Application: class org.javaee.samples.employees.MyApplication
webapp_web.1.lf3y5k7pkpt9@moby | 2017-10-07 00:17:56,621 WARN [org.jboss.as.weld] (ServerService Thread Pool -- 12) WFLYWELD0052: Using deployment classloader to load proxy classes for module com.fasterxml.jackson.jaxrs.jackson-jaxrs-json-provider:main. Package-private access will not work. To fix this the module should declare dependencies on [org.jboss.weld.core, org.jboss.weld.spi]
webapp_web.1.lf3y5k7pkpt9@moby | 2017-10-07 00:17:56,682 INFO [org.wildfly.extension.undertow] (ServerService Thread Pool -- 12) WFLYUT0021: Registered web context: /
webapp_web.1.lf3y5k7pkpt9@moby | 2017-10-07 00:17:57,094 INFO [org.jboss.as.server] (main) WFLYSRV0010: Deployed "docker-javaee.war" (runtime-name : "docker-javaee.war")
Make sure to wait for the last log statement to show.
Access application
Now that the WildFly and MySQL servers have been configured, let’s access the application. You need to specify IP address of the host where WildFly is running (localhost in our case).
The endpoint can be accessed in this case as:
curl -v http://localhost:8080/resources/employees
The output is shown as:
* Trying ::1...
* TCP_NODELAY set
* Connected to localhost (::1) port 8080 (#0)
> GET /resources/employees HTTP/1.1
> Host: localhost:8080
> User-Agent: curl/7.51.0
> Accept: */*
>
< HTTP/1.1 200 OK
< Connection: keep-alive
< Content-Type: application/xml
< Content-Length: 478
< Date: Sat, 07 Oct 2017 00:22:59 GMT
<
* Curl_http_done: called premature == 0
* Connection #0 to host localhost left intact
<?xml version="1.0" encoding="UTF-8" standalone="yes"?><collection><employee><id>1</id><name>Penny</name></employee><employee><id>2</id><name>Sheldon</name></employee><employee><id>3</id><name>Amy</name></employee><employee><id>4</id><name>Leonard</name></employee><employee><id>5</id><name>Bernadette</name></employee><employee><id>6</id><name>Raj</name></employee><employee><id>7</id><name>Howard</name></employee><employee><id>8</id><name>Priya</name></employee></collection>
This shows all employees stored in the database.
Stop application
If you only want to stop the application temporarily while keeping any networks that were created as part of this application, the recommended way is to set the amount of service replicas to 0.
docker service scale webapp_db=0 webapp_web=0
It shows the output:
webapp_db scaled to 0
webapp_web scaled to 0
Since --detach=false was not specified, tasks will be scaled in the background.
In a future release, --detach=false will become the default.
This is especially useful if the stack contains volumes and you want to keep the data. It allows you to simply start the stack again with setting the replicas to a number higher than 0.
Remove application completely
Shutdown the application using docker stack rm webapp:
Removing service webapp_db
Removing service webapp_web
Removing network webapp_default
This stops the container in each service and removes the services. It also deletes any networks that were created as part of this application.
8.7 - Docker & Netbeans
Docker & Netbeans
Docker and NetBeans
This section shows you basic Docker tooling with NetBeans:
- Pull/Build Docker images
- Run/Start/Stop Docker containers
NOTE: NetBeans only supports configuring Docker Engine running using Docker Toolbox. This means that if you are running Docker for Mac or Docker for Windows then NetBeans cannot be used.
Configure Docker Host
In “Services” window, right-click on “Docker”, click on “Add Docker...”

Specify Docker Machine coordinates, click on “Test Connection” to validate the connection:

NOTE: No support for Docker for Mac/Windows, filed as https://netbeans.org/bugzilla/show_bug.cgi?id=262398[#262398].
Click on “Finish” to see:

Expand the connection to see “Images” and “Containers”.
Pull an Image
Right-click on Docker node and select “Pull...”.

Type the image name to narrow down the search from Docker Store:

Click on “Pull” to pull the image.
Log is updated in the Output window:

This image is now shown in Services tab

Any existing images on the Docker Host will be shown here as well.
Run a Container
Select an image, right-click on it, and click on “Run...”.

This brings up a dialog that allows the options that can be configured for running the container. Some of them are:
- Container name
- Override the command
- Keep STDIN open and allocate pseudo-TTY (
-iton CLI) - Publish ports on Docker host interface (
-Por-pindocker runcommand)

Click on “Next>” to see the options to configure exposed ports. Click on “Add” to explicitly map host port “8091” to container port “8091”.

Click on “Finish” to run the container. “Services” window is updated as:

Log is shown in the “Output” window:

Right-click on the container, select “Show Log” to show the log generated by the container. The container can be paused and stopped from here as well.
Build an Image
On the configured Docker Host, right-click and select “Build...” to build a new image:

Specify a directory where Dockerfile exists, give the image name:

Click on “Next>”, choose the options that matter:

Click on “Finish” to build the image. The image is shown in the “Services” window:

8.8 - Docker and IntelliJ
Docker and IntelliJ IDEA
This chapter will show you basic Docker tooling with IntelliJ IDEA:
- Pull Docker images
- Run, stop, delete a Container
- Build an Image
Install Docker Plugin in IDEA
Go to “Preferences”, “Plugins”, “Install JetBrains plugin...”, search on “docker” and click on “Install”

Restart IntelliJ IDEA to active plugin.
Click on “Create New Project”, select “Java”, “Web Application”

Click on “Next”, give the project a name “dockercon”, click on “Finish”. This will open up the project in IntelliJ window.
Go to “Preferences”, “Clouds”, add a new deployment by clicking on “+”. Click on “Import credentials from Docker Machine”, “Detect”, and see a successful connection. You may have to check the IP address of your Docker Machine. Find the IP address of your Docker Machine as docker-machine ip <machine-name> and specify the correct IP address here.

Go to “View”, “Tool Windows”, “Docker Tooling Window”. Click on “Connect”" to connect with Docker Machine. Make sure Docker Machine is running.
WARNING: IDEA does not work with “Docker for Mac” at this time. (ADD BUG #)

Pull an Image
Select top-level node with the name “Docker”, click on “Pull image”

Type an image name, such as arungupta/couchbase, and “OK”

Expand “Containers” and “Images” to see existing running containers and images.
The specified image is now downloaded and shown as well.
Run a Container
Select the downloaded image, click on “Create container”
Select “After launch” and enter the URL as http://192.168.99.100:8091. Make sure to match the IP address of your Docker Machine.

In “Container” tab, add “Port bindings” for 8091:8091

Click on “Run” to run the container.
This will bring up the browser window and display the page http://192.168.99.100:8091 and looks like:

This image uses http://developer.couchbase.com/documentation/server/current/rest-api/rest-endpoints-all.html[Couchbase REST API] to configure the Couchbase server.
Right-click on the running container, select “Inspect” to see more details about the container.

Click on “Stop container” to stop the container and “Delete container” to delete the container.
Build an Image
-
Refer to the instructions https://www.jetbrains.com/help/idea/2016.1/docker.html
-
Right-click on the project, create a new directory
docker-dir -
Artifact
- Click on top-right for “
Project Structure” - select “
Artifacts” - change “
Type:” to “Web Application: Archive” - change the name to
dockercon - change
Output directorytodocker-dir
- Click on top-right for “
-
Create “
Dockerfile” in this directory. Use the contents
FROM jboss/wildfly
ADD dockercon.war /opt/jboss/wildfly/standalone/deployments/
- “
Run”, “Edit Configurations”, add new “Docker Deployment”- “
Deployment” tab- Change the name to
dockercon - Select “
After launch”, change the URL to “http://192.168.99.100:18080/dockercon/index.jsp” - In “
Before launch”, add “Build Artifacts” and select the artifact
- Change the name to
- “
Container” tab - Add “
Port bindings” for “8080:18080”
- “
- View, Tool Windows, Docker, connect to it
- Run the project
8.9 - Docker & Eclipse
- Install Docker Tooling in Eclipse
- Docker Perspective and View
- Pull an Image
- Run a Container
- Build an Image
Docker and Eclipse
This chapter will show you basic Docker tooling with Eclipse:
- Pull/Push/Build Docker images
- Run/Start/Stop/Kill Docker containers
- Customize views
Install Docker Tooling in Eclipse
Downlaod Eclipse for Java Developer and Install.
Go to “Help” menu, “Install New Software...”.
Select Eclipse update site for the release, search for Docker, select “Docker Tooling”.

Click on “Next>”, “Next>”, accept the license agreement, click on “Finish” to start the installation.
Restart Eclipse for the installation to complete.
Docker Perspective and View
Go to “Window”, “Perspective”, “Open Perspective”, “Other...”, “Docker Tooling”.

Click on “OK” to see the perspective.

This has three views:
- Docker Explorer: a tree view listing all connected Docker instances, with image and containers.
- Docker Images: a table view listing containers for selected Docker connection.
- Docker Containers: a table view listing containers for selected Docker connection
Click on the text in Docker Explorer to create a new connection. If you are on Mac/Windows, you are likely using Docker for Mac/Windows or Docker Toolbox to setup Docker Host. Eclipse allows to configure Docker Engine using both Docker for Mac/Windows and Docker Toolbox.
If you are using Docker for Mac/Windows, then the default values are shown:

Click on “Test Connection” to test the connection.

If you are using Toolbox, enter the values as shown:

The exact value of TCP Connection can be found using docker-machine ls command. The path for authentication is the directory name where certificates for your Docker Machine, couchbase in this case, are stored.
Click on “Test Connection” to make sure the connection is successfully configured.

In either case, the configuration can be completed once the connection is tested. Click on “Finish” to complete the configuration.
Docker Explorer is updated to show the connection.
Containers and Images configured for the Docker Machine are shown in tabs. They can be expanded to see the list in Explorer itself.
Pull an Image
Expand the connection to see “Containers” and “Images”.
Right-click on “Images” and select “Pull...”.
Type the image name and click on “Finish”.

This image is now shown in Explorer and Docker Images tab.

Any existing images on the Docker Host will be shown here.
Run a Container
Select an image, right-click on it, and click on “Run...”. It shows the options that can be configured for running the container. Some of them are:
- Publish ports on Docker host interface (
-Por-pindocker runcommand) - Keep STDIN open and allocate pseudo-TTY (
-iton CLI) - Remove container after it exits (
--rmon CLI) - Volume mapping (
-von CLI) - Environment variables (
-eon CLI)
Uncheck “Publish all exposed ports” box to map to corresponding ports.

Click on “Finish” to run the container.
Right-click on the started container, select “Display Log” to show the log.

The container can be paused, stopped and killed from here as well.
To see more details about the container, right-click on the container, select “Show In”, “Properties”.

Build an Image
In Docker Images tab, click on the hammer icon on top right.
Give the image name, specify an empty directory, click on “Edit Dockerfile” to edit the contents of Dockerfile

Click on “Save” and “Finish” to create the image.
9 - GoLang
9.1 - Agenda
| Description | Timing |
|---|---|
| Welcome | 8:45 AM to 9:00 AM |
| Installing Go | 9:00 AM to 9:30 AM |
| Basics of Docker | 9:30 AM to 10:30 AM |
| Building and Running a Docker Container | 10:30 AM to 11:30 AM |
| Coffee/Tea Break | 11:30 AM to 11:45 AM |
| Dockerize your first Golang Application - Part 1 | 11:45 AM to 1:00 PM |
| Lunch | 1:00 PM to 2:00 PM |
| Dockerize your first Golang Application - Part 2 | 2:00 PM to 2:30 PM |
| Working with Go Modules and Docker | 2:30 PM to 3:30 PM |
| Coffee/Tea Break | 3:30 PM to 3:45 PM |
| Dockerize Multi-Container Go Application Using Docker Compose | 3:45 PM to 5:00 PM |
| Quiz/Prize/Certificate Distribution | 5:00 PM to 5:30 PM |
9.2 - Basics of Docker
Basics of Docker
This section introduces the basic terminology of Docker.
Docker is a platform for developers and sysadmins to build, ship, and run applications. Docker lets you quickly assemble applications from components and eliminates the friction that can come when shipping code. Docker lets you test and deploy your code into production as fast as possible.
Docker simplifies software delivery by making it easy to build and share images that contain your application’s entire environment, or application operating system.
What does it mean by an application operating system ?
Your application typically requires a specific version of operating system, application server, runtime, and database server. It may also require configuration files, and multiple other dependencies. The application may need binding to specific ports and certain amount of memory. The components and configuration together required to run your application is what is referred to as application operating system.
You can certainly provide an installation script that will download and install these components. Docker simplifies this process by allowing to create an image that contains your application and infrastructure together, managed as one component. These images are then used to create Docker containers which run on the container virtualization platform, provided by Docker.
Main Components of Docker System
Docker has three main components:
- Images are the build component of Docker and are the read-only templates defining an application operating system.
- Containers are the run component of Docker and created from images. Containers can be run, started, stopped, moved, and deleted.
- Images are stored, shared, and managed in a registry and are the distribution component of Docker.
- DockerHub is a publicly available registry and is available at http://hub.docker.com.
In order for these three components to work together, the Docker Daemon (or Docker Engine) runs on a host machine and does the heavy lifting of building, running, and distributing Docker containers. In addition, the Client is a Docker binary which accepts commands from the user and communicates back and forth with the Engine.
The Client communicates with the Engine that is either co-located on the same host or on a different host. Client uses the pull command to request the Engine to pull an image from the registry. The Engine then downloads the image from Docker Store, or whichever registry is configured. Multiple images can be downloaded from the registry and installed on the Engine. Client uses the run run the container.
Docker Image
We’ve already seen that Docker images are read-only templates from which Docker containers are launched. Each image consists of a series of layers. Docker makes use of union file systems to combine these layers into a single image. Union file systems allow files and directories of separate file systems, known as branches, to be transparently overlaid, forming a single coherent file system.
One of the reasons Docker is so lightweight is because of these layers. When you change a Docker image—for example, update an application to a new version— a new layer gets built. Thus, rather than replacing the whole image or entirely rebuilding, as you may do with a virtual machine, only that layer is added or updated. Now you don’t need to distribute a whole new image, just the update, making distributing Docker images faster and simpler.
Every image starts from a base image, for example ubuntu, a base Ubuntu image, or fedora, a base Fedora image. You can also use images of your own as the basis for a new image, for example if you have a base Apache image you could use this as the base of all your web application images.
NOTE: By default, Docker obtains these base images from Docker Store.
Docker images are then built from these base images using a simple, descriptive set of steps we call instructions. Each instruction creates a new layer in our image. Instructions include actions like:
- Run a command
- Add a file or directory
- Create an environment variable
- Run a process when launching a container
These instructions are stored in a file called a Dockerfile. Docker reads this Dockerfile when you request a build of an image, executes the instructions, and returns a final image.
Docker Container
A container consists of an operating system, user-added files, and meta-data. As we’ve seen, each container is built from an image. That image tells Docker what the container holds, what process to run when the container is launched, and a variety of other configuration data. The Docker image is read-only. When Docker runs a container from an image, it adds a read-write layer on top of the image (using a union file system as we saw earlier) in which your application can then run.
Docker Engine
Docker Host is created as part of installing Docker on your machine. Once your Docker host has been created, it then allows you to manage images and containers. For example, the image can be downloaded and containers can be started, stopped and restarted.
Docker Client
The client communicates with the Docker Host and let’s you work with images and containers.
Check if your client is working using the following command:
docker -v
It shows the output:
Docker version 20.10.2, build 2291f61
NOTE: The exact version may differ based upon how recently the installation was performed.
The exact version of Client and Server can be seen using docker version command. This shows the output as:
docker version
Client: Docker Engine - Community
Cloud integration: 1.0.7
Version: 20.10.2
API version: 1.41
Go version: go1.13.15
Git commit: 2291f61
Built: Mon Dec 28 16:12:42 2020
OS/Arch: darwin/amd64
Context: default
Experimental: true
Server: Docker Engine - Community
Engine:
Version: 20.10.2
API version: 1.41 (minimum version 1.12)
Go version: go1.13.15
Git commit: 8891c58
Built: Mon Dec 28 16:15:28 2020
OS/Arch: linux/amd64
Experimental: true
containerd:
Version: 1.4.3
GitCommit: 269548fa27e0089a8b8278fc4fc781d7f65a939b
runc:
Version: 1.0.0-rc92
GitCommit: ff819c7e9184c13b7c2607fe6c30ae19403a7aff
docker-init:
Version: 0.19.0
GitCommit: de40ad0
ajeetraina@Ajeets-MacBook-Pro realtime-sensor-jetson %
The complete set of commands can be seen using docker --help.
Test Your Knowledge
| S. No. | Question. | Response |
|---|---|---|
| 1 | What is difference between Docker Image and Docker Container? | |
| 2 | Where are all Docker images stored? | |
| 3 | Is DockerHub a public or private Docker registry? | |
| 4 | What is the main role of Docker Engine? |
9.3 - Building and Running a Docker Container
Build a Docker Image
This section explains how to create a Docker image.
Dockerfile
Docker build images by reading instructions from a Dockerfile. A Dockerfile is a text document that contains all the commands a user could call on the command line to assemble an image. docker image build command uses this file and executes all the commands in succession to create an image.
build command is also passed a context that is used during image creation. This context can be a path on your local filesystem or a URL to a Git repository.
Dockerfile is usually called Dockerfile. The complete list of commands that can be specified in this file are explained at https://docs.docker.com/reference/builder/. The common commands are listed below:
Common commands for Dockerfile
| Command | Purpose | Example |
|---|---|---|
| FROM | First non-comment instruction in Dockerfile | FROM ubuntu |
| COPY | Copies mulitple source files from the context to the file system of the container at the specified path | COPY .bash_profile /home |
| ENV | Sets the environment variable | ENV HOSTNAME=test |
| RUN | Executes a command | RUN apt-get update |
| CMD | Defaults for an executing container | CMD ["/bin/echo", "hello world"] |
| EXPOSE | Informs the network ports that the container will listen on | EXPOSE 8093 |
| ================== |
Create your first image
Create a new directory hellodocker.
In that directory, create a new text file Dockerfile. Use the following contents:
FROM ubuntu:latest
CMD ["/bin/echo", "hello world"]
This image uses ubuntu as the base image. CMD command defines the command that needs to run. It provides a different entry point of /bin/echo and an argument “hello world”.
Build the image
docker image build . -t helloworld
. in this command is the context for the command docker image build. -t adds a tag to the image.
The following output is shown:
Sending build context to Docker daemon 2.048kB
Step 1/2 : FROM ubuntu:latest
latest: Pulling from library/ubuntu
9fb6c798fa41: Pull complete
3b61febd4aef: Pull complete
9d99b9777eb0: Pull complete
d010c8cf75d7: Pull complete
7fac07fb303e: Pull complete
Digest: sha256:31371c117d65387be2640b8254464102c36c4e23d2abe1f6f4667e47716483f1
Status: Downloaded newer image for ubuntu:latest
---> 2d696327ab2e
Step 2/2 : CMD /bin/echo hello world
---> Running in 9356a508590c
---> e61f88f3a0f7
Removing intermediate container 9356a508590c
Successfully built e61f88f3a0f7
Successfully tagged helloworld:latest
List the images
You can list the images available using docker image ls:
REPOSITORY TAG IMAGE ID CREATED SIZE
helloworld latest e61f88f3a0f7 3 minutes ago 122MB
ubuntu latest 2d696327ab2e 4 days ago 122MB
Other images may be shown as well but we are interested in these two images for now.
Run the container using the command:
docker container run helloworld
to see the output:
hello world
If you do not see the expected output, check your Dockerfile that the content exactly matches as shown above. Build the image again and now run it.
Change the base image from ubuntu to busybox in Dockerfile. Build the image again:
docker image build -t helloworld:2 .
and view the images using docker image ls command:
REPOSITORY TAG IMAGE ID CREATED SIZE
helloworld 2 7fbedda27c66 3 seconds ago 1.13MB
helloworld latest e61f88f3a0f7 5 minutes ago 122MB
ubuntu latest 2d696327ab2e 4 days ago 122MB
busybox latest 54511612f1c4 9 days ago 1.13MB
helloworld:2 is the format that allows to specify the image name and assign a tag/version to it separated by :.
Example Go Application
Create a main.go file with the following content:
Now that we have our server, let’s set about writing our Dockerfile and construct a container in which our Go application will live.
Create Dockerfile with following content:
Now that we have defined everything we need for our Go application to run in our Dockerfile we can now build an image using this file. In order to do that, we’ll need to run the following command:
$ docker build -t my-go-app .
Sending build context to Docker daemon 5.12kB
Step 1/6 : FROM golang:1.12.0-alpine3.9
---> d4953956cf1e
Step 2/6 : RUN mkdir /app
---> Using cache
---> be346f9ff24f
Step 3/6 : ADD . /app
---> eb420da7413c
Step 4/6 : WORKDIR /app
---> Running in d623a88e4a00
Removing intermediate container d623a88e4a00
---> ffc439c5bec5
Step 5/6 : RUN go build -o main .
---> Running in 15805f4f7685
Removing intermediate container 15805f4f7685
---> 31828faf8ae4
Step 6/6 : CMD ["/app/main"]
---> Running in 9d54463b7e84
Removing intermediate container 9d54463b7e84
---> 3f9244a1a240
Successfully built 3f9244a1a240
Successfully tagged my-go-app:latest
We can now verify that our image exists on our machine by using docker images command:
$ docker images
REPOSITORY TAG IMAGE ID CREATED SIZE
my-go-app latest 3f9244a1a240 2 minutes ago 355MB$ docker images
In order to run this newly created image, we can use the docker run command and pass in the ports we want to map to and the image we wish to run.
$ docker run -p 8080:8081 -it my-go-app
-p 8080:8081- This exposes our application which is running on port 8081 within our container on http://localhost:8080 on our local machine.-it- This flag specifies that we want to run this image in interactive mode with a tty for this container process.my-go-app- This is the name of the image that we want to run in a container.
Awesome! Now if you go to http://localhost:8080 in your browser, you should see that the application is responds with Hello, "/".
Run Container in Background
You’ll notice that if we ctrl-c this within the terminal, it will kill the container. If we want to have it run permanently in the background, you can replace -it with -d to run this container in detached mode.
In order to view the list of containers running in the background you can use docker ps which should output something like this:
$ docker ps
CONTAINER ID IMAGE COMMAND CREATED STATUS PORTS NAMES
70fcc9195865 my-go-app "/app/main" 5 seconds ago Up 3 seconds 0.0.0.0:8080->8081/tcp silly_swirles
Go Modules
Let’s look at a more complex example which features imported modules. In this instance, we will need to add a step within our Dockerfile which does the job of downloading our dependencies prior to the go build command executing:
9.4 - Dockerize Your First Go Application
Create the main.go file with the following content:
Now that we have our server, let’s set about writing our Dockerfile and constructing the container in which our newly born Go application will live.
create dockerfile with following content:
Now that we have defined everything we need for our Go application to run in our Dockerfile we can now build an image using this file. In order to do that, we’ll need to run the following command:
$ docker build -t my-go-app .
Sending build context to Docker daemon 5.12kB
Step 1/6 : FROM golang:1.12.0-alpine3.9
---> d4953956cf1e
Step 2/6 : RUN mkdir /app
---> Using cache
---> be346f9ff24f
Step 3/6 : ADD . /app
---> eb420da7413c
Step 4/6 : WORKDIR /app
---> Running in d623a88e4a00
Removing intermediate container d623a88e4a00
---> ffc439c5bec5
Step 5/6 : RUN go build -o main .
---> Running in 15805f4f7685
Removing intermediate container 15805f4f7685
---> 31828faf8ae4
Step 6/6 : CMD ["/app/main"]
---> Running in 9d54463b7e84
Removing intermediate container 9d54463b7e84
---> 3f9244a1a240
Successfully built 3f9244a1a240
Successfully tagged my-go-app:latest
We can now verify that our image exists on our machine by typing docker images:
$ docker images
REPOSITORY TAG IMAGE ID CREATED SIZE
my-go-app latest 3f9244a1a240 2 minutes ago 355MB$ docker images
In order to run this newly created image, we can use the docker run command and pass in the ports we want to map to and the image we wish to run.
$ docker run -p 8080:8081 -it my-go-app
-p 8080:8081- This exposes our application which is running on port 8081 within our container on http://localhost:8080 on our local machine.-it- This flag specifies that we want to run this image in interactive mode with a tty for this container process.my-go-app- This is the name of the image that we want to run in a container.
Awesome, if we open up http://localhost:8080 within our browser, we should see that our application is successfully responding with Hello, "/".
Running our Container In the Background
You’ll notice that if we ctrl-c this within the terminal, it will kill the container. If we want to have it run permanently in the background, you can replace -it with -d to run this container in detached mode.
In order to view the list of containers running in the background you can use docker ps which should output something like this:
$ docker ps
CONTAINER ID IMAGE COMMAND CREATED STATUS PORTS NAMES
70fcc9195865 my-go-app "/app/main" 5 seconds ago Up 3 seconds 0.0.0.0:8080->8081/tcp silly_swirles
9.5 - Working with Go Modules and Docker
Let’s look at a more complex example which features imported modules. In this instance, we will need to add a step within our Dockerfile which does the job of downloading our dependencies prior to the go build command executing:
Goapp - Building Images Faster and Better With Multi-Stage Builds
Docker provides a set of standard practices to follow in order to keep your image size small - also covers multi-stage builds in brief.
Let’s start without using multi-stage builds.
Dockerfile
FROM golang
ADD . /app
WORKDIR /app
RUN go build # This will create a binary file named app
ENTRYPOINT /app/app
Build and run the image
docker build -t goapp .
~/g/helloworld ❯❯❯ docker run -it --rm goapp
Hello World!!
Now let us check the image size
❯❯❯ docker images | grep goapp
goapp latest b4221e45dfa0 18 seconds ago 805MB
New Dockerfile
Re-build and run the image
❯❯❯ docker run -it --rm goapp
Hello World!!
Let us check the image again
❯❯❯ docker images | grep goapp
goapp latest 100f92d756da 8 seconds ago 8.15MB
What’s happening here?
We are building the image in two stages. First, we are using a Golang base image, copying our code inside it and building our executable file App. Now in the next stage, we are using a new Alpine base image and copying the binary which we built earlier to our new stage. Important point to note here is that the image built at each stage is entirely independent.
- Stage 0
# Build executable stage
FROM golang
ADD . /app
WORKDIR /app
RUN go build
ENTRYPOINT /app/app
- Stage 1
# Build final image
FROM alpine:latest
RUN apk --no-cache add ca-certificates
WORKDIR /root/
COPY --from=0 /app/app .
CMD ["./app”]
Note the line COPY —from=0 /app/app -> this lets you access data from inside the image built in previous image.
9.6 - Dockerize Multi-Container Go App Using Compose
The app fetches the quote of the day from a public API hosted at http://quotes.rest then it caches the result in Redis. For subsequent API calls, the app will return the result from Redis cache instead of fetching it from the public API
create following file structure :
go-docker-compose
↳ model
↳ quote.go
↳ app.go
Run Go application
git clone https://github.com/docker-community-leaders/dockercommunity/
cd /content/en/examples/Golang/go-docker-compose
go mod init https://github.com/docker-community-leaders/dockercommunity/content/en/examples/Golang/go-docker-compose
go build
Run binaries
$ ./go-docker-compose
2019/02/02 17:19:35 Starting Server
$ curl http://localhost:8080/qod
The free soul is rare, but you know it when you see it - basically because you feel good, very good, when you are near or with them.
Dockerize above go application
application;s services via Docker Compose
Our application consists of two services -
- App service that contains the API to display the “quote of the day”.
- Redis which is used by the app to cache the “quote of the day”.
Let’s define both the services in a docker-compose.yml file
Running the application with docker compose
$ docker-compose up
Starting go-docker-compose_redis_1 ... done
Starting go-docker-compose_app_1 ... done
Attaching to go-docker-compose_redis_1, go-docker-compose_app_1
redis_1 | 1:C 02 Feb 2019 12:32:45.791 # oO0OoO0OoO0Oo Redis is starting oO0OoO0OoO0Oo
redis_1 | 1:C 02 Feb 2019 12:32:45.791 # Redis version=5.0.3, bits=64, commit=00000000, modified=0, pid=1, just started
redis_1 | 1:C 02 Feb 2019 12:32:45.791 # Warning: no config file specified, using the default config. In order to specify a config file use redis-server /path/to/redis.conf
redis_1 | 1:M 02 Feb 2019 12:32:45.792 * Running mode=standalone, port=6379.
redis_1 | 1:M 02 Feb 2019 12:32:45.792 # WARNING: The TCP backlog setting of 511 cannot be enforced because /proc/sys/net/core/somaxconn is set to the lower value of 128.
redis_1 | 1:M 02 Feb 2019 12:32:45.792 # Server initialized
redis_1 | 1:M 02 Feb 2019 12:32:45.792 # WARNING you have Transparent Huge Pages (THP) support enabled in your kernel. This will create latency and memory usage issues with Redis. To fix this issue run the command 'echo never > /sys/kernel/mm/transparent_hugepage/enabled' as root, and add it to your /etc/rc.local in order to retain the setting after a reboot. Redis must be restarted after THP is disabled.
redis_1 | 1:M 02 Feb 2019 12:32:45.793 * DB loaded from disk: 0.000 seconds
redis_1 | 1:M 02 Feb 2019 12:32:45.793 * Ready to accept connections
app_1 | 2019/02/02 12:32:46 Starting Server
The docker-compose up command starts all the services defined in the docker-compose.yml file.
You can interact with the Go service using curl -
$ curl http://localhost:8080/qod
A show of confidence raises the bar
Stopping all the services with docker compose
$ docker-compose down