This the multi-page printable view of this section. Click here to print.
Docker for Beginners
- 1: Agenda
- 2: Pre-requisite
- 3: Getting Started with Docker Image
- 4: Accessing & Managing Docker Image
- 5: Getting Started with Dockerfile
- 6: Creating Private Docker Registry
- 7: Docker Volumes
- 8: Docker Networks
1 - Agenda
| Description | Timing |
|---|---|
| Welcome | 8:45 AM to 9:00 AM |
| Creating a DockerHub Account | 9:00 AM to 9:15 AM |
| Getting Started with Docker Image | 9:15 AM to 10:15 AM |
| Accessing & Managing Docker Container | 10:15 AM to 11:15 AM |
| Coffee/Tea Break | 11:15 AM to 11:30 AM |
| Getting Started with Dockerfile - Part 1 | 11:30 AM to 1:00 PM |
| Lunch | 1:00 PM to 2:00 PM |
| Getting Started with Dockerfile - Part 2 | 2:00 PM to 3:30 PM |
| Creating Private Docker Registry | 3:30 PM to 4:00 PM |
| Docker Volumes | 4:00 PM to 4:30 PM |
| Coffee/Tea Break | 4:00 PM to 4:30 PM |
| Docker Networking | 4:45 PM to 5:45 PM |
| Quiz/Prize/Certificate Distribution | 5:45 PM to 6:00 PM |
2 - Pre-requisite
- Creating Your DockerHub Account - 15 min
Creating a DockerHub Account
Open https://hub.docker.com and click on “Sign Up” for DockerHub

Enter your username as DockerID and provide your email address( I would suggest you to provide your Gmail ID)

Example:
I have added ajeetraina as my userID as shown below. Please note that we will require this userID at the later point of time during the workshop. Hence, do keep it handy.

That’s it. Head over to your Email account to validate this account.

3 - Getting Started with Docker Image
- Running Hello World Example
- Working with Docker Image
- Saving Images and Containers as Tar Files for Sharing
- Building Your First Alpine Docker Image and Push it to DockerHub
- Test Your Knowledge
Getting Started with Docker Image
Demonstrating Hello World Example
Tested Infrastructure
| Platform | Number of Instance | Reading Time |
|---|---|---|
| Play with Docker | 1 | 5 min |
Pre-requisite
- Create an account with DockerHub
- Open PWD Platform on your browser
- Click on Add New Instance on the left side of the screen to bring up Alpine OS instance on the right side
Running Hello World Example
$ docker run hello-world
Unable to find image 'hello-world:latest' locally
latest: Pulling from library/hello-world
0e03bdcc26d7: Pull complete
Digest: sha256:31b9c7d48790f0d8c50ab433d9c3b7e17666d6993084c002c2ff1ca09b96391d
Status: Downloaded newer image for hello-world:latest

Hello from Docker!
This message shows that your installation appears to be working correctly.

To generate this message, Docker took the following steps:
 1. The Docker client contacted the Docker daemon.
 2. The Docker daemon pulled the "hello-world" image from the Docker Hub.
    (amd64)
 3. The Docker daemon created a new container from that image which runs the
    executable that produces the output you are currently reading.
 4. The Docker daemon streamed that output to the Docker client, which sent it
    to your terminal.

To try something more ambitious, you can run an Ubuntu container with:
 $ docker run -it ubuntu bash

Share images, automate workflows, and more with a free Docker ID:
 https://hub.docker.com/

For more examples and ideas, visit:
 https://docs.docker.com/get-started/
Explanation
This image is a prime example of using the scratch image effectively. See hello.c in https://github.com/docker-library/hello-world for the source code of the hello binary included in this image.
So what’s happened here? We’ve called the docker run command, which is responsible for launching containers.
The argument hello-world is the name of the image someone created on dockerhub for us. It will first search for “hello-world” image locally and then search in Dockerhub.
Once the image has been downloaded, Docker turns the image into a running container and executes it.
Did you Know?
- The Hello World Docker Image is only 1.84 KB size.
[node1] (local) root@192.168.0.18 ~
$ docker images
REPOSITORY          TAG                 IMAGE ID            CREATED             SIZE
hello-world         latest              4ab4c602aa5e        6 weeks ago         1.84kB
- While running
docker pscommand, it doesn’t display any running container. Reason - It gets executed once and exit immediately.
$ docker ps
CONTAINER ID        IMAGE               COMMAND             CREATED             STATUS
      PORTS               NAMES
- You can use
docker inspect <imagename>command to inspect about this particular Docker Image.
$ docker inspect 4ab
[
    {
        "Id": "sha256:4ab4c602aa5eed5528a6620ff18a1dc4faef0e1ab3a5eddeddb410714478c67f",
        "RepoTags": [
            "hello-world:latest"
        ],
        "RepoDigests": [
            "hello-world@sha256:0add3ace90ecb4adbf7777e9aacf18357296e799f81cabc9fde470971e499788"
        ],
        "Parent": "",
        "Comment": "",
        "Created": "2018-09-07T19:25:39.809797627Z",
        "Container": "15c5544a385127276a51553acb81ed24a9429f9f61d6844db1fa34f46348e420",
        "ContainerConfig": {
            "Hostname": "15c5544a3851",
            "Domainname": "",
            "User": "",
            "AttachStdin": false,
            "AttachStdout": false,
            "AttachStderr": false,
            "Tty": false,
            "OpenStdin": false,
            "StdinOnce": false,
            "Env": [
                "PATH=/usr/local/sbin:/usr/local/bin:/usr/sbin:/usr/bin:/sbin:/bin"
            ],
            "Cmd": [
                "/bin/sh",
                "-c",
                "#(nop) ",
                "CMD [\"/hello\"]"
            ],
            "ArgsEscaped": true,
            "Image": "sha256:9a5813f1116c2426ead0a44bbec252bfc5c3d445402cc1442ce9194fc1397027",
            "Volumes": null,
            "WorkingDir": "",
            "Entrypoint": null,
            "OnBuild": null,
            "Labels": {}
        },
        "DockerVersion": "17.06.2-ce",
        "Author": "",
        "Config": {
            "Hostname": "",
            "Domainname": "",
            "User": "",
            "AttachStdin": false,
            "AttachStdout": false,
            "AttachStderr": false,
            "Tty": false,
            "OpenStdin": false,
            "StdinOnce": false,
            "Env": [
                "PATH=/usr/local/sbin:/usr/local/bin:/usr/sbin:/usr/bin:/sbin:/bin"
            ],
            "Cmd": [
                "/hello"
            ],
            "ArgsEscaped": true,
            "Image": "sha256:9a5813f1116c2426ead0a44bbec252bfc5c3d445402cc1442ce9194fc1397027",
            "Volumes": null,
            "WorkingDir": "",
            "Entrypoint": null,
            "OnBuild": null,
            "Labels": null
        },
        "Architecture": "amd64",
        "Os": "linux",
        "Size": 1840,
        "VirtualSize": 1840,
        "GraphDriver": {
            "Data": {
                "MergedDir": "/var/lib/docker/overlay2/e494ae30abc49ad403ef5c2a32bcb894629ea4da6d4d226fbca70d27ed9a74d8/merged",
                "UpperDir": "/var/lib/docker/overlay2/e494ae30abc49ad403ef5c2a32bcb894629ea4da6d4d226fbca70d27ed9a74d8/diff",
                "WorkDir": "/var/lib/docker/overlay2/e494ae30abc49ad403ef5c2a32bcb894629ea4da6d4d226fbca70d27ed9a74d8/work"
            },
            "Name": "overlay2"
        },
        "RootFS": {
            "Type": "layers",
            "Layers": [
                "sha256:428c97da766c4c13b19088a471de6b622b038f3ae8efa10ec5a37d6d31a2df0b"
            ]
        },
        "Metadata": {
            "LastTagTime": "0001-01-01T00:00:00Z"
        }
    }
]
Working with Docker Image
Tested Infrastructure
| Platform | Number of Instance | Reading Time |
|---|---|---|
| Play with Docker | 1 | 5 min |
Pre-requisite
- Create an account with DockerHub
- Open PWD Platform on your browser
- Click on Add New Instance on the left side of the screen to bring up Alpine OS instance on the right side
Listing the Docker Images
$ docker images
REPOSITORY          TAG                 IMAGE ID            CREATED             SIZE
hello-world         latest              4ab4c602aa5e        6 weeks ago         1.84kB
Show all images (default hides intermediate images)
docker images -a
REPOSITORY          TAG                 IMAGE ID            CREATED             SIZE
hello-world         latest              4ab4c602aa5e        6 weeks ago         1.84kB
List images by name and tag
The docker images command takes an optional [REPOSITORY[:TAG]] argument that restricts the list to images that match the argument. If you specify REPOSITORY but no TAG, the docker images command lists all images in the given repository.
To demo this, let us pull all various versions of alpine OS
docker pull alpine:3.6
docker pull alpine:3.7
docker pull alpine:3.8
docker pull alpine:3.9
[node4] (local) root@192.168.0.20 ~
$ docker images
REPOSITORY          TAG                 IMAGE ID            CREATED             SIZE
alpine              3.6                 43773d1dba76        7 days ago          4.03MB
alpine              3.7                 6d1ef012b567        7 days ago          4.21MB
alpine              3.8                 dac705114996        7 days ago          4.41MB
alpine              3.9                 5cb3aa00f899        7 days ago          5.53MB
[node4] (local) root@192.168.0.20 ~
$ docker images alpine:3.7
REPOSITORY          TAG                 IMAGE ID            CREATED             SIZE
alpine              3.7                 6d1ef012b567        7 days ago          4.21MB
List the full length image IDs
$ docker images --no-trunc
REPOSITORY          TAG                 IMAGE ID                                                                  CREATED
     SIZE
alpine              3.6                 sha256:43773d1dba76c4d537b494a8454558a41729b92aa2ad0feb23521c3e58cd0440   7 days ago
     4.03MB
alpine              3.7                 sha256:6d1ef012b5674ad8a127ecfa9b5e6f5178d171b90ee462846974177fd9bdd39f   7 days ago
     4.21MB
alpine              3.8                 sha256:dac7051149965716b0acdcab16380b5f4ab6f2a1565c86ed5f651e954d1e615c   7 days ago
     4.41MB
alpine              3.9                 sha256:5cb3aa00f89934411ffba5c063a9bc98ace875d8f92e77d0029543d9f2ef4ad0   7 days ago
     5.53MB
Listing out images with filter
$ docker images
REPOSITORY          TAG                 IMAGE ID            CREATED             SIZE
ubuntu              latest              94e814e2efa8        3 days ago          88.9MB
alpine              3.6                 43773d1dba76        7 days ago          4.03MB
alpine              3.7                 6d1ef012b567        7 days ago          4.21MB
alpine              3.8                 dac705114996        7 days ago          4.41MB
alpine              3.9                 5cb3aa00f899        7 days ago          5.53MB
If you want to filter out just alpine
$ docker images --filter=reference='alpine'
REPOSITORY          TAG                 IMAGE ID            CREATED             SIZE
alpine              3.6                 43773d1dba76        7 days ago          4.03MB
alpine              3.7                 6d1ef012b567        7 days ago          4.21MB
alpine              3.8                 dac705114996        7 days ago          4.41MB
alpine              3.9                 5cb3aa00f899        7 days ago          5.53MB
Saving Images and Containers as Tar Files for Sharing
Imagine a scenario where you have built Docker images and containers that you would be interested to keep and share it with your other collaborators or colleagues. The below methods shall help you achieve it.
Four basic Docker CLI comes into action:
- The
docker export- Export a container’s filesystem as a tar archive - The
docker import- Import the contents from a tarball to create a filesystem image - The
docker save- Save one or more images to a tar archive (streamed to STDOUT by default) - The
docker load- Load an image from a tar archive or STDIN
Tested Infrastructure
| Platform | Number of Instance | Reading Time |
|---|---|---|
| Play with Docker | 1 | 5 min |
Pre-requisite
- Create an account with DockerHub
- Open PWD Platform on your browser
- Click on Add New Instance on the left side of the screen to bring up Alpine OS instance on the right side
Create Nginx Container
$ docker run -d -p 80:80 nginx
Unable to find image 'nginx:latest' locally
latest: Pulling from library/nginx
a5a6f2f73cd8: Pull complete
1ba02017c4b2: Pull complete
33b176c904de: Pull complete
Digest: sha256:5d32f60db294b5deb55d078cd4feb410ad88e6fe77500c87d3970eca97f54dba
Status: Downloaded newer image for nginx:latest
df2caf9283e84a15bb2321a17aabe84e3e0762ec82fc180e2a4c15fcf0f96588
[node1] (local) root@192.168.0.33 ~
Displaying Running Container
$ docker ps -a
CONTAINER ID        IMAGE               COMMAND                  CREATED             STATUS              PORTS                NAMES
df2caf9283e8        nginx               "nginx -g 'daemon of…"   35 seconds ago      Up 34 seconds       0.0.0.0:80->80/tcp   vigorous_jang
$ docker export df2 > nginx.tar
You could commit this container as a new image locally, but you could also use the Docker import command:
$ docker import - mynginx < nginx.tar
sha256:aaaed50d250a671042e8dc383c6e05012e245f5eaf555d10c40be63f6028ee7b
$ docker images
REPOSITORY          TAG                 IMAGE ID            CREATED             SIZE
mynginx             latest              aaaed50d250a        25 seconds ago      107MB
nginx               latest              568c4670fa80        2 weeks ago         109MB
If you wanted to share this image with one of your collaborators, you could upload the tar file on a web server and let your collaborator download it and use the import command on his Docker host.
If you would rather deal with images that you have already committed, you can use the load and save commands:
$ docker save -o mynginx1.tar nginx
$ ls -l
total 218756
-rw-------    1 root     root     112844800 Dec 18 02:53 mynginx1.tar
-rw-r--r--    1 root     root     111158784 Dec 18 02:50 nginx.tar
$ docker rmi mynginx
Untagged: mynginx:latest
Deleted: sha256:aaaed50d250a671042e8dc383c6e05012e245f5eaf555d10c40be63f6028ee7b
Deleted: sha256:41135ad184eaac0f5c4f46e4768555738303d30ab161a7431d28a5ccf1778a0f
Now delete all images and containers running and try to run the below command to load Docker image into your system:
$ docker images
REPOSITORY          TAG                 IMAGE ID            CREATED             SIZE
$ docker load < mynginx1.tar
Loaded image: nginx:latest
[node1] (local) root@192.168.0.33 ~$ docker images
REPOSITORY          TAG                 IMAGE ID            CREATED             SIZE
nginx               latest              568c4670fa80        2 weeks ago         109MB
[node1] (local) root@192.168.0.33 ~
$
Building Your First Alpine Docker Image and Push it to DockerHub
How to build Your First Alpine Docker Image and Push it to DockerHub
Tested Infrastructure
| Platform | Number of Instance | Reading Time |
|---|---|---|
| Play with Docker | 1 | 5 min |
Pre-requisite
- Create an account with DockerHub
- Open PWD Platform on your browser
- Click on Add New Instance on the left side of the screen to bring up Alpine OS instance on the right side
Under this tutorial we will see how to build our own first alpine based Docker Image.
$ docker run -dit alpine sh
620e1bcb5ab6e84b75a7a5c35790a77691112e59830ea1d5d85244bc108578c9
[node4] (local) root@192.168.0.20 ~
$ docker ps
CONTAINER ID        IMAGE               COMMAND             CREATED             STATUS              PORTS               NAMES
620e1bcb5ab6        alpine              "sh"                3 seconds ago       Up 2 seconds                            keen_alba
ttani
[node4] (local) root@192.168.0.20 ~
$ docker attach 62
/ #
/ #
/ # cat /etc/os-release
NAME="Alpine Linux"
ID=alpine
VERSION_ID=3.9.2
PRETTY_NAME="Alpine Linux v3.9"
HOME_URL="https://alpinelinux.org/"
BUG_REPORT_URL="https://bugs.alpinelinux.org/"
/ #
Updating APK Packages
/ # apk update
fetch http://dl-cdn.alpinelinux.org/alpine/v3.9/main/x86_64/APKINDEX.tar.gz
fetch http://dl-cdn.alpinelinux.org/alpine/v3.9/community/x86_64/APKINDEX.tar.gz
v3.9.2-21-g3dda2a36ce [http://dl-cdn.alpinelinux.org/alpine/v3.9/main]
v3.9.2-19-gfdf726d41a [http://dl-cdn.alpinelinux.org/alpine/v3.9/community]
OK: 9756 distinct packages available
/ # ^
/ # apk add git
(1/7) Installing ca-certificates (20190108-r0)
(2/7) Installing nghttp2-libs (1.35.1-r0)
(3/7) Installing libssh2 (1.8.0-r4)
(4/7) Installing libcurl (7.64.0-r1)
(5/7) Installing expat (2.2.6-r0)
(6/7) Installing pcre2 (10.32-r1)
(7/7) Installing git (2.20.1-r0)
Executing busybox-1.29.3-r10.trigger
Executing ca-certificates-20190108-r0.trigger
OK: 20 MiB in 21 packages
/ #
Now lets come out of it by Ctrl+P+Q and commit the changes
$ docker ps
CONTAINER ID        IMAGE               COMMAND             CREATED             STATUS              PORTS               NAMES
620e1bcb5ab6        alpine              "sh"                4 minutes ago       Up 4 minutes                            keen_alba
ttani
[node4] (local) root@192.168.0.20 ~
$ docker commit -m "Added GIT" 620 ajeetraina/alpine-git
sha256:9a8cd6c3bd8761013b2b932c58af2870f5637bfdf4227d7414073b0458ed0c54
[node4] (local) root@192.168.0.20 ~
$ docker images
REPOSITORY              TAG                 IMAGE ID            CREATED             SIZE
ajeetraina/alpine-git   latest              9a8cd6c3bd87        11 seconds ago      31.2MB
ubuntu                  latest              94e814e2efa8        3 days ago          88.9MB
alpine                  3.6                 43773d1dba76        7 days ago          4.03MB
alpine                  3.7                 6d1ef012b567        7 days ago          4.21MB
alpine                  3.8                 dac705114996        7 days ago          4.41MB
alpine                  3.9                 5cb3aa00f899        7 days ago          5.53MB
alpine                  latest              5cb3aa00f899        7 days ago          5.53MB
There you see a new image just created.
Time to tag the image
$ docker tag --help

Usage:  docker tag SOURCE_IMAGE[:TAG] TARGET_IMAGE[:TAG]

Create a tag TARGET_IMAGE that refers to SOURCE_IMAGE
[node4] (local) root@192.168.0.20 ~
$ docker tag ajeetraina/alpine-git:latest ajeetraina/alpine-git:1.0
$ docker images
REPOSITORY              TAG                 IMAGE ID            CREATED             SIZE
ajeetraina/alpine-git   1.0                 9a8cd6c3bd87        2 minutes ago       31.2MB
ajeetraina/alpine-git   latest              9a8cd6c3bd87        2 minutes ago       31.2MB
ubuntu                  latest              94e814e2efa8        3 days ago          88.9MB
alpine                  3.6                 43773d1dba76        7 days ago          4.03MB
alpine                  3.7                 6d1ef012b567        7 days ago          4.21MB
alpine                  3.8                 dac705114996        7 days ago          4.41MB
alpine                  3.9                 5cb3aa00f899        7 days ago          5.53MB
alpine                  latest              5cb3aa00f899        7 days ago          5.53MB
Pushing it to DockerHub
$ docker login
Login with your Docker ID to push and pull images from Docker Hub. If you don't have a Docker ID, head over to https://hub.docker
.com to create one.
Username: ajeetraina
Password:
WARNING! Your password will be stored unencrypted in /root/.docker/config.json.
Configure a credential helper to remove this warning. See
https://docs.docker.com/engine/reference/commandline/login/#credentials-store

Login Succeeded
[node4] (local) root@192.168.0.20 ~
$ docker push ajeetraina/alpine-git:1.0
The push refers to repository [docker.io/ajeetraina/alpine-git]
3846235f8c17: Pushed
bcf2f368fe23: Mounted from library/alpine
1.0: digest: sha256:85d50f702e930db9e5b958387e667b7e26923f4de340534085cea184adb8411e size: 740
[node4] (local) root@192.168.0.20 ~
Test Your Knowledge
| S. No. | Question. | Response |
|---|---|---|
| 1 | What is difference between Docker Image and Docker Container? | |
| 2 | Where are all Docker images stored? | |
| 3 | Is DockerHub a public or private Docker registry? | |
| 4 | What is the main role of Docker Engine? | |
| 5 | Can you run Alpine container without even pulling it? | |
| 6 | What is the minimal size of Docker image you have built? | |
| 7 | I have mix of Ubuntu and CentOS-based Docker images. How shall I filter it out? |
4 - Accessing & Managing Docker Image
- Accessing the Container Shell
- Running a Command inside running Container
- Managing Docker Containers
- Test Your Knowledge
Accessing the Container Shell
Tested Infrastructure
| Platform | Number of Instance | Reading Time |
|---|---|---|
| Play with Docker | 1 | 5 min |
Pre-requisite
- Create an account with DockerHub
- Open PWD Platform on your browser
- Click on Add New Instance on the left side of the screen to bring up Alpine OS instance on the right side
Create Ubuntu Container
docker run -dit ubuntu
Accessing the container shell
docker exec -t <container-id> bash
Accesssing the container shell
docker attach <container-id>
Running a command inside running Container
Tested Infrastructure
| Platform | Number of Instance | Reading Time |
|---|---|---|
| Play with Docker | 1 | 5 min |
Pre-requisite
- Create an account with DockerHub
- Open PWD Platform on your browser
- Click on Add New Instance on the left side of the screen to bring up Alpine OS instance on the right side
Create Ubuntu Container
docker run -dit ubuntu
Opening up the bash shell
docker exec -t <container-id> bash
Managing Docker containers
Tested Infrastructure
| Platform | Number of Instance | Reading Time |
|---|---|---|
| Play with Docker | 1 | 5 min |
Pre-requisite
- Create an account with DockerHub
- Open PWD Platform on your browser
- Click on Add New Instance on the left side of the screen to bring up Alpine OS instance on the right side
Preparations
- Clean your docker host using the commands (in bash):
$ docker rm -f $(docker ps -a -q)
Instructions
- Run the following containers from the dockerhub:
$ docker run -d -p 5000:5000 --name app1 selaworkshops/python-app:1.0
$ docker run -d -p 5001:5001 -e "port=5001" --name app2 selaworkshops/python-app:2.0
- Ensure the containers are running:
$ docker ps
- Stop the first container:
$ docker stop app1
- Kill the second container:
$ docker kill app2
- Display running containers:
$ docker ps
- Show all the containers (includind non running containers):
$ docker ps -a
- Let’s start both containers again:
$ docker start app1 app2
- Restart the second container:
$ docker restart app2
- Display the docker host information with:
$ docker info
- Show the running processes in the first container using:
$ docker top app1
- Retrieve the history of the second container:
$ docker history selaworkshops/python-app:2.0
- Inspect the second container image:
$ docker inspect selaworkshops/python-app:2.0
- Inspect the first container and look for the internal ip:
$ docker inspect app1
"Networks": {
                "bridge": {
                    "IPAMConfig": null,
                    "Links": null,
                    "Aliases": null,
                    "NetworkID": "822cb66790c6358d9decab874916120f3bdeff7193a4375c94ca54d50832303d",
                    "EndpointID": "9aa96dc29be08eddc6d8f429ebecd2285c064fda288681a3611812413cbdfc1f",
                    "Gateway": "172.17.0.1",
                    "IPAddress": "172.17.0.3",
                    "IPPrefixLen": 16,
                    "IPv6Gateway": "",
                    "GlobalIPv6Address": "",
                    "GlobalIPv6PrefixLen": 0,
                    "MacAddress": "02:42:ac:11:00:03",
                    "DriverOpts": null
                }
            }
- Show the logs of the second container using the flag –follow:
$ docker logs --follow app2
- Browse to the application and see the containers logs from the terminal:
http://localhost:5001
- Stop to tracking logs:
$ CTRL + C
Test Your Knowledge - Quiz2
| S. No. | Question. | Response |
|---|---|---|
| 1 | What are different ways to access container shell? | |
| 2 | How to run a command inside a Docker container | |
| 3 | Is it possible to stop overall Docker containers in a single shot? | |
| 4 | How do you remove all dangling images in Docker? | |
| 5 | How do you access services ports under Docker? |
5 - Getting Started with Dockerfile
- What is a Dockerfile?
- Understanding Layering Concept with Dockerfile
- Creating Docker Image
- ENTRYPOINT vs RUN
- Writing Dockerfile with Hello Python Script Added
- Test Your Knowledge
What is a Dockerfile?
- A Dockerfile is a text file which contains a series of commands or instructions.
- These instructions are executed in the order in which they are written.
- Execution of these instructions takes place on a base image.
- On building the Dockerfile, the successive actions form a new image from the base parent image.
Understanding Image Layering Concept with Dockerfile
Docker container is a runnable instance of an image, which is actually made by writing a readable/writable layer on top of some read-only layers.
The parent image used to create another image from a Dockerfile is read-only. When we execute instructions on this parent image, new layers keep adding up. These layers are created when we run docker build command.
The instructions RUN, COPY, ADD mostly contribute to the addition of layers in a Docker build.
Each layer is read-only except the last one - this is added to the image for generating a runnable container. This last layer is called “container layer”. All changes made to the container, like making new files, installing applications, etc. are done in this thin layer.
Let’s understand this layering using an example:
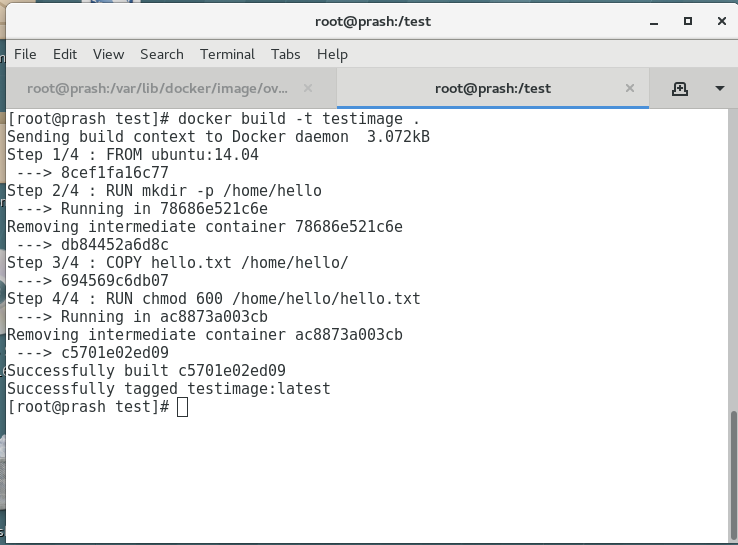
Consider the Dockerfile given below:
FROM ubuntu:latest
RUN mkdir -p /hello/hello
COPY hello.txt /hello/hello
RUN chmod 600 /hello/hello/hello.txt
Layer ID
Each instruction the Dockerfile generates a layer. Each of this layer has a randomly generated unique ID. This ID can be seen at the time of build. See the image below:
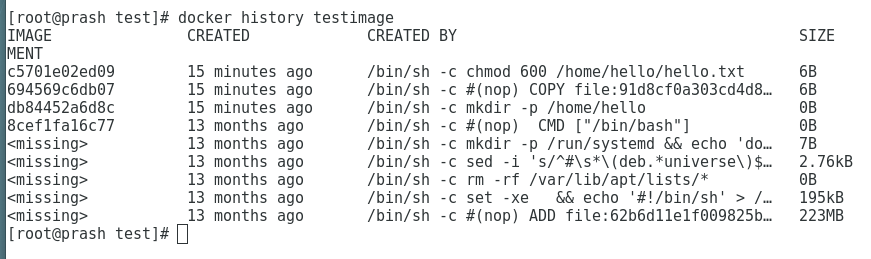
To view all these layers once an image is built from a Dockerfile, we can use docker history command.
To see more information about the Docker image and the layers use ‘docker inspect’ command as such:
# docker inspect testimage:latest

[
    {
        "Id": "sha256:c5701e02ed095ae7cabaef9fcef009d1f272206ff707deca13a680e024db7f02",
        "RepoTags": [
            "testimage:latest"
        ],
        "RepoDigests": [],
        "Parent": "sha256:694569c6db07ecef432cee1a9a4a6d45f2fd1f6be16814bf59e101bed966e612",
        "Comment": "",
        "Created": "2019-06-03T23:47:01.026463541Z",
        "Container": "ac8873a003cb9ed972b4675f8d27181b99112e7530a5803ff89780e3ecc18b1c",
        "ContainerConfig": {
            "Hostname": "",
            "Domainname": "",
            "User": "",
            "AttachStdin": false,
            "AttachStdout": false,
            "AttachStderr": false,
            "Tty": false,
            "OpenStdin": false,
            "StdinOnce": false,
            "Env": [
                "PATH=/usr/local/sbin:/usr/local/bin:/usr/sbin:/usr/bin:/sbin:/bin"
            ],
            "Cmd": [
                "/bin/sh",
                "-c",
                "chmod 600 /home/hello/hello.txt"
            ],
            "ArgsEscaped": true,
            "Image": "sha256:694569c6db07ecef432cee1a9a4a6d45f2fd1f6be16814bf59e101bed966e612",
            "Volumes": null,
            "WorkingDir": "",
            "Entrypoint": null,
            "OnBuild": null,
            "Labels": null
        },
        "DockerVersion": "18.03.1-ce",
        "Author": "",
        "Config": {
            "Hostname": "",
            "Domainname": "",
            "User": "",
            "AttachStdin": false,
            "AttachStdout": false,
            "AttachStderr": false,
            "Tty": false,
            "OpenStdin": false,
            "StdinOnce": false,
            "Env": [
                "PATH=/usr/local/sbin:/usr/local/bin:/usr/sbin:/usr/bin:/sbin:/bin"
            ],
            "Cmd": [
                "/bin/bash"
            ],
            "ArgsEscaped": true,
            "Image": "sha256:694569c6db07ecef432cee1a9a4a6d45f2fd1f6be16814bf59e101bed966e612",
            "Volumes": null,
            "WorkingDir": "",
            "Entrypoint": null,
            "OnBuild": null,
            "Labels": null
        },
        "Architecture": "amd64",
        "Os": "linux",
        "Size": 222876395,
        "VirtualSize": 222876395,
        "GraphDriver": {
            "Data": {
                "LowerDir": "/var/lib/docker/overlay2/86a76eac21ae67f6d78e59076107a121e6dfb9cc922e68e1be975fc97e711eb1/diff:/var/lib/docker/overlay2/0604b502d31eff670769257ba3411fca09fbe2eab03343660ba557024915a1e6/diff:/var/lib/docker/overlay2/16af32e079fbc252ea5de044628285d5c3a34fc8441602a762729482666b2431/diff:/var/lib/docker/overlay2/732c4ab0164f92664ce831b4a830251132bf17cbcb7d093334a7a367b1a665e5/diff:/var/lib/docker/overlay2/c8a69709e5093c6eefa317f015cbf1422a446b2fe5d3f3d52a7e0d8af8dc6a28/diff:/var/lib/docker/overlay2/c93b36ec3a753592518727a2ea4547ab4e53d58489b9fae0838b2806e9c18346/diff:/var/lib/docker/overlay2/e67589599c2a5ed3bd74a269f3effaa52f94975fd811a866f1fe2bbcb2edabe4/diff",
                "MergedDir": "/var/lib/docker/overlay2/31c68adcd824f155d23de4197b3d0b8776b079c307c1e4c0f2f8bbc73807adc0/merged",
                "UpperDir": "/var/lib/docker/overlay2/31c68adcd824f155d23de4197b3d0b8776b079c307c1e4c0f2f8bbc73807adc0/diff",
                "WorkDir": "/var/lib/docker/overlay2/31c68adcd824f155d23de4197b3d0b8776b079c307c1e4c0f2f8bbc73807adc0/work"
            },
            "Name": "overlay2"
        },
        "RootFS": {
            "Type": "layers",
            "Layers": [
                "sha256:05b0f7f2a81723fd647744a7340477ef9619f5ddeba3f2ca039dac3dd143cd59",
                "sha256:0c3819952093832ffd8865bf72bc17f2f5475795cffe97e2b4c4ff36e638c244",
                "sha256:14fa4a9494bf9e61f83a1bb96cd9e963ab0cbbdaf8ed91ff5eec5196c5bf7b12",
                "sha256:b33859b66bfd3ad176ccf3be8dbd52d6b9823de8cc26688f2efeb76a0ea24a78",
                "sha256:4622c8e1bdc0716e185fa3b338fa415dfdad3724336315de0bebd173a6ceaf05",
                "sha256:6427efc3a0d7bae1fe315b844703580b2095073dcdf54a6ed9c7b1c0d982d9b0",
                "sha256:59cd898074ac7765bacd76a11724b8d666ed8e9c14e7806dfb20a486102f6f1e",
                "sha256:ad24f18512fddb8794612f7ec5955d06dcee93641d02932d809f0640263b8e79"
            ]
        },
        "Metadata": {
            "LastTagTime": "2019-06-04T05:17:01.430558997+05:30"
        }
    }
]
Visualizing layers of Docker Image
docker run --rm -it -v /var/run/docker.sock:/var/run/docker.sock wagoodman/dive testimage
[● Layers]───────────────────────────────────────────────────────────────────────────── [Current Layer Contents]───────────────────────────────────────────────────────────────
Cmp   Size  Command                                                                     Permission     UID:GID       Size  Filetree
     63 MB  FROM e388568efdf7281                                                        drwxr-xr-x         0:0     4.8 MB  ├── bin
    988 kB  [ -z "$(apt-get indextargets)" ]                                            -rwxr-xr-x         0:0     1.1 MB  │   ├── bash
     745 B  set -xe   && echo '#!/bin/sh' > /usr/sbin/policy-rc.d  && echo 'exit 101' > -rwxr-xr-x         0:0      35 kB  │   ├── bunzip2
       7 B  mkdir -p /run/systemd && echo 'docker' > /run/systemd/container             -rwxr-xr-x         0:0        0 B  │   ├── bzcat → bin/bunzip2
       0 B  mkdir -p /hello/hello                                                       -rwxrwxrwx         0:0        0 B  │   ├── bzcmp → bzdiff
      37 B  #(nop) COPY file:666735678ded52c6f9e0693ca27b4dc3d466e3d79c585a58c3b9a91357 -rwxr-xr-x         0:0     2.1 kB  │   ├── bzdiff
      37 B  chmod 600 /hello/hello/hello.txt                                            -rwxrwxrwx         0:0        0 B  │   ├── bzegrep → bzgrep
                                                                                        -rwxr-xr-x         0:0     4.9 kB  │   ├── bzexe
[Layer Details]──────────────────────────────────────────────────────────────────────── -rwxrwxrwx         0:0        0 B  │   ├── bzfgrep → bzgrep
                                                                                        -rwxr-xr-x         0:0     3.6 kB  │   ├── bzgrep
Tags:   (unavailable)                                                                   -rwxr-xr-x         0:0        0 B  │   ├── bzip2 → bin/bunzip2
Id:     e388568efdf72814bd6439a80d822ce06b631689a82292a2b96382d020d63a4c                -rwxr-xr-x         0:0      14 kB  │   ├── bzip2recover
Digest: sha256:43c67172d1d182ca5460fc962f8f053f33028e0a3a1d423e05d91b532429e73d         -rwxrwxrwx         0:0        0 B  │   ├── bzless → bzmore
Command:                                                                                -rwxr-xr-x         0:0     1.3 kB  │   ├── bzmore
#(nop) ADD file:08e718ed0796013f5957a1be7da3bef6225f3d82d8be0a86a7114e5caad50cbc in /   -rwxr-xr-x         0:0      35 kB  │   ├── cat
                                                                                        -rwxr-xr-x         0:0      64 kB  │   ├── chgrp
[Image Details]──────────────────────────────────────────────────────────────────────── -rwxr-xr-x         0:0      60 kB  │   ├── chmod
                                                                                        -rwxr-xr-x         0:0      68 kB  │   ├── chown
Total Image size: 64 MB                                                                 -rwxr-xr-x         0:0     142 kB  │   ├── cp
Potential wasted space: 308 B                                                           -rwxr-xr-x         0:0     121 kB  │   ├── dash
Image efficiency score: 99 %                                                            -rwxr-xr-x         0:0     101 kB  │   ├── date
                                                                                        -rwxr-xr-x         0:0      76 kB  │   ├── dd
Count   Total Space  Path                                                               -rwxr-xr-x         0:0      85 kB  │   ├── df
    2         234 B  /var/lib/dpkg/diversions                                           -rwxr-xr-x         0:0     134 kB  │   ├── dir
    2          74 B  /hello/hello/hello.txt                                             -rwxr-xr-x         0:0      72 kB  │   ├── dmesg
                                                                                        -rwxrwxrwx         0:0        0 B  │   ├── dnsdomainname → hostname
                                                                                        -rwxrwxrwx         0:0        0 B  │   ├── domainname → hostname
                                                                                        -rwxr-xr-x         0:0      35 kB  │   ├── echo
                                                                                        -rwxr-xr-x         0:0       28 B  │   ├── egrep
                                                                                        -rwxr-xr-x         0:0      31 kB  │   ├── false
                                                                                        -rwxr-xr-x         0:0       28 B  │   ├── fgrep
                                                                                        -rwxr-xr-x         0:0      65 kB  │   ├── findmnt
                                                                                        -rwxr-xr-x         0:0     220 kB  │   ├── grep
                                                                                        -rwxr-xr-x         0:0     2.3 kB  │   ├── gunzip
                                                                                        -rwxr-xr-x         0:0     5.9 kB  │   ├── gzexe
                                                                                        -rwxr-xr-x         0:0     102 kB  │   ├── gzip
Lab #1: Create an image with GIT installed
Pre-requisite:
Tested Infrastructure
| Platform | Number of Instance | Reading Time |
|---|---|---|
| Play with Docker | 1 | 5 min |
Pre-requisite
- Create an account with DockerHub
- Open PWD Platform on your browser
- Click on Add New Instance on the left side of the screen to bring up Alpine OS instance on the right side
Assignment:
- Create an image with GIT installed
- Tag your image as labs-git:v1.0
- Create a container based on that image, and run git –version to check that it is installed correctly
Creating Dockerfile
FROM alpine:3.5
RUN apk update
RUN apk add git
Build Docker Image
docker build -t ajeetraina/alpine-git .
Tagging image as labs-git
docker tag ajeetraina/alpine-git ajeetraina/labs-git:v1.0
Verify the Images
$ docker images
REPOSITORY              TAG                 IMAGE ID            CREATED             SIZE
ajeetraina/alpine-git   latest              cb913e37a593        16 seconds ago      26.6MB
ajeetraina/labs-git     v1.0                cb913e37a593        16 seconds ago      26.6MB
Create a container
docker run -itd ajeetraina/labs-git:v1.0 /bin/sh
$ docker ps
CONTAINER ID        IMAGE                      COMMAND             CREATED             STATUS              PORTS               NAMES
3e26a5268f55        ajeetraina/labs-git:v1.0   "/bin/sh"           4 seconds ago       Up 2 seconds                            elated_neumann
Enter into Container Shell
docker attach 3e26
Please press “Enter” key twice so as to enter into container shell
Verify if GIT is installed
/ # git --version
git version 2.13.7
Lab #2: Create an image with ADD instruction
COPY and ADD are both Dockerfile instructions that serve similar purposes. They let you copy files from a specific location into a Docker image.
COPY takes in a src and destination. It only lets you copy in a local file or directory from your host (the machine building the Docker image) into the Docker image itself.
ADD lets you do that too, but it also supports 2 other sources. First, you can use a URL instead of a local file / directory. Secondly, you can extract a tar file from the source directly into the destination.
Pre-requisite:
Tested Infrastructure
| Platform | Number of Instance | Reading Time |
|---|---|---|
| Play with Docker | 1 | 5 min |
Pre-requisite
- Create an account with DockerHub
- Open PWD Platform on your browser
- Click on Add New Instance on the left side of the screen to bring up Alpine OS instance on the right side
Assignment:
- Create an image with ADD instruction
- Tag your image as labs-add:v1.0
- Create a container based on that image, and see the extracted tar file.
Creating Dockerfile
FROM alpine:3.5
RUN apk update
ADD http://www.vlsitechnology.org/pharosc_8.4.tar.gz .
Build Docker Image
docker build -t saiyam911/alpine-add . -f <name of dockerfile>
Tagging image as labs-git
docker tag saiyam911/alpine-add saiyam911/labs-add:v1.0
Verify the Images
$ docker images
REPOSITORY                   TAG                 IMAGE ID            CREATED             SIZE
saiyam911/alpine-add        latest              cdf97cb49d48        38 minutes ago       300MB
saiyam911/labs-add          v1.0                cdf97cb49d48        38 minutes ago       300MB
Create a container
docker run -itd saiyam911/labs-add:v1.0 /bin/sh
$ docker ps
CONTAINER ID        IMAGE                      COMMAND             CREATED             STATUS              PORTS               NAMES
f0940750f61a        saiyam911/labs-add:v1.0   "/bin/sh"           20 seconds ago      Up 18 seconds                           distracted_darwin
Enter into Container Shell
docker attach f094
Please press “Enter” key twice so as to enter into container shell
Verify if the link has been extracted onto the container
/ # ls -ltr
-rw-------    1 root     root     295168000 Sep 19  2007 pharosc_8.4.tar.gz
ADD Command lets you to add a tar directly from a link and explode to the container.
Lab #3: Create an image with COPY instruction
The COPY instruction copies files or directories from source and adds them to the filesystem of the container at destinatio.
Two form of COPY instruction
COPY [--chown=<user>:<group>] <src>... <dest>
COPY [--chown=<user>:<group>] ["<src>",... "<dest>"] (this form is required for paths containing whitespace)
Tested Infrastructure
| Platform | Number of Instance | Reading Time |
|---|---|---|
| Play with Docker | 1 | 5 min |
Pre-requisite
- Create an account with DockerHub
- Open PWD Platform on your browser
- Click on Add New Instance on the left side of the screen to bring up Alpine OS instance on the right side
Assignment:
- Create an image with COPY instruction
- COPY instruction in Multi-stage Builds
Create an image with COPY instruction
Dockerfile
FROM nginx:alpine
LABEL maintainer="Collabnix"

COPY index.html /usr/share/nginx/html/
ENTRYPOINT ["nginx", "-g", "daemon off;"]
Lets create the index.html file
$ echo "Welcome to Dockerlabs !" > index.html
Building Docker Image
$ docker image build -t cpy:v1 .
Staring the container
$ docker container run -d --rm --name myapp1 -p 80:80 cpy:v1
Checking index file
$ curl localhost
Welcome to Dockerlabs !
COPY instruction in Multi-stage Builds
Dockerfile
FROM alpine AS stage1
LABEL maintainer="Collabnix"
RUN echo "Welcome to Docker Labs!" > /opt/index.html

FROM nginx:alpine
LABEL maintainer="Collabnix"
COPY --from=stage1 /opt/index.html /usr/share/nginx/html/
ENTRYPOINT ["nginx", "-g", "daemon off;"]
Building Docker Image
$ docker image build -t cpy:v2 .
Staring the container
$ docker container run -d --rm --name myapp2 -p 8080:80 cpy:v2
Checking index file
$ curl localhost:8080
Welcome to Docker Labs !
NOTE: You can name your stages, by adding an AS
COPY --from=nginx:latest /etc/nginx/nginx.conf /nginx.conf
Lab #4: Create an image with CMD instruction
Tested Infrastructure
| Platform | Number of Instance | Reading Time |
|---|---|---|
| Play with Docker | 1 | 5 min |
Pre-requisite
- Create an account with DockerHub
- Open PWD Platform on your browser
- Click on Add New Instance on the left side of the screen to bring up Alpine OS instance on the right side
Creating Dockerfile
FROM alpine:3.6

RUN apk update
CMD ["top"]
Building Docker Container
docker build -t ajeetraina/lab3_cmd . -f Dockerfile_cmd
Running the Docker container
docker run ajeetraina/lab3_cmd:latest
Lab #5: Create an image with ENTRYPOINT instruction
The ENTRYPOINT instruction make your container run as an executable.
ENTRYPOINT can be configured in two forms:
- Exec Form
ENTRYPOINT [“executable”, “param1”, “param2”] - Shell Form
ENTRYPOINT command param1 param2
If an image has an ENTRYPOINT if you pass an argument it, while running container it wont override the existing entrypoint, it will append what you passed with the entrypoint.To override the existing ENTRYPOINT you should user –entrypoint flag when running container.
Tested Infrastructure
| Platform | Number of Instance | Reading Time |
|---|---|---|
| Play with Docker | 1 | 5 min |
Pre-requisite
- Create an account with DockerHub
- Open PWD Platform on your browser
- Click on Add New Instance on the left side of the screen to bring up Alpine OS instance on the right side
Assignment:
- Create an image with ENTRYPOINT instruction(Exec Form)
- ENTRYPOINT instruction in Shell Form
- Override the existing ENTRYPOINT
Create an image with ENTRYPOINT instruction(Exec Form)
Dockerfile
FROM alpine:3.5
LABEL maintainer="Collabnix"

ENTRYPOINT ["/bin/echo", "Hi, your ENTRYPOINT instruction in Exec Form !"]
Build Docker Image
$ docker build -t entrypoint:v1 .
Verify the Image
$ docker image ls

REPOSITORY          TAG                 IMAGE ID            CREATED             SIZE
entrypoint          v1                  1d06f06c2062        2 minutes ago       4MB
alpine              3.5                 f80194ae2e0c        7 months ago        4MB
Create a container
$ docker container run entrypoint:v1
Hi, your ENTRYPOINT instruction in Exec Form !
ENTRYPOINT instruction in Shell Form
Dockerfile
$ cat Dockerfile
FROM alpine:3.5
LABEL maintainer="Collabnix"

ENTRYPOINT echo "Hi, your ENTRYPOINT instruction in Shell Form !"
Build Docker Image
$ docker build -t entrypoint:v2 .
Verify the Image
$ docker image ls

REPOSITORY          TAG                 IMAGE ID            CREATED             SIZE
entrypoint          v2                  cde521f13080        2 minutes ago       4MB
entrypoint          v1                  1d06f06c2062        5 minutes ago      4MB
alpine              3.5                 f80194ae2e0c        7 months ago        4MB
Create a container
$ docker container run entrypoint:v2
Hi, your ENTRYPOINT instruction in Shell Form !
Override the existing ENTRYPOINT
$ docker container run --entrypoint "/bin/echo" entrypoint:v2 "Hello, Welocme to Docker Meetup! "
Hello, Welocme to Docker Meetup!
Lab #6: Create an image with WORKDIR instruction
The WORKDIR directive in Dockerfile defines the working directory for the rest of the instructions in the Dockerfile. The WORKDIR instruction wont create a new layer in the image but will add metadata to the image config. If the WORKDIR doesn’t exist, it will be created even if it’s not used in any subsequent Dockerfile instruction. you can have multiple WORKDIR in same Dockerfile. If a relative path is provided, it will be relative to the previous WORKDIR instruction.
WORKDIR /path/to/workdir
If no WORKDIR is specified in the Dockerfile then the default path is /. The WORKDIR instruction can resolve environment variables previously set in Dockerfile using ENV.
Tested Infrastructure
| Platform | Number of Instance | Reading Time |
|---|---|---|
| Play with Docker | 1 | 5 min |
Pre-requisite
- Create an account with DockerHub
- Open PWD Platform on your browser
- Click on Add New Instance on the left side of the screen to bring up Alpine OS instance on the right side
Assignment
- Dockerfile with WORKDIR instruction
- WORKDIR with Relative path
- WORKDIR with Absolute path
- WORKDIR with environment variables as path
Dockerfile with WORKDIR instruction
Dockerfile
FROM alpine:3.9.3
LABEL maintainer="Collabnix"

WORKDIR /opt
Building Docker image
$ docker build -t workdir:v1 .
Testing current WORKDIR by running container
$ docker run -it workdir:v1 pwd
WORKDIR with relative path
Dockerfile
FROM alpine:3.9.3
LABEL maintainer="Collabnix"

WORKDIR /opt
RUN echo "Welcome to Docker Labs" > opt.txt
WORKDIR folder1
RUN echo "Welcome to Docker Labs" > folder1.txt
WORKDIR folder2
RUN echo "Welcome to Docker Labs" > folder2.txt
Building Docker image
$ docker build -t workdir:v2 .
Testing current WORKDIR by running container
$ docker run -it workdir:v2 pwd
WORKDIR with Absolute path
Dockerfile
FROM alpine:3.9.3
LABEL maintainer="Collabnix"

WORKDIR /opt/folder1
RUN echo "Welcome to Docker Labs" > opt.txt
WORKDIR /var/tmp/
Building Docker image
$ docker build -t workdir:v3 .
Testing current WORKDIR by running container
$ docker run -it workdir:v3 pwd
WORKDIR with environment variables as path
Dockerfile
FROM alpine:3.9.3
LABEL maintainer="Collabnix"

ENV DIRPATH /myfolder
WORKDIR $DIRPATH
Building Docker image
$ docker build -t workdir:v4 .
Testing current WORKDIR by running container
$ docker run -it workdir:v4 pwd
Lab #7: Create an image with RUN instruction
The RUN instruction execute command on top of the below layer and create a new layer.
RUN instruction can be wrote in two forms:
- RUN
(shell form) - RUN [“executable”, “param1”, “param2”] (exec form)
Tested Infrastructure
| Platform | Number of Instance | Reading Time |
|---|---|---|
| Play with Docker | 1 | 5 min |
Pre-requisite
- Create an account with DockerHub
- Open PWD Platform on your browser
- Click on Add New Instance on the left side of the screen to bring up Alpine OS instance on the right side
Assignment:
- Create an image with RUN instruction
- Combining multiple RUN instruction to one
Create an image with RUN instruction
FROM alpine:3.9.3
LABEL maintainer="Collabnix"
RUN apk add --update
RUN apk add curl
RUN rm -rf /var/cache/apk/
Building Docker image
$ docker image build -t run:v1 .
Checking layer of the image
$  docker image history run:v1
IMAGE               CREATED             CREATED BY                                      SIZE
NT
5b09d7ba1736        19 seconds ago      /bin/sh -c rm -rf /var/cache/apk/               0B
192115cc597a        21 seconds ago      /bin/sh -c apk add curl                         1.55MB
0518580850f1        43 seconds ago      /bin/sh -c apk add --update                     1.33MB
8590497d994e        45 seconds ago      /bin/sh -c #(nop)  LABEL maintainer=Collabnix   0B
cdf98d1859c1        4 months ago        /bin/sh -c #(nop)  CMD ["/bin/sh"]              0B
<missing>           4 months ago        /bin/sh -c #(nop) ADD file:2e3a37883f56a4a27…   5.53MB
Number of layers 6
Checking image size
$ docker image ls run:v1
REPOSITORY          TAG                 IMAGE ID            CREATED             SIZE
run                 v1                  5b09d7ba1736        4 minutes ago       8.42MB
Its 8.42MB
Combining multiple RUN instruction to one
FROM alpine:3.9.3
LABEL maintainer="Collabnix"
RUN apk add --update && \
	apk add curl  && \
	rm -rf /var/cache/apk/
Building Docker image
$ docker image build -t run:v2 .
Checking layer of the image
$ docker image history run:v2
IMAGE               CREATED             CREATED BY                                      SIZE
NT
784298155541        50 seconds ago      /bin/sh -c apk add --update  && apk add curl…   1.55MB
8590497d994e        8 minutes ago       /bin/sh -c #(nop)  LABEL maintainer=Collabnix   0B
cdf98d1859c1        4 months ago        /bin/sh -c #(nop)  CMD ["/bin/sh"]              0B
<missing>           4 months ago        /bin/sh -c #(nop) ADD file:2e3a37883f56a4a27…   5.53MB
Number of layers 4
Checking image size
$ docker image ls run:v2
REPOSITORY          TAG                 IMAGE ID            CREATED             SIZE
run                 v2                  784298155541        3 minutes ago       7.08MB
its now 7.08MB
Lab #8: Create an image with ARG instruction
The ARG directive in Dockerfile defines the parameter name and defines its default value. This default value can be overridden by the --build-arg <parameter name>=<value> in the build command docker build.
`ARG <parameter name>[=<default>]`
The build parameters have the same effect as ENV, which is to set the environment variables. The difference is that the environment variables of the build environment set by ARG will not exist in the future when the container is running. But don’t use ARG to save passwords and the like, because docker history can still see all the values.
Tested Infrastructure
| Platform | Number of Instance | Reading Time |
|---|---|---|
| Play with Docker | 1 | 5 min |
Pre-requisite
- Create an account with DockerHub
- Open PWD Platform on your browser
- Click on Add New Instance on the left side of the screen to bring up Alpine OS instance on the right side
Assignment
- Writing a Dockerfile with ARG instruction
- Building Docker Image with default argument
- Running container argv:v1
- Passing the argument during image build time
- Running container argv:v2
Writing a Dockerfile with ARG instruction
We are writing a Dockerfile which echo “Welcome $WELCOME_USER, to Docker World!” where default argument value for WELCOME_USER as Collabnix.
FROM alpine:3.9.3
LABEL maintainer="Collabnix"

#Setting a default value to Argument WELCOME_USER
ARG WELCOME_USER=Collabnix
RUN echo "Welcome $WELCOME_USER, to Docker World!" > message.txt
CMD cat message.txt
Building Docker Image with default argument
$ docker image build -t arg:v1 .
Running container argv:v1
$ docker run arg:v1

Welcome Collabnix, to Docker World!
Passing the argument(WELCOME_USER) during image build time using –build-arg flag
$ docker image build -t arg:v2 --build-arg WELCOME_USER=Savio .
Running container argv:v2
$ docker run arg:v2

Welcome Savio, to Docker World!
NOTE: ARG is the only one instruction which can come before FROM instruction, but then arg value can be used only by FROM.
Lab #9: Create an image with ENV instruction
The ENV instruction in Dockerfile sets the environment variable for your container when you start. The default value can be overridden by passing --env <key>=<value> when you start the container.
Tested Infrastructure
| Platform | Number of Instance | Reading Time |
|---|---|---|
| Play with Docker | 1 | 5 min |
Pre-requisite
- Create an account with DockerHub
- Open PWD Platform on your browser
- Click on Add New Instance on the left side of the screen to bring up Alpine OS instance on the right side
Assignment
- Writing a Dockerfile with ENV instruction
- Building Docker Image
- Running container env:v1
- Override existing env while running container
Writing a Dockerfile with ENV instruction
Dockerfile
FROM alpine:3.9.3
LABEL maintainer="Collabnix"

ENV WELCOME_MESSAGE="Welcome to Docker World"

CMD ["sh", "-c", "echo $WELCOME_MESSAGE"]
Building Docker Image
$ docker build -t env:v1 .
Running container env:v1
$ docker container run env:v1
Welcome to Docker World
Override existing env while running container
$ docker container run --env WELCOME_MESSAGE="Welcome to Docker Workshop" env:v1
Welcome to Docker Workshop
Lab #10: Create an image with VOLUME instruction
Pre-requisite:
Tested Infrastructure
| Platform | Number of Instance | Reading Time |
|---|---|---|
| Play with Docker | 1 | 5 min |
Pre-requisite
- Create an account with DockerHub
- Open PWD Platform on your browser
- Click on Add New Instance on the left side of the screen to bring up Alpine OS instance on the right side
Assignment
- Create an image with VOLUME instruction
- Finding the volume created on the host
- Testing mount working as exepected
Create an image with VOLUME instruction
Dockerfile
FROM nginx:alpine
LABEL maintainer="Collabnix"

VOLUME /myvol
CMD [ "nginx","-g","daemon off;" ]
Building Docker image
$ docker build -t volume:v1 .
Create a container based on volume:v1 image
$ docker container run --rm -d --name volume-test volume:v1
Finding the volume created on the host
Checking the volume name of the container
$ docker container inspect -f '{{ (index .Mounts 0).Name }}' volume-test
ed09456a448934218f03acbdaa31f465ebbb92e0d45e8284527a2c538cc6b016
Listout Volume in the host
$ docker volume ls
DRIVER              VOLUME NAME
local               ed09456a448934218f03acbdaa31f465ebbb92e0d45e8284527a2c538cc6b016
You will see the volume has been created.
Volume mount path in host
$ docker container inspect -f '{{ (index .Mounts 0).Source }}' volume-test
/var/lib/docker/volumes/ed09456a448934218f03acbdaa31f465ebbb92e0d45e8284527a2c538cc6b016/_data
Testing mount working as exepected
Create a file in this folder
$ touch /var/lib/docker/volumes/ed09456a448934218f03acbdaa31f465ebbb92e0d45e8284527a2c538cc6b016/_data/mytestfile.txt
Checking file is there in run container
$ docker container exec -it volume-test ls myvol
Lab #11: Create an image with EXPOSE instruction
The EXPOSE instruction expose a port, the protocol can be UDP or TCP associated with the indicated port, default is TCP with no specification. The EXPOSE won’t be able to map the ports on the host machine. Regardless of the EXPOSE settings, EXPOSE port can be override using -p flag while starting the container.
Pre-requisite:
Tested Infrastructure
| Platform | Number of Instance | Reading Time |
|---|---|---|
| Play with Docker | 1 | 5 min |
Pre-requisite
- Create an account with DockerHub
- Open PWD Platform on your browser
- Click on Add New Instance on the left side of the screen to bring up Alpine OS instance on the right side
Assignment
- Create an image with EXPOSE instruction
- Inspecting the EXPOSE port in the image
- Publish all exposed port
Create an image with VOLUME instruction
Dockerfile
FROM nginx:alpine
LABEL maintainer="Collabnix"

EXPOSE 80/tcp
EXPOSE 80/udp

CMD [ "nginx","-g","daemon off;" ]
Building Docker image
$ docker build -t expose:v1 .
Create a container based on expose:v1 image
$ docker container run --rm -d --name expose-inst expose:v1
Inspecting the EXPOSE port in the image
$ docker image inspect --format={{.ContainerConfig.ExposedPorts}} expose:v1
Publish all exposed ports
We can publish all EXPOSE port using -P flag.
$ docker container run --rm -P -d --name expose-inst-Publish expose:v1
Checking the publish port
$  docker container ls
CONTAINER ID        IMAGE               COMMAND                  CREATED             STATUS              PORTS                                          NAMES
24983e09bd86        expose:v1           "nginx -g 'daemon of…"   46 seconds ago      Up 45 seconds       0.0.0.0:32768->80/tcp, 0.0.0.0:32768->80/udp   expose-inst-Publish
Lab #12: Create an image with LABEL Instruction
You can add labels to your image to help organize images by project, record licensing information, to aid in automation, or for other reasons. For each label, add a line beginning with LABEL and with one or more key-value pairs. The following examples show the different acceptable formats.
Docker offers support to add labels into images as a way to add custom metadata on them. The label syntax on your Dockerfile is as follows:
LABEL <key>=<value> <key>=<value> <key>=<value> ...
The LABEL instruction adds metadata to an image. A LABEL is a key-value pair. To include spaces within a LABEL value, use quotes and backslashes as you would in command-line parsing. A few usage examples:
LABEL "com.example.vendor"="ACME Incorporated"
LABEL com.example.label-with-value="foo"
LABEL version="1.0"
LABEL description="This text illustrates \
that label-values can span multiple lines."
An image can have more than one label. You can specify multiple labels on a single line. Prior to Docker 1.10, this decreased the size of the final image, but this is no longer the case. You may still choose to specify multiple labels in a single instruction, in one of the following two ways:
LABEL multi.label1="value1" multi.label2="value2" other="value3"
LABEL multi.label1="value1" \
      multi.label2="value2" \
      other="value3"
Labels included in base or parent images (images in the FROM line) are inherited by your image. If a label already exists but with a different value, the most-recently-applied value overrides any previously-set value.
To view an image’s labels, use the docker inspect command.
"Labels": {
    "com.example.vendor": "ACME Incorporated"
    "com.example.label-with-value": "foo",
    "version": "1.0",
    "description": "This text illustrates that label-values can span multiple lines.",
    "multi.label1": "value1",
    "multi.label2": "value2",
    "other": "value3"
},
Lab #13: Create an image with ONBUILD instruction
Format: ONBUILD <other instructions>.
ONBUILD is a special instruction, followed by other instructions, such as RUN, COPY, etc., and these instructions will not be executed when the current image is built. Only when the current image is mirrored, the next level of mirroring will be executed.
The other instructions in Dockerfile are prepared to customize the current image. Only ONBUILD is prepared to help others customize themselves.
Suppose we want to make an image of the application written by Node.js. We all know that Node.js uses npm for package management, and all dependencies, configuration, startup information, etc. are placed in the package.json file. After getting the program code, you need to do npm install first to get all the required dependencies. Then you can start the app with npm start. Therefore, in general, Dockerfile will be written like this:
FROM node:slim
RUN mkdir /app
WORKDIR /app
COPY ./package.json /app
RUN [ "npm", "install" ]
COPY . /app/
CMD [ "npm", "start" ]
Put this Dockerfile in the root directory of the Node.js project, and after building the image, you can use it to start the container. But what if we have a second Node.js project? Ok, then copy this Dockerfile to the second project. If there is a third project? Copy it again? The more copies of a file, the more difficult it is to have version control, so let’s continue to look at the maintenance of such scenarios.
If the first Node.js project is in development, I find that there is a problem in this Dockerfile, such as typing a typo, or installing an extra package, then the developer fixes the Dockerfile, builds it again, and solves the problem. The first project is ok, but the second one? Although the original Dockerfile was copied and pasted from the first project, it will not fix their Dockerfile because the first project, and the Dockerfile of the second project will be automatically fixed.
So can we make a base image, and then use the base image for each project? In this way, the basic image is updated, and each project does not need to synchronize the changes of Dockerfile. After rebuilding, it inherits the update of the base image. Ok, yes, let’s see the result. Then the above Dockerfile will become:
FROM node:slim
RUN mkdir /app
WORKDIR /app
CMD [ "npm", "start" ]
Here we take out the project-related build instructions and put them in the subproject. Assuming that the name of the base image is my-node, the own Dockerfile in each project becomes:
FROM my-node
Yes, there is only one such line. When constructing a mirror with this one-line Dockerfile in each project directory, the three lines of the previous base image ONBUILD will start executing, successfully copy the current project code into the image, and execute for this project. npm install, generate an application image.
Lab
# Dockerfile
FROM busybox
ONBUILD RUN echo "You won't see me until later"
Docker build
docker build -t me/no_echo_here .

Uploading context  2.56 kB
Uploading context
Step 0 : FROM busybox
Pulling repository busybox
769b9341d937: Download complete
511136ea3c5a: Download complete
bf747efa0e2f: Download complete
48e5f45168b9: Download complete
 ---> 769b9341d937
Step 1 : ONBUILD RUN echo "You won't see me until later"
 ---> Running in 6bf1e8f65f00
 ---> f864c417cc99
Successfully built f864c417cc9
Here the ONBUILD instruction is read, not run, but stored for later use.
# Dockerfile
FROM me/no_echo_here
docker build -t me/echo_here . Uploading context 2.56 kB Uploading context Step 0 : FROM cpuguy83/no_echo_here
Executing 1 build triggers
Step onbuild-0 : RUN echo "You won't see me until later"
 ---> Running in ebfede7e39c8
You won't see me until later
 ---> ca6f025712d4
 ---> ca6f025712d4
Successfully built ca6f025712d4
Ubutu Rails
FROM ubuntu:12.04

RUN apt-get update -qq && apt-get install -y ca-certificates sudo curl git-core
RUN rm /bin/sh && ln -s /bin/bash /bin/sh

RUN locale-gen  en_US.UTF-8
ENV LANG en_US.UTF-8
ENV LANGUAGE en_US.UTF-8
ENV LC_ALL en_US.UTF-8

RUN curl -L https://get.rvm.io | bash -s stable
ENV PATH /usr/local/rvm/bin:/usr/local/sbin:/usr/local/bin:/usr/sbin:/usr/bin:/sbin:/bin
RUN /bin/bash -l -c rvm requirements
RUN source /usr/local/rvm/scripts/rvm && rvm install ruby
RUN rvm all do gem install bundler

ONBUILD ADD . /opt/rails_demo
ONBUILD WORKDIR /opt/rails_demo
ONBUILD RUN rvm all do bundle install
ONBUILD CMD rvm all do bundle exec rails server
This Dockerfile is doing some initial setup of a base image. Installs Ruby and bundler. Pretty typical stuff. At the end are the ONBUILD instructions.
ONBUILD ADD . /opt/rails_demo Tells any child image to add everything in the current directory to /opt/railsdemo. Remember, this only gets run from a child image, that is when another image uses this one as a base (or FROM). And it just so happens if you look in the repo I have a skeleton rails app in railsdemo that has it’s own Dockerfile in it, we’ll take a look at this later.
ONBUILD WORKDIR /opt/rails_demo Tells any child image to set the working directory to /opt/rails_demo, which is where we told ADD to put any project files
ONBUILD RUN rvm all do bundle install Tells any child image to have bundler install all gem dependencies, because we are assuming a Rails app here.
ONBUILD CMD rvm all do bundle exec rails server Tells any child image to set the CMD to start the rails server
Ok, so let’s see this image build, go ahead and do this for yourself so you can see the output.
git clone git@github.com:sangam14/docker_onbuild.git
cd docker_onbuild
docker build -t sangam14/docker_onbuild .

Step 0 : FROM ubuntu:12.04
 ---> 9cd978db300e
Step 1 : RUN apt-get update -qq && apt-get install -y ca-certificates sudo curl git-core
 ---> Running in b32a089b7d2d
# output supressed
ldconfig deferred processing now taking place
 ---> d3fdefaed447
Step 2 : RUN rm /bin/sh && ln -s /bin/bash /bin/sh
 ---> Running in f218cafc54d7
 ---> 21a59f8613e1
Step 3 : RUN locale-gen  en_US.UTF-8
 ---> Running in 0fcd7672ddd5
Generating locales...
done
Generation complete.
 ---> aa1074531047
Step 4 : ENV LANG en_US.UTF-8
 ---> Running in dcf936d57f38
 ---> b9326a787f78
Step 5 : ENV LANGUAGE en_US.UTF-8
 ---> Running in 2133c36335f5
 ---> 3382c53f7f40
Step 6 : ENV LC_ALL en_US.UTF-8
 ---> Running in 83f353aba4c8
 ---> f849fc6bd0cd
Step 7 : RUN curl -L https://get.rvm.io | bash -s stable
 ---> Running in b53cc257d59c
# output supressed
---> 482a9f7ac656
Step 8 : ENV PATH /usr/local/rvm/bin:/usr/local/sbin:/usr/local/bin:/usr/sbin:/usr/bin:/sbin:/bin
 ---> Running in c4666b639c70
 ---> b5d5c3e25730
Step 9 : RUN /bin/bash -l -c rvm requirements
 ---> Running in 91469dbc25a6
# output supressed
Step 10 : RUN source /usr/local/rvm/scripts/rvm && rvm install ruby
 ---> Running in cb4cdfcda68f
# output supressed
Step 11 : RUN rvm all do gem install bundler
 ---> Running in 9571104b3b65
Successfully installed bundler-1.5.3
Parsing documentation for bundler-1.5.3
Installing ri documentation for bundler-1.5.3
Done installing documentation for bundler after 3 seconds
1 gem installed
 ---> e2ea33486d62
Step 12 : ONBUILD ADD . /opt/rails_demo
 ---> Running in 5bef85f266a4
 ---> 4082e2a71c7e
Step 13 : ONBUILD WORKDIR /opt/rails_demo
 ---> Running in be1a06c7f9ab
 ---> 23bec71dce21
Step 14 : ONBUILD RUN rvm all do bundle install
 ---> Running in 991da8dc7f61
 ---> 1547bef18de8
Step 15 : ONBUILD CMD rvm all do bundle exec rails server
 ---> Running in c49139e13a0c
 ---> 23c388fb84c1
Successfully built 23c388fb84c1
Lab #14: Create an image with HEALTHCHECK instruction
The HEALTHCHECK directive tells Docker how to determine if the state of the container is normal. This was a new directive introduced during Docker 1.12. Before the HEALTHCHECK directive, the Docker engine can only determine if the container is in a state of abnormality by whether the main process in the container exits. In many cases, this is fine, but if the program enters a deadlock state, or an infinite loop state, the application process does not exit, but the container is no longer able to provide services. Prior to 1.12, Docker did not detect this state of the container and would not reschedule it, causing some containers to be unable to serve, but still accepting user requests.
The syntax look like:
HEALTHCHECK [options] CMD <command>:
The above syntax set the command to check the health of the container
How does it work?
When a HEALTHCHECK instruction is specified in an image, the container is started with it, the initial state will be starting, and will become healthy after the HEALTHCHECK instruction is checked successfully. If it fails for a certain number of times, it will become unhealthy.
What options does HEALTHCHECK support?
--interval=<interval>: interval between two health checks, the default is 30 seconds;
--timeout=<time length>: The health check command runs the timeout period. If this time is exceeded, the health check is regarded as a failure. The default is 30 seconds.
--retries=<number>: When the specified number of consecutive failures, the container status is treated as unhealthy, the default is 3 times.
Like CMD, ENTRYPOINT, HEALTHCHECK can only appear once. If more than one is written, only the last one will take effect.
Pre-requisite:
Tested Infrastructure
| Platform | Number of Instance | Reading Time |
|---|---|---|
| Play with Docker | 1 | 5 min |
Pre-requisite
- Create an account with DockerHub
- Open PWD Platform on your browser
- Click on Add New Instance on the left side of the screen to bring up Alpine OS instance on the right side
Assignment:
- Writing a Dockerfile with HEALTHCHECK instruction
- Build a Docker Image
- Check that the nginx config file exists
- Check if nginx is healthy
- Make Docker container Unhealthy and check
- Create the nginx.conf file and Making the container go healthy
Writing a Dockerfile with HEALTHCHECK instruction
Suppose we have a simple Web service. We want to add a health check to determine if its Web service is working. We can use curl to help determine the HEALTHCHECK of its Dockerfile:
FROM nginx:1.13
HEALTHCHECK --interval=30s --timeout=3s \
  CMD curl -f http://localhost/ || exit 1
EXPOSE 80
Here we set a check every 3 seconds (here the interval is very short for the test, it should be relatively long), if the health check command does not respond for more than 3 seconds, it is considered a failure, and use curl -fs http://localhost/ || exit 1 As a health check command.
Building Docker Image
docker image build -t nginx:1.13 .
Check that the nginx config file exists
docker run --name=nginx-proxy -d \
        --health-cmd='stat /etc/nginx/nginx.conf || exit 1' \
        nginx:1.13
Check if nginx is healthy
docker inspect --format='{{.State.Health.Status}}' nginx-proxy
Make Docker container Unhealthy and check
docker exec nginx-proxy rm /etc/nginx/nginx.conf
Check if nginx is healthy
sleep 5; docker inspect --format='{{.State.Health.Status}}' nginx-proxy
Creating the nginx.conf file and Making the container go healthy
docker exec nginx-proxy touch /etc/nginx/nginx.conf
sleep 5; docker inspect --format='{{.State.Health.Status}}' nginx-proxy
healthy
Lab #15: Create an image with SHELL instruction
Pre-requisite:
- Create an account with DockerHub
- Open PWD Platform on your browser
- Click on Add New Instance on the left side of the screen to bring up Alpine OS instance on the right side
Tested Infrastructure
| Platform | Number of Instance | Reading Time |
|---|---|---|
| Play with Docker | 1 | 5 min |
How does it work?
Format: SHELL ["executable", "parameters"]
- The SHELL instruction allows the default shell used for the shell form of commands to be overridden.
The default shell on Linux is
["/bin/sh", "-c"], and on Windows is["cmd", "/S", "/C"]. The SHELL instruction must be written in JSON form in a Dockerfile. - The SHELL instruction is particularly useful on Windows where there are two commonly used and quite different native shells:
cmdandpowershell, as well as alternate shells available includingsh. - The SHELL instruction can appear multiple times. Each SHELL instruction overrides all previous SHELL instructions, and affects all subsequent instructions.
Create a Dockerfile
FROM windowsservercore

# Executed as cmd /S /C echo default
RUN echo default

# Executed as cmd /S /C powershell -command Write-Host default
RUN powershell -command Write-Host default

# Executed as powershell -command Write-Host hello
SHELL ["powershell", "-command"]
RUN Write-Host hello

# Executed as cmd /S /C echo hello
SHELL ["cmd", "/S"", "/C"]
RUN echo hello
The following instructions can be affected by the SHELL instruction when the shell form of them is used in a Dockerfile: RUN, CMD and ENTRYPOINT.
The following example is a common pattern found on Windows which can be streamlined by using the SHELL instruction:
RUN powershell -command Execute-MyCmdlet -param1 "c:\foo.txt"
The command invoked by docker will be:
cmd /S /C powershell -command Execute-MyCmdlet -param1 "c:\foo.txt"
This is inefficient for two reasons.
First, there is an un-necessary cmd.exe command processor (aka shell) being invoked.
Second, each RUN instruction in the shell form requires an extra powershell -command prefixing the command.
To make it more efficient, one of two mechanisms can be employed. One is to use the JSON form of the RUN command such as:
RUN ["powershell", "-command", "Execute-MyCmdlet", "-param1 \"c:\\foo.txt\""]
While the JSON form is unambiguous and does not use the un-necessary cmd.exe, it does require more verbosity through double-quoting and escaping.
The alternate mechanism is to use the SHELL instruction and the shell form, making a more natural syntax for Windows users, especially when combined with the escape parser directive:
# escape=`

FROM windowsservercore
SHELL ["powershell","-command"]
RUN New-Item -ItemType Directory C:\Example
ADD Execute-MyCmdlet.ps1 c:\example\
RUN c:\example\Execute-MyCmdlet -sample 'hello world'
Build an image
PS E:\docker\build\shell> docker build -t shell .
Sending build context to Docker daemon 3.584 kB
Step 1 : FROM windowsservercore
 ---> 5bc36a335344
Step 2 : SHELL powershell -command
 ---> Running in 87d7a64c9751
 ---> 4327358436c1
Removing intermediate container 87d7a64c9751
Step 3 : RUN New-Item -ItemType Directory C:\Example
 ---> Running in 3e6ba16b8df9


Directory: C:\

Mode                LastWriteTime         Length Name
----                -------------         ------ ----
d-----         6/2/2016   2:59 PM                Example


 ---> 1f1dfdcec085
Removing intermediate container 3e6ba16b8df9
Step 4 : ADD Execute-MyCmdlet.ps1 c:\example\
 ---> 6770b4c17f29
Removing intermediate container b139e34291dc
Step 5 : RUN c:\example\Execute-MyCmdlet -sample 'hello world'
 ---> Running in abdcf50dfd1f
Hello from Execute-MyCmdlet.ps1 - passed hello world
 ---> ba0e25255fda
Removing intermediate container abdcf50dfd1f
Successfully built ba0e25255fda
PS E:\docker\build\shell>
- The SHELL instruction could also be used to modify the way in which a shell operates.
For example, using
SHELL cmd /S /C /V:ON|OFFon Windows, delayed environment variable expansion semantics could be modified. - The
SHELLinstruction can also be used on Linux should an alternate shell be required suchzsh,csh,tcshand others. - The
SHELLfeature was added in Docker 1.12.
Lab 16: Create an image with USER Instruction
The USER directive is similar to WORKDIR, which changes the state of the environment and affects future layers. WORKDIR is to change the working directory, and USER is the identity of the commands such as RUN, CMD and ENTRYPOINT.
Of course, like WORKDIR, USER just helps you switch to the specified user. This user must be pre-established, otherwise it cannot be switched.
Example:
RUN groupadd -r redis && useradd -r -g redis redis
USER redis
RUN [ "redis-server" ]
If the script executed with root wants to change the identity during execution, such as wanting to run a service process with an already established user, don’t use su or sudo, which requires a more cumbersome configuration. And often in the absence of TTY environment. It is recommended to use [gosu] (https://github.com/tianon/gosu).
# Create a redis user and use gosu to change another user to execute the command
RUN groupadd -r redis && useradd -r -g redis redis
# download gosu
RUN wget -O /usr/local/bin/gosu "https://github.com/tianon/gosu/releases/download/1.7/gosu-amd64" \
    && chmod +x /usr/local/bin/gosu \
    && gosu nobody true
# Set CMD and execute it as another user
CMD [ "exec", "gosu", "redis", "redis-server" ]
Pre-requisite:
Tested Infrastructure
| Platform | Number of Instance | Reading Time |
|---|---|---|
| Play with Docker | 1 | 5 min |
Pre-requisite
- Create an account with DockerHub
- Open PWD Platform on your browser
- Click on Add New Instance on the left side of the screen to bring up Alpine OS instance on the right side
How is ENTRYPOINT different from the RUN instruction?
Tested Infrastructure
| Platform | Number of Instance | Reading Time |
|---|---|---|
| Play with Docker | 1 | 5 min |
Pre-requisite
- Create an account with DockerHub
- Open PWD Platform on your browser
- Click on Add New Instance on the left side of the screen to bring up Alpine OS instance on the right side
What is ENTRYPOINT meant for?
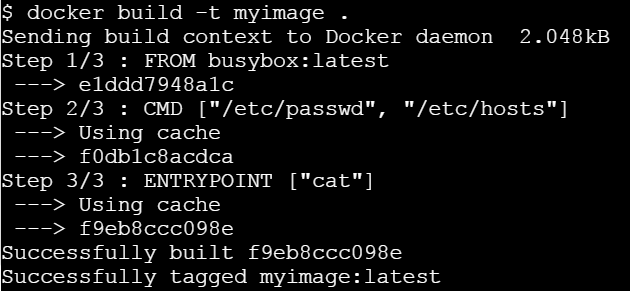
ENTRYPOINT is meant to provide the executable while CMD is to pass the default arguments to the executable. To understand it clearly, let us consider the below Dockerfile:
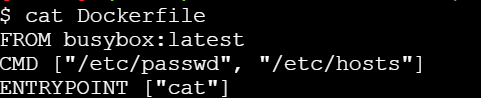
If you try building this Docker image using docker build command -
Let us run this image without any argument.
Let’s run it passing a command line argument

This clearly state that ENTRYPOINT is meant to provide the executable while CMD is to pass the default arguments to the executable.
Writing Dockerfile with Hello Python Script Added
Pre-requisite:
- Create an account with DockerHub
- Open PWD Platform on your browser
- Click on Add New Instance on the left side of the screen to bring up Alpine OS instance on the right side
Tested Infrastructure
| Platform | Number of Instance | Reading Time |
|---|---|---|
| Play with Docker | 1 | 5 min |
[node1] (local) root@192.168.0.38 ~
$ mkdir /test
[node1] (local) root@192.168.0.38 ~
$ cd /test
[node1] (local) root@192.168.0.38 /test
$ pwd
/test
Open a file named ‘Dockerfile’ with a text editor.
[node1] (local) root@192.168.0.38 /test
$ vi Dockerfile
Writing a Dockerfile
Setting a Base Image using FROM keyword
FROM ubuntu
Thus, our image would start building taking base as Ubuntu.
Defining the Author (Optional) using MAINTAINER keyword
MAINTAINER Prashansa Kulshrestha
Running a commands on the base image to form new layers using RUN keyword
RUN apt-get update
RUN apt-get install python
Since, the base image was Ubuntu, we can run Ubuntu commands here. These commands above install python over Ubuntu.
Adding a simple Hello World printing python file to the container’s file system using ADD command
ADD hello.py /home/hello.py
ADD a.py /home/a.py
We will place our hello.py and a.py files in the newly created directory itself (/test). ADD command would copy it from /test (current working directory) of host system to container’s filesystem at /home. The destination directories in the container would be create incase they don’t exist.
Code for hello.py:
print ("Hello World")
Code for a.py:
print ("Overriden Hello")
Specifying default execution environment for the container using CMD and ENTRYPOINT
These keywords let us define the default execution environment for a container when it just initiates from an image or just starts. If a command is specified with CMD keyword, it is the first command which a container executes as soon as it instantiates from an image. However, command and arguments provided with CMD can be overridden if user specifies his own commands while running the container using ‘docker run’ command.'
ENTRYPOINT helps to create a executable container and the commands and arguments provided with this keyword are not overridden.
We can also provide the default application environment using ENTRYPOINT and default arguments to be passed to it via CMD keyword. This can be done as follows:
CMD ["/home/hello.py"]
ENTRYPOINT ["python"]
So, default application mode of container would be python and if no other filename is provided as argument to it then it will execute hello.py placed in its /home directory.
Benefit of this is that user can choose some other file to run with the same application at runtime, that is, while launching the container.
So, our overall Dockerfile currently looks like this:
FROM ubuntu
MAINTAINER Prashansa Kulshrestha
RUN apt-get update
RUN apt-get install -y python
ADD hello.py /home/hello.py
ADD a.py /home/a.py
CMD ["/home/hello.py"]
ENTRYPOINT ["python"]
Building a Dockerfile
To create an image from the Dockerfile, we need to build it. This is done as follows:
[node1] (local) root@192.168.0.38 /test
$ docker build -t pythonimage .
The option -t lets us tag our image with a name we desire. So, here we have named our image as ‘pythonimage’. The ‘.’ in the end specifies current working directory i.e. /test. We initiated our build process from here. Docker would find the file named ‘Dockerfile’ in the current directory to process the build.
Running a container from the newly built image
[node1] (local) root@192.168.0.38 /test
$ docker run --name test1 pythonimage
Hello World
[node1] (local) root@192.168.0.38 /test
$
So, here /home/hello.py file placed in the container executed and displayed the output ‘Hello World’, since it was specified as default with CMD keyword.
[node1] (local) root@192.168.0.38 /test
$ docker run --name test2 pythonimage /home/a.py
Overriden Hello
[node1] (local) root@192.168.0.38 /test
$
Here, user specified another file to be run with python (default application for this container). So, the file specified with CMD got overridden and we obtained the output from /home/a.py.
6 - Creating Private Docker Registry
Building a Private Docker Registry
Tested Infrastructure
| Platform | Number of Instance | Reading Time |
|---|---|---|
| Play with Docker | 1 | 5 min |
Pre-requisite
- Create an account with DockerHub
- Open PWD Platform on your browser
- Click on Add New Instance on the left side of the screen to bring up Alpine OS instance on the right side
Create a directory to permanently store images.
$ mkdir -p /registry/data
Authenticate with DockerHub
$docker login
Start the registry container.
$ docker run -d \
  -p 5000:5000 \
  --name registry \
  -v /registry/data:/var/lib/registry \
  --restart always \
  registry:2
b1a641f8d710eee34405ad575050179f5a1262f1c845806cc3c2b435dea1648c
Display running containers.
$ docker ps
$ docker ps
CONTAINER ID        IMAGE               COMMAND                  CREATED             STATUS              PORTS
                    NAMES
3a056bf96c6d        registry:2          "/entrypoint.sh /etc…"   About an hour ago   Up About an hour    0.0.0
.0:5000->5000/tcp   registry
Pull Alpine 3.6 image from official repository.
$ docker pull alpine:3.6

stretch: Pulling from library/alpine
723254a2c089: Pull complete
Digest: sha256:0a5fcee6f52d5170f557ee2447d7a10a5bdcf715dd7f0250be0b678c556a501b
Status: Downloaded newer image for alpine:3.6
Tag local alpine 3.6 image with an additional tag - local repository address.
$ docker tag alpine:3.6 localhost:5000/alpine:3.6
Push image to the local repository.
[node1] (local) root@192.168.0.23 ~
$ docker push localhost:5000/alpine:3.6
The push refers to repository [localhost:5000/alpine:3.6]
90d1009ce6fe: Pushed
stretch: digest: sha256:38236c068c393272ad02db100e09cac36a5465149e2924a035ee60d6c60c38fe size: 529
[node1] (local) root@192.168.0.23 ~
Remove local images.
[node1] (local) root@192.168.0.23 ~
$ docker image remove alpine:3.6
Untagged: alpine:3.6
Untagged: alpine@sha256:df6ebd5e9c87d0d7381360209f3a05c62981b5c2a3ec94228da4082ba07c4f05
[node1] (local) root@192.168.0.23 ~
$ docker image remove localhost:5000/alpine:3.6
Untagged: localhost:5000/alpine:3.6
Untagged: localhost:5000/debian@sha256:38236c068c393272ad02db100e09cac36a5465149e2924a035ee60d6c60c38fe
Deleted: sha256:4879790bd60d439cfe39c063660eef7af525d5f6f1cbb701a14c7cfc11cbfcf7
Pull Alpine 3.6 image from local repository.
[node1] (local) root@192.168.0.23 ~
$ docker pull localhost:5000/alpine:3.6
stretch: Pulling from alpine
54f7e8ac135a: Pull complete
Digest: sha256:38236c068c393272ad02db100e09cac36a5465149e2924a035ee60d6c60c38fe
Status: Downloaded newer image for localhost:5000/alpine:3.6
List stored images.
[node1] (local) root@192.168.0.23 ~
$ docker image ls
REPOSITORY              TAG                 IMAGE ID            CREATED             SIZE
localhost:5000/alpine   3.6                 4879790bd60d        12 days ago         101MB
registry                2                   2e2f252f3c88        2 months ago        33.3MB
Shared local registry
Create a directory to permanently store images.
$ mkdir -p /srv/registry/data
Create a directory to permanently store certificates and authentication data.
$ mkdir -p /srv/registry/security
Store domain and intermediate certificates using /srv/registry/security/registry.crt file, private key using /srv/registry/security/registry.key file. Use valid certificate and do not waste time with self-signed one. This step is required do use basic authentication.
Install apache2-utils to use htpasswd utility.
[node1] (local) root@192.168.0.23 ~
$ apk add apache2-utils
OK: 302 MiB in 110 packages
Create initial username and password. The only supported password format is bcrypt.
$ : | sudo tee /srv/registry/security/htpasswd
[node1] (local) root@192.168.0.23 ~
$ echo "password" | sudo htpasswd -iB /srv/registry/security/htpasswd username
Adding password for user username
Adding password for user username
$
[node1] (local) root@192.168.0.23 ~
$ cat /srv/registry/security/htpasswd
username:$2y$05$q9R5FSNYpAppB4Vw/AGWb.RqMCGE8DmZ4q5HZC/1wC87oTWyvB9vy
[node1] (local) root@192.168.0.23 ~
$
Stop and Remove all old containers
$ docker stop $(docker ps -a -q)
3a056bf96c6d
[node1] (local) root@192.168.0.23 ~
$ docker rm -f $(docker ps -a -q)
3a056bf96c6d
Start the registry container.
[node1] (local) root@192.168.0.23 ~
$ docker run -d   -p 443:5000   --name registry   -v /srv/registry/data:/var/lib/registry   -v /srv/registry/security:/etc/security   -e REGISTRY_HTTP_TLS_CERTIFICATE=/etc/security/registry.crt   -e REGISTRY_HTTP_TLS_KEY=/etc/security/registry.key   -e REGISTRY_AUTH=htpasswd   -e REGISTRY_AUTH_HTPASSWD_PATH=/etc/security/htpasswd   -e REGISTRY_AUTH_HTPASSWD_REALM="Registry Realm"   --restart always   registry:2
e7755af8cbd70ea84ab77237a87cb97fd1abb18c7726fbc116c40f081d3b7098
[node1] (local) root@192.168.0.23 ~
Display running containers.
[node1] (local) root@192.168.0.23 ~
$ docker ps
CONTAINER ID        IMAGE               COMMAND                  CREATED              STATUS        PORTS               NAMES
e7755af8cbd7        registry:2          "/entrypoint.sh /etc…"   About a minute ago   Restarting (1) 22 seconds ago                       registry
[node1] (local) root@192.168.0.23 ~
Pull Alpine image from official repository.
$ docker pull alpine:3.6

stretch: Pulling from library/alpine
723254a2c089: Pull complete
Digest: sha256:0a5fcee6f52d5170f557ee2447d7a10a5bdcf715dd7f0250be0b678c556a501b
Status: Downloaded newer image for alpine:3.6
Tag local Alpine image with an additional tag - local repository address.
$ docker tag alpine:3.6 registry.collabnix.com/alpine:3.6
This time you need to provide login credentials to use local repository.
$ docker push registry.collabnix.com/alpine:3.6

e27a10675c56: Preparing
no basic auth credentials
$ docker pull registry.collabnix.com/alpine:3.6
Error response from daemon: Get https://registry.collabnix.com/v2/alpine/manifests/3.6: no basic auth credentials
Log in to the local registry.
$ docker login --username username registry.collabnix.com
Password: ********

Login Succeeded
Push image to the local repository.
$ docker push registry.collabnix.com/alpine:3.6
The push refers to repository [registry.collabnix.com/alpine]
e27a10675c56: Pushed
stretch: digest: sha256:02741df16aee1b81c4aaff4c48d75cc2c308bade918b22679df570c170feef7c size: 529
Remove local images.
$ docker image remove alpine:3.6

Untagged: alpine:3.6
Untagged: alpine@sha256:0a5fcee6f52d5170f557ee2447d7a10a5bdcf715dd7f0250be0b678c556a501b
$ docker image remove registry.collabnix.com/alpine:3.6

Untagged: registry.collabnix.com/alpine:3.6
Untagged: registry.sl.collabnix.com/alpine@sha256:02741df16aee1b81c4aaff4c48d75cc2c308bade918b22679df570c170feef7c
Deleted: sha256:da653cee0545dfbe3c1864ab3ce782805603356a9cc712acc7b3100d9932fa5e
Deleted: sha256:e27a10675c5656bafb7bfa9e4631e871499af0a5ddfda3cebc0ac401dfe19382
Pull Debian Stretch image from local repository.
$ docker pull registry.collabnix.com/alpine:3.6

stretch: Pulling from alpine
723254a2c089: Pull complete
Digest: sha256:02741df16aee1b81c4aaff4c48d75cc2c308bade918b22679df570c170feef7c
Status: Downloaded newer image for registry.collabnix.com/alpine:3.6
List stored images.
$ docker image ls

REPOSITORY                           TAG                 IMAGE ID            CREATED             SIZE
registry                             2                   d1fd7d86a825        4 weeks ago         33.3MB
registry.collabnix.com/alpine        3.6             da653cee0545        2 months ago        100MB
hello-world                          latest              f2a91732366c        2 months ago
Test Your Knowledge
7 - Docker Volumes
Managing volumes through Docker CLI
Tested Infrastructure
| Platform | Number of Instance | Reading Time |
|---|---|---|
| Play with Docker | 1 | 5 min |
Pre-requisite
docker volume commands
Creating Volume called demo
docker volume create demo
Listing Docker Volumes
docker volume ls
Inspecting “demo” Docker Volume
docker inspect demo
Removing the “demo” Docker Volume
docker volume rm demo
Creating Volume Mount from docker run command & sharing same Volume Mounts among multiple containers
Tested Infrastructure
| Platform | Number of Instance | Reading Time |
|---|---|---|
| Play with Docker | 1 | 5 min |
Pre-requisite
Volumes can be shared across containers
Preparations
- Clean your docker host using the commands :
$ docker rm -f $(docker ps -a -q)
$ docker volume rm $(docker volume ls -q)
Task
-
The Task for this lab is to create a volume, call it my_volume.
-
you should than run a simple an thin container and attach a volume to it. use the image selaworkshops/busybox:latest and use any name to the mounted volume directory (e.g : data)
-
change something in the volume folder , e.g : add a file with some content.
-
create a second volume mounted to the same volume , make sure the file you created in step 3 exists !
Instructions
- Display existing volumes:
$ docker volume ls
- Create a new volume:
$ docker volume create my-volume
- Inspect the new volume to find the mountpoint (volume location):
$ docker volume inspect my-volume
[
    {
        "CreatedAt": "2018-06-13T20:36:15Z",
        "Driver": "local",
        "Labels": {},
        "Mountpoint": "/var/lib/docker/volumes/my-volume/_data",
        "Name": "my-volume",
        "Options": {},
        "Scope": "local"
    }
]
- Let’s run a container and mount the created volume to the root:
$ docker run -it -v my-volume:/data --name my-container selaworkshops/busybox:latest
- Create a new file under /data:
$ cd /data
$ echo "hello" > hello.txt
$ ls
- Open other terminal instance and run other container with the same volume:
$ docker run -it -v my-volume:/data --name my-container-2 selaworkshops/busybox:latest
- Inspect the /data folder (the created file will be there):
$ cd data
$ ls
- Exit from both containers and delete them:
$ exit
$ docker rm -f my-container my-container-2
- Ensure the containers were deleted
$ docker ps -a
- Run a new container attaching the created volume:
$ docker run -it -v my-volume:/data --name new-container selaworkshops/busybox:latest
- Inspect the /data folder (the created file will be there):
$ cd data
$ ls
- Exit from the container and delete it:
$ exit
$ docker rm -f new-container
8 - Docker Networks
- Step 1 - The
docker networkcommand - Step 2 - List networks
- Step 3 - Inspect a network
- Step 4 - List network driver plugins
- Test Your Knowledge
Prerequisites
You will need all of the following to complete this lab:
- A Linux-based Docker Host running Docker 1.12 or higher
Step 1: The docker network command
The docker network command is the main command for configuring and managing container networks.
Run a simple docker network command from any of your lab machines.
$ docker network

Usage:  docker network COMMAND

Manage Docker networks

Options:
      --help   Print usage

Commands:
  connect     Connect a container to a network
  create      Create a network
  disconnect  Disconnect a container from a network
  inspect     Display detailed information on one or more networks
  ls          List networks
  rm          Remove one or more networks

Run 'docker network COMMAND --help' for more information on a command.
The command output shows how to use the command as well as all of the docker network sub-commands. As you can see from the output, the docker network command allows you to create new networks, list existing networks, inspect networks, and remove networks. It also allows you to connect and disconnect containers from networks.
Step 2: List networks
Run a docker network ls command to view existing container networks on the current Docker host.
$ docker network ls
NETWORK ID          NAME                DRIVER              SCOPE
1befe23acd58        bridge              bridge              local
726ead8f4e6b        host                host                local
ef4896538cc7        none                null                local
The output above shows the container networks that are created as part of a standard installation of Docker.
New networks that you create will also show up in the output of the docker network ls command.
You can see that each network gets a unique ID and NAME. Each network is also associated with a single driver. Notice that the “bridge” network and the “host” network have the same name as their respective drivers.
Step 3: Inspect a network
The docker network inspect command is used to view network configuration details. These details include; name, ID, driver, IPAM driver, subnet info, connected containers, and more.
Use docker network inspect to view configuration details of the container networks on your Docker host. The command below shows the details of the network called bridge.
$ docker network inspect bridge
[
    {
        "Name": "bridge",
        "Id": "1befe23acd58cbda7290c45f6d1f5c37a3b43de645d48de6c1ffebd985c8af4b",
        "Scope": "local",
        "Driver": "bridge",
        "EnableIPv6": false,
        "IPAM": {
            "Driver": "default",
            "Options": null,
            "Config": [
                {
                    "Subnet": "172.17.0.0/16",
                    "Gateway": "172.17.0.1"
                }
            ]
        },
        "Internal": false,
        "Containers": {},
        "Options": {
            "com.docker.network.bridge.default_bridge": "true",
            "com.docker.network.bridge.enable_icc": "true",
            "com.docker.network.bridge.enable_ip_masquerade": "true",
            "com.docker.network.bridge.host_binding_ipv4": "0.0.0.0",
            "com.docker.network.bridge.name": "docker0",
            "com.docker.network.driver.mtu": "1500"
        },
        "Labels": {}
    }
]
NOTE: The syntax of the
docker network inspectcommand isdocker network inspect <network>, where<network>can be either network name or network ID. In the example above we are showing the configuration details for the network called “bridge”. Do not confuse this with the “bridge” driver.
Step 4: List network driver plugins
The docker info command shows a lot of interesting information about a Docker installation.
Run a docker info command on any of your Docker hosts and locate the list of network plugins.
$ docker info
Containers: 0
 Running: 0
 Paused: 0
 Stopped: 0
Images: 0
Server Version: 1.12.3
Storage Driver: aufs
<Snip>
Plugins:
 Volume: local
 Network: bridge host null overlay    <<<<<<<<
Swarm: inactive
Runtimes: runc
<Snip>
The output above shows the bridge, host, null, and overlay drivers.
Bridge networking
In this lab you’ll learn how to build, manage, and use bridge networks.
You will complete the following steps as part of this lab.
- Step 1 - The default bridge network
- Step 2 - Connect a container to the default bridge network
- Step 3 - Test the network connectivity
- Step 4 - Configure NAT for external access
Prerequisites
You will need all of the following to complete this lab:
- A Linux-based Docker host running Docker 1.12 or higher
- The lab was built and tested using Ubuntu 16.04
Step 1: The default bridge network
Every clean installation of Docker comes with a pre-built network called bridge. Verify this with the docker network ls command.
$ docker network ls
NETWORK ID          NAME                DRIVER              SCOPE
1befe23acd58        bridge              bridge              local
726ead8f4e6b        host                host                local
ef4896538cc7        none                null                local
The output above shows that the bridge network is associated with the bridge driver. It’s important to note that the network and the driver are connected, but they are not the same. In this example the network and the driver have the same name - but they are not the same thing!
The output above also shows that the bridge network is scoped locally. This means that the network only exists on this Docker host. This is true of all networks using the bridge driver - the bridge driver provides single-host networking.
All networks created with the bridge driver are based on a Linux bridge (a.k.a. a virtual switch).
Install the brctl command and use it to list the Linux bridges on your Docker host.
# Install the brctl tools

$ apt-get install bridge-utils
<Snip>

# List the bridges on your Docker host

$ brctl show
bridge name     bridge id               STP enabled     interfaces
docker0         8000.0242f17f89a6       no
The output above shows a single Linux bridge called docker0. This is the bridge that was automatically created for the bridge network. You can see that it has no interfaces currently connected to it.
You can also use the ip command to view details of the docker0 bridge.
$ ip a
<Snip>
3: docker0: <NO-CARRIER,BROADCAST,MULTICAST,UP> mtu 1500 qdisc noqueue state DOWN group default
    link/ether 02:42:f1:7f:89:a6 brd ff:ff:ff:ff:ff:ff
    inet 172.17.0.1/16 scope global docker0
       valid_lft forever preferred_lft forever
    inet6 fe80::42:f1ff:fe7f:89a6/64 scope link
       valid_lft forever preferred_lft forever
Step 2: Connect a container
The bridge network is the default network for new containers. This means that unless you specify a different network, all new containers will be connected to the bridge network.
Create a new container.
$ docker run -dt ubuntu sleep infinity
6dd93d6cdc806df6c7812b6202f6096e43d9a013e56e5e638ee4bfb4ae8779ce
This command will create a new container based on the ubuntu:latest image and will run the sleep command to keep the container running in the background. As no network was specified on the docker run command, the container will be added to the bridge network.
Run the brctl show command again.
$ brctl show
bridge name     bridge id               STP enabled     interfaces
docker0         8000.0242f17f89a6       no              veth3a080f
Notice how the docker0 bridge now has an interface connected. This interface connects the docker0 bridge to the new container just created.
Inspect the bridge network again to see the new container attached to it.
$ docker network inspect bridge
<Snip>
        "Containers": {
            "6dd93d6cdc806df6c7812b6202f6096e43d9a013e56e5e638ee4bfb4ae8779ce": {
                "Name": "reverent_dubinsky",
                "EndpointID": "dda76da5577960b30492fdf1526c7dd7924725e5d654bed57b44e1a6e85e956c",
                "MacAddress": "02:42:ac:11:00:02",
                "IPv4Address": "172.17.0.2/16",
                "IPv6Address": ""
            }
        },
<Snip>
Step 3: Test network connectivity
The output to the previous docker network inspect command shows the IP address of the new container. In the previous example it is “172.17.0.2” but yours might be different.
Ping the IP address of the container from the shell prompt of your Docker host. Remember to use the IP of the container in your environment.
$ ping 172.17.0.2
64 bytes from 172.17.0.2: icmp_seq=1 ttl=64 time=0.069 ms
64 bytes from 172.17.0.2: icmp_seq=2 ttl=64 time=0.052 ms
64 bytes from 172.17.0.2: icmp_seq=3 ttl=64 time=0.050 ms
64 bytes from 172.17.0.2: icmp_seq=4 ttl=64 time=0.049 ms
64 bytes from 172.17.0.2: icmp_seq=5 ttl=64 time=0.049 ms
^C
--- 172.17.0.2 ping statistics ---
5 packets transmitted, 5 received, 0% packet loss, time 3999ms
rtt min/avg/max/mdev = 0.049/0.053/0.069/0.012 ms
Press Ctrl-C to stop the ping. The replies above show that the Docker host can ping the container over the bridge network.
Log in to the container, install the ping
program and ping www.dockercon.com.
# Get the ID of the container started in the previous step.
$ docker ps
CONTAINER ID    IMAGE    COMMAND             CREATED  STATUS  NAMES
6dd93d6cdc80    ubuntu   "sleep infinity"    5 mins   Up      reverent_dubinsky

# Exec into the container
$ docker exec -it 6dd93d6cdc80 /bin/bash

# Update APT package lists and install the iputils-ping package
root@6dd93d6cdc80:/# apt-get update
<Snip>

apt-get install iputils-ping
Reading package lists... Done
<Snip>

# Ping www.dockercon.com from within the container
root@6dd93d6cdc80:/# ping www.dockercon.com
PING www.dockercon.com (104.239.220.248) 56(84) bytes of data.
64 bytes from 104.239.220.248: icmp_seq=1 ttl=39 time=93.9 ms
64 bytes from 104.239.220.248: icmp_seq=2 ttl=39 time=93.8 ms
64 bytes from 104.239.220.248: icmp_seq=3 ttl=39 time=93.8 ms
^C
--- www.dockercon.com ping statistics ---
3 packets transmitted, 3 received, 0% packet loss, time 2002ms
rtt min/avg/max/mdev = 93.878/93.895/93.928/0.251 ms
This shows that the new container can ping the internet and therefore has a valid and working network configuration.
Step 4: Configure NAT for external connectivity
In this step we’ll start a new NGINX container and map port 8080 on the Docker host to port 80 inside of the container. This means that traffic that hits the Docker host on port 8080 will be passed on to port 80 inside the container.
NOTE: If you start a new container from the official NGINX image without specifying a command to run, the container will run a basic web server on port 80.
Start a new container based off the official NGINX image.
$ docker run --name web1 -d -p 8080:80 nginx
Unable to find image 'nginx:latest' locally
latest: Pulling from library/nginx
386a066cd84a: Pull complete
7bdb4b002d7f: Pull complete
49b006ddea70: Pull complete
Digest: sha256:9038d5645fa5fcca445d12e1b8979c87f46ca42cfb17beb1e5e093785991a639
Status: Downloaded newer image for nginx:latest
b747d43fa277ec5da4e904b932db2a3fe4047991007c2d3649e3f0c615961038
Check that the container is running and view the port mapping.
$ docker ps
CONTAINER ID    IMAGE               COMMAND                  CREATED             STATUS              PORTS                           NAMES
b747d43fa277   nginx               "nginx -g 'daemon off"   3 seconds ago       Up 2 seconds        443/tcp, 0.0.0.0:8080->80/tcp   web1
6dd93d6cdc80        ubuntu              "sleep infinity"         About an hour ago   Up About an hour                                    reverent_dubinsky
There are two containers listed in the output above. The top line shows the new web1 container running NGINX. Take note of the command the container is running as well as the port mapping - 0.0.0.0:8080->80/tcp maps port 8080 on all host interfaces to port 80 inside the web1 container. This port mapping is what effectively makes the containers web service accessible from external sources (via the Docker hosts IP address on port 8080).
Now that the container is running and mapped to a port on a host interface you can test connectivity to the NGINX web server.
To complete the following task you will need the IP address of your Docker host. This will need to be an IP address that you can reach (e.g. if your lab is in AWS this will need to be the instance’s Public IP).
Point your web browser to the IP and port 8080 of your Docker host. The following example shows a web browser pointed to 52.213.169.69:8080

If you try connecting to the same IP address on a different port number it will fail.
If for some reason you cannot open a session from a web broswer, you can connect from your Docker host using the curl command.
$ curl 127.0.0.1:8080
<!DOCTYPE html>
<html>
<head>
<title>Welcome to nginx!</title>
    <Snip>
<p><em>Thank you for using nginx.</em></p>
</body>
</html>
If you try and curl the IP address on a different port number it will fail.
NOTE: The port mapping is actually port address translation (PAT).