This the multi-page printable view of this section. Click here to print.
Docker for intermediate
- 1: Advanced Docker networking
- 2: Docker compose
- 3: First Look at Docker Application Packages?
- 4: Introduction to Docker Swarm
- 5: Multistage build
- 6: What happens when Containers are Launched?
1 - Advanced Docker networking
Advanced network configuration
introduces some of Docker’s advanced network configurations and options.
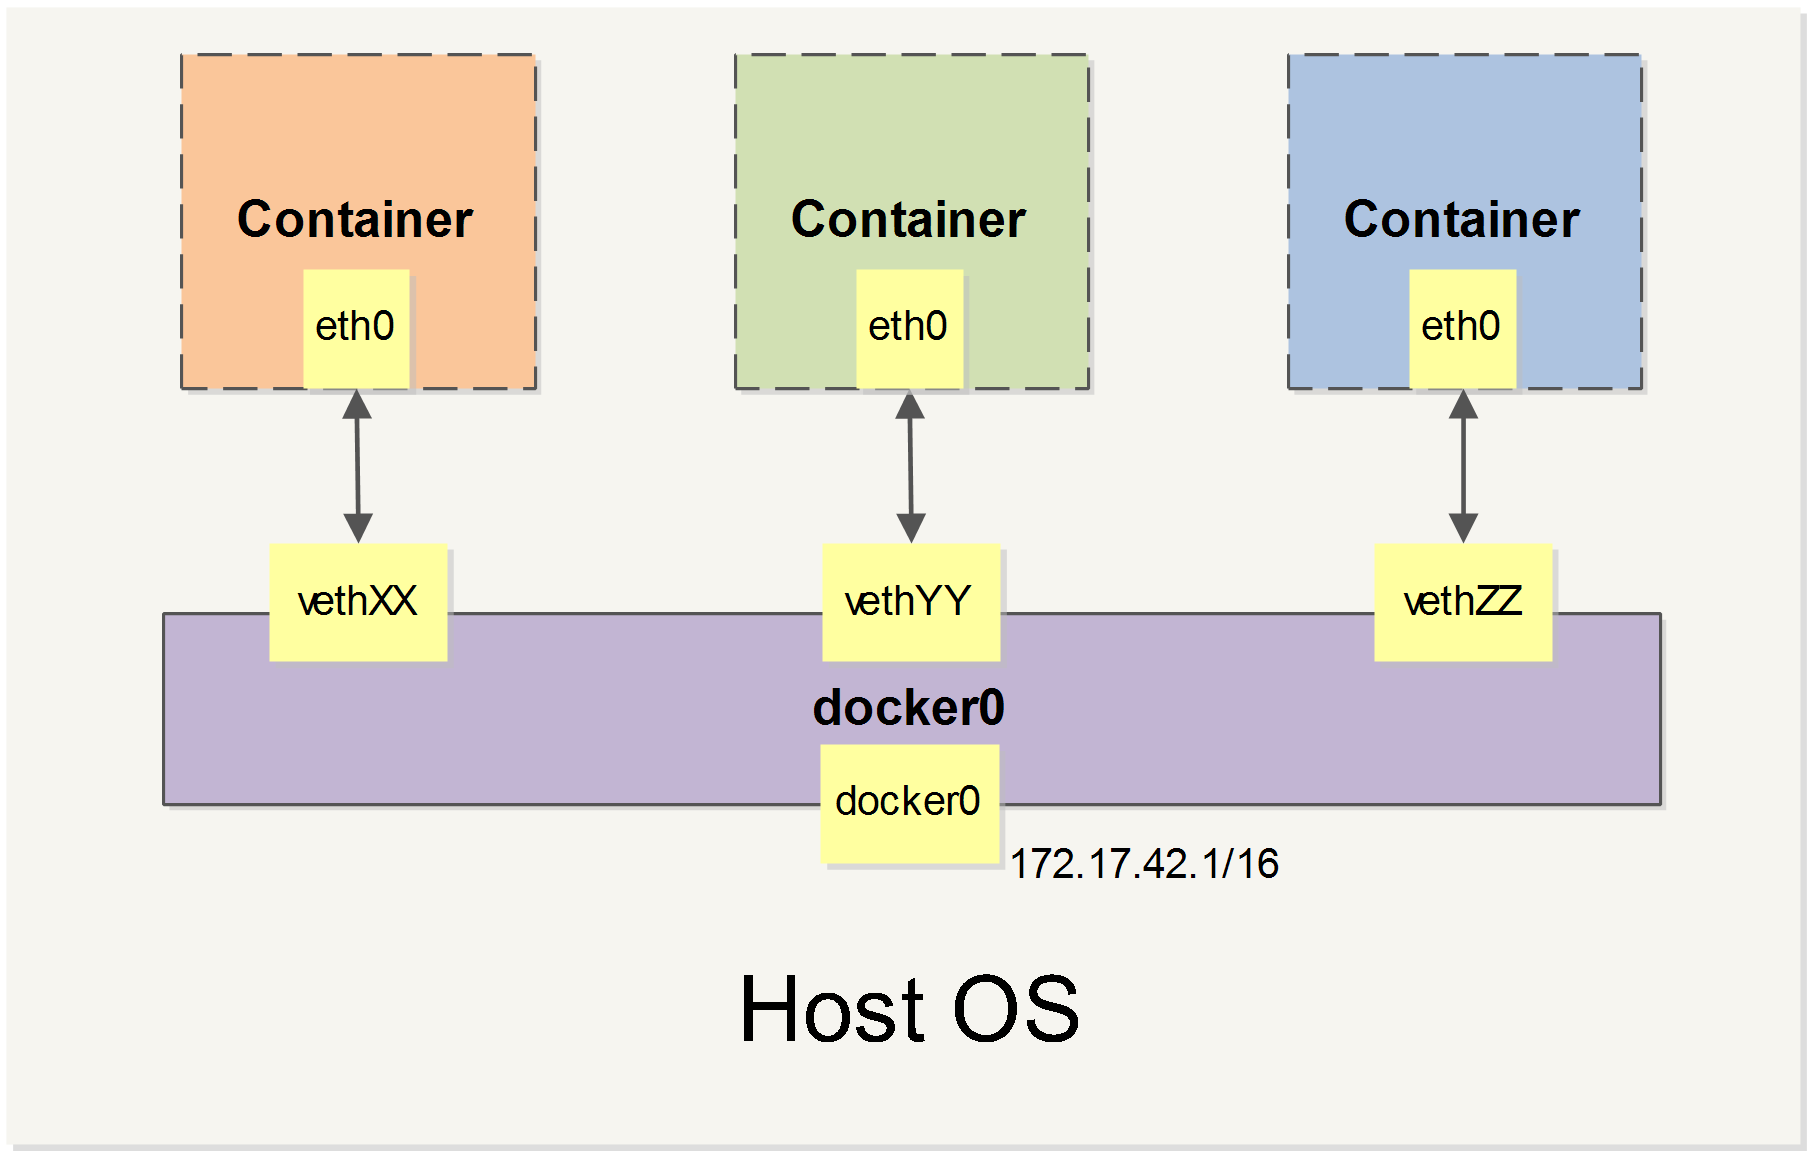
When Docker starts, it automatically creates a docker0 virtual bridge on the host. It is actually a bridge of Linux, which can be understood as a software switch. It will be forwarded between the network ports that are mounted to it.
At the same time, Docker randomly assigns an address in a private unoccupied private network segment (defined in RFC1918 ) to the docker0 interface. For example, the typical 172.17.42.1 mask of 255.255.0.0 . The network port in the container started after this will also automatically assign an address of the same network segment ( 172.17.0.0/16 ).
When creating a Docker container, a pair of veth pair interfaces are created (when the packet is sent to one interface, the other interface can also receive the same packet). The pair is terminated in the container, eth0 ; the other end is local and mounted to the docker0 bridge, with the name starting with veth (for example, vethAQI2QT ). In this way, the host can communicate with the container and the containers can communicate with each other. Docker created a virtual shared network between the host and all containers.
we will cover all of Docker’s network custom configurations in some scenarios. And adjust, complement, or even replace Docker’s default network configuration with Linux commands.
Configuring DNS
How to customize the host name and DNS of the configuration container? The secret is that Docker uses virtual files to mount three related configuration files for the container.
Use the mount command in the container to see the mount information:
$ mount /dev/disk/by-uuid/1fec...ebdf on /etc/hostname type ext4 ... /dev/disk/by-uuid/1fec...ebdf on /etc/hosts type ext4 ... tmpfs on /etc/resolv.conf type tmpfs ...
- This mechanism allows the DNS configuration of all Docker containers to be updated immediately after the host host’s DNS information is updated via the
/etc/resolv.conffile.
Configure DNS for all containers, or add the following to the /etc/docker/daemon.json file to set it up.
{ "dns" : [ "114.114.114.114" , "8.8.8.8" ] }
This way the container DNS is automatically configured to 114.114.114.114 and 8.8.8.8 each time it is started. Use the following command to prove that it has taken effect.
$ docker run -it --rm ubuntu:18.04 cat etc/resolv.conf nameserver 114.114.114.114 nameserver 8.8.8.8
If the user wants to manually specify the configuration of the container, you can add the following parameters when starting the container with the docker run command:
-h HOSTNAME or --hostname=HOSTNAME sets the hostname of the container, which will be written to /etc/hostname and/etc/hostscontainer. But it is not docker container ls , neither in the docker container ls nor in the other container’s /etc/hosts .
--dns=IP_ADDRESS Add the DNS server to the /etc/resolv.conf of the container and let the container use this server to resolve all hostnames that are not in /etc/hosts .
--dns-search=DOMAIN sets the search domain of the container. When the search domain is set to .example.com , when searching for a host named host, DNS not only searches for host but also searches for host.example.com .
Note: If the last two parameters are not specified when the container starts, Docker will default to configuring the container with /etc/resolv.conf on the host.
Disable networking for a container
Tested Infrastructure
| Platform | Number of Instance | Reading Time |
|---|---|---|
| Mac OS | 1 | 5 min |
Pre-requisite
- A linux system (here we have used macbook)
- Docker installed
If we want to disable the networking stack on a container, we can use the “–network none” flag when starting the container. Within the container, only the loopback device is created.
Steps to implement this
- Create a container
$ docker run --rm -dit --network none --name no-net-alpine alpine:latest ash
Unable to find image 'alpine:latest' locally
latest: Pulling from library/alpine
4fe2ade4980c: Pull complete
Digest: sha256:621c2f39f8133acb8e64023a94dbdf0d5ca81896102b9e57c0dc184cadaf5528
Status: Downloaded newer image for alpine:latest
b961be5a20f2795125b85818ea2522ebb173beb36ec43fe10ed78cbd9a1a5d9e
- Check the container’s network stack, by executing “ip link show” networking commands within the container. Notice that no eth0 was created.
$ docker exec no-net-alpine ip link show
1: lo: <LOOPBACK,UP,LOWER_UP> mtu 65536 qdisc noqueue state UNKNOWN qlen 1
    link/loopback 00:00:00:00:00:00 brd 00:00:00:00:00:00
2: tunl0@NONE: <NOARP> mtu 1480 qdisc noop state DOWN qlen 1
    link/ipip 0.0.0.0 brd 0.0.0.0
3: ip6tnl0@NONE: <NOARP> mtu 1452 qdisc noop state DOWN qlen 1
    link/tunnel6 00:00:00:00:00:00:00:00:00:00:00:00:00:00:00:00 brd 00:00:00:00:00:00:00:00:00:00:00:00:00:00:00:00
- You can check that no routing table available in this container
$ docker exec no-net-alpine ip route
$
- Stop the container
$ docker stop no-net-alpine
no-net-alpine
- Container will be automatically removed while stop, because it was created with the –rm flag.
$ docker container rm no-net-alpine
Error: No such container: no-net-alpine
Without “–network none” option
If we do not use “–network none” then we can see below differences.
$ docker run --rm -dit  --name no-net-alpine alpine:latest ash
8a90992643c7b75e8d4daaf6d55fd9961c264f8f1af49d3e9ed420b657706ef9

$ docker exec no-net-alpine ip link show
1: lo: <LOOPBACK,UP,LOWER_UP> mtu 65536 qdisc noqueue state UNKNOWN qlen 1
    link/loopback 00:00:00:00:00:00 brd 00:00:00:00:00:00
2: tunl0@NONE: <NOARP> mtu 1480 qdisc noop state DOWN qlen 1
    link/ipip 0.0.0.0 brd 0.0.0.0
3: ip6tnl0@NONE: <NOARP> mtu 1452 qdisc noop state DOWN qlen 1
    link/tunnel6 00:00:00:00:00:00:00:00:00:00:00:00:00:00:00:00 brd 00:00:00:00:00:00:00:00:00:00:00:00:00:00:00:00
10: eth0@if11: <BROADCAST,MULTICAST,UP,LOWER_UP,M-DOWN> mtu 1500 qdisc noqueue state UP
    link/ether 02:42:ac:11:00:02 brd ff:ff:ff:ff:ff:ff
You could see eth0 related info in networking command output.
Exposing a Container Port on the Host
Tested Infrastructure
| Platform | Number of Instance | Reading Time |
|---|---|---|
| Mac OS | 1 | 5 min |
Pre-requisite
- A linux system (here we have used macbook)
- Docker installed
To expose the container port on the host we use -p or –publish option. [-p host_port:container_port ]
$ docker run -dit --name my-apache-app -p 8080:80 -v "$PWD":/usr/local/apache2/htdocs/ httpd:2.4
7e14fd11385969433f3273c3af0c74f9b0d0afd5f8aa7492b9705712df421f14
Once the port exposed to host , try to reach the port via explorer or with curl commands. You should get proper output from the container
$ curl localhost:8080
<!DOCTYPE HTML PUBLIC "-//W3C//DTD HTML 3.2 Final//EN">
<html>
 <head>
  <title>Index of /</title>
 </head>
 <body>
<h1>Index of /</h1>
<ul></ul>
</body></html>
Finding IP address of Container
Tested Infrastructure
| Platform | Number of Instance | Reading Time |
|---|---|---|
| Mac OS | 1 | 5 min |
Pre-requisite
- A linux system (here we have used macbook)
- Docker installed
If you want to get the IP address of the container running on your system “docker inspect” with –format option will be helpful. Create a container and pass the container name or id to the “docker inspect” with –format or -f option.
$ docker run --rm -dit  --name no-net-alpine alpine:latest ash
8a90992643c7b75e8d4daaf6d55fd9961c264f8f1af49d3e9ed420b657706ef9

$ docker inspect -f '{{range .NetworkSettings.Networks}}{{.IPAddress}}{{end}}' no-net-alpine
172.17.0.2
Verifying host-level settings that impact Docker networking
Docker relies on the host being capable of performing certain functions to make Docker networking work. Namely, your Linux host must be configured to allow IP forwarding. In addition, since the release of Docker 1.7, you may now choose to use hairpin Network Address Translation (NAT) rather than the default Docker user land proxy. In this recipe, we’ll review the requirement for the host to have IP forwarding enabled. We’ll also talk about NAT hairpin and discuss the host-level requirements for that option as well. In both cases, we’ll show Docker’s default behavior with regard to its settings as well as how you can alter them.
Tested Infrastructure
| Platform | Number of Instance | Reading Time |
|---|---|---|
| Ubuntu 18.04 | 1 | 5 min |
Pre-requisite
- Create an account with DockerHub
- Open PWD Platform on your browser
- Click on Add New Instance on the left side of the screen to bring up Alpine OS instance on the right side
Most Linux distributions default the IP forward value to disabled or 0. Fortunately for us, in a default configuration, Docker takes care of updating this setting to the correct value when the Docker service starts. For instance, let’s take a look at a freshly rebooted host that doesn’t have the Docker service enabled at boot time. If we check the value of the setting before starting Docker, we can see that it’s disabled. Starting the Docker engine automatically enables the setting for us:
user@docker1:~$ more /proc/sys/net/ipv4/ip_forward
0
user@docker1:~$ sudo systemctl start docker
user@docker1:~$ sysctl net.ipv4.ip_forward
net.ipv4.ip_forward = 1
Linking Containers in Docker
Tested Infrastructure
| Platform | Number of Instance | Reading Time |
|---|---|---|
| Mac OS | 1 | 5 min |
Pre-requisite
- A linux system (here we have used macbook)
- Docker installed
In order to connect together multiple docker containers or services running inside docker container, ‘–link’ flag can be used in order to securely connect and provide a channel to transfer information from one container to another. A simple application of using a Wordpress container linked to MySQL container, can explain this well
- Pull the latest MySql container
$ docker pull mysql:latest
latest: Pulling from library/mysql
a5a6f2f73cd8: Already exists
936836019e67: Pull complete
283fa4c95fb4: Pull complete
1f212fb371f9: Pull complete
e2ae0d063e89: Pull complete
5ed0ae805b65: Pull complete
0283dc49ef4e: Pull complete
a7e1170b4fdb: Pull complete
88918a9e4742: Pull complete
241282fa67c2: Pull complete
b0fecf619210: Pull complete
bebf9f901dcc: Pull complete
Digest: sha256:b7f7479f0a2e7a3f4ce008329572f3497075dc000d8b89bac3134b0fb0288de8
Status: Downloaded newer image for mysql:latest
- Run MySql Container in detach mode (MySQL 8 changed the password authentication method. We’re looking for the mysql_native_password plugin, hence “–default-authentication-plugin=mysql_native_password” option require)
$ docker run --name mysql01 -e MYSQL_ROOT_PASSWORD=Password1234 -d mysql --default-authentication-plugin=mysql_native_password
fdabd410a66e4b65ec959677c932ccad79542ee9081d86ad2cbd0e2fe0265f1d
- Pull Wordpress docker container
$ docker pull wordpress:latest
latest: Pulling from library/wordpress
a5a6f2f73cd8: Already exists
633e0d1cd2a3: Pull complete
fcdfdf7118ba: Pull complete
4e7dc76b1769: Pull complete
c425447c8835: Pull complete
75780b7b9977: Pull complete
33ed51bc30e8: Pull complete
7c4215700bc4: Pull complete
d4f613c1e621: Pull complete
de5465a3fde0: Pull complete
6d373ffaf200: Pull complete
991bff14f001: Pull complete
d0a8c1ecf326: Pull complete
aa3627a535bb: Pull complete
a36be75bb622: Pull complete
98ebddb8e6ca: Pull complete
ed6e19b74de1: Pull complete
18b9cc4a2286: Pull complete
dfe625c958ac: Pull complete
Digest: sha256:f431a0681072aff336acf7a3736a85266fe7b46de116f29a2ea767ff55ad8f54
Status: Downloaded newer image for wordpress:latest
- Run the wordpress container linking it to MySQL Container (will run the database container with name “mysql-wordpress” and will set root password for MySQL container)
$ docker run --name wordpress01 --link mysql01 -p 8080:80 -e WORDPRESS_DB_HOST=mysql01:3306 -e WORDPRESS_DB_USER=root -e WORDPRESS_DB_PASSWORD=Password1234 -e WORDPRESS_DB_NAME=wordpress -e WORDPRESS_TABLE_PREFIX=wp_ -d wordpress
83b1f3215b01e7640246eb945977052bbf64f500a5b7fa18bd5a27841b01289b
- Check the status of the Containers
$ docker ps
CONTAINER ID        IMAGE               COMMAND                  CREATED              STATUS              PORTS                  NAMES
83b1f3215b01        wordpress           "docker-entrypoint.s…"   33 seconds ago       Up 32 seconds       0.0.0.0:8080->80/tcp   wordpress01
fdabd410a66e        mysql               "docker-entrypoint.s…"   About a minute ago   Up About a minute   3306/tcp, 33060/tcp    mysql01
- As, we have linked both the container now wordpress container can be accessed from browser using the address http://localhost:8080 and setup of wordpress can be done easily.

Docker Quick Networking Guide
Below is a list of commands related to the Docker network.
Some of these command options are only configurable when the Docker service is started and will not take effect immediately.
-b BRIDGEor--bridge=BRIDGEspecifies the bridge to which the container is mounted--bip=CIDRcustom masker0 mask-H SOCKET...or--host=SOCKET...Channel for the Docker server to receive commands--icc=true|falseWhether communication between containers is supported--ip-forward=true|falsePlease see the communication between the containers below--iptables=true|falseyou allow Docker to add iptables rules?--mtu=BYTES MTUin the –mtu=BYTES container network
The following two command options can be specified either when starting the service or when starting the container. Specifying the Docker service when it is started will become the default value, and the default value of the setting can be overwritten when the docker run is executed later.
--dns=IP_ADDRESS...Use the specified DNS server--dns-search=DOMAIN...Specify the DNS search domain
Finally, these options are only used when the docker run executed because it is specific to the container’s properties.
-h HOSTNAMEor--hostname=HOSTNAMEconfiguration container hostname--link=CONTAINER_NAME:ALIASadds a connection to another container--net=bridge|none|container:NAME_or_ID|hostconfigures the bridge mode of the container-p SPEC or --publish=SPECmaps the container port to the host host-P or --publish-all=true|falsemaps all ports of the container to the host
Contributor - Sangam Biradar
2 - Docker compose
Docker compose
Docker compose is a tool built by docker to ease the task to creating and configring multiple containers in a development environment counter-part of docker-compose for prodcution environment is docker swarm. Docker compose takes as input a YAML configuration file and creates the resources (containers, networks, volumes etc.) by communicating with the docker daemon through docker api.
Compose file used in examples
version: '3'

services:
    web:
        build: .
        image: web-client
        depends_on:
        - server
        ports:
        - "8080:8080"
    server:
        image: akshitgrover/helloworld
        volumes:
        - "/app" # Anonymous volume
        - "data:/data" # Named volume
        - "mydata:/data" # External volume

volumes:
    data:
    mydata:
        external: true
Refer this for configuring your compose file.
CLI Cheatsheet
Build
Used to build services specified in docker-compose.yml file with build specification.
Refer this for more details.
Note: Images build will be tagged as {DIR}_{SERVICE} unless image name is specified in the service specification.
docker-compose build [OPTIONS] [SERVICE...]

OPTIONS:

--compress | Command line flag to compress the build context, Build context is nothing but a directory where docker-compose.yml file is located. As this directory can container a lot of files, sending build context to the container can take a lot of time thus compression is needed.

--force-rm | Remove any intermediate container while building.

--no-cache | Build images without using any cached layers from previoud builds.

--pull | Allways pull newer version of the base image.

-m, --memory | Set memory limit for the container used for building the image.

--parallel | Exploit go routines to parallely build images, As docker daemon is written in go.

--build-arg key=val | Pass any varaible to the dockerfile from the command line.


SERVICE:

If you want to build any particular services instead of every service specified in the compose file pass the name (same as in the compose file) as arguments to the command.

Example:

docker-compose build --compress     # Will compress the build context of service web.
Bundle
Used to generate distributed application bundle (DAB) from the compose file.
Refer this for more details about DBA.
docker-compose bundle [OPTIONS]

OPTIONS:

--push-image | Push images to the register if any service has build specifcation.

-o, --output PATH | Output path for .dab file.
Config
Used to validate the compose file
NOTE: Run this command in direcotry where docker-compose.yml file is located.
docker-compose config
Up
Creates and starts the resources as per the specification the docker-compose.yml file.
docker-compose up [OPTIONS] [SERVICE...]

OPTIONS:

-d, --detach | Run containers in background.

--build | Always build images even if it exists.

--no-deps | Avoid creating any linked services.

--force-recreate | Force recreating containers even if specification is not changed.

--no-recreate | Do not recreate containers.

--no-build | Do not build any image even if it is missing.

--no-start | Just create the containers without starting them.

--scale SERVICE=NUM | Create multiple containers for a service.

-V, --renew-anon-volumes | Recreate anonymous volumes instead of getting data from previous ones.

Example:

docker-compose up -d        # Will run service containers in background
docker-compose up web       # Will start service web and server because of 'depends_on' field
docker-compose up server    # will start server service only.
Down
Stop and clear any resources created while lifting docker-compose.
By default only containers and networks defined in the compose file are removed. Networks and Volumes with external = true and never removed.
docker-compose down [OPTIONS]

--rmi type | Remove images Type = all (Remove every image in the compose file), local (Remove images with no custom tag)

-v, --volumes | Remove named volumes except the external ones and also remove anonymous volumes

-t, --timeout TIMEOUT | Speficy shutdown time in seconds. (default = 10)

Example:

docker-compose down         # Will delete all containers of both web and server and no volume will be removed

docker-compose down -v      # Will also delete anonymous and data volumes.
Scale
Scale particular services
docker-compose scale [SERVICE=NUM...]

Example:

docker-compose scale server=3 web=2
Start
Start created containers.
docker-compose start [SERVICE...]

Example:

docker-compose start        # Start containers for every service.
docker-compose start web    # Start containers only for service web.
Stop
Stop running containers.
docker-compose stop [SERVICE...]

Example:

docker-compose stop         # Stop containers for every service.
docker-compose stop web     # Stop containers only for service web.
Docker compose with swarm secrets
Start securing your swarm services using the latest compose reference that allows to specify secrets in your application stack
Getting started
Make sure your daemon is in swarm mode or initialize it as follows:
docker swarm init --advertise-addr $(hostname -i)
Automatic provision
In this example we’ll let compose automatically create our secrets and provision them through compose with the defined secret file
Create a new secret and store it in a file:
echo "shh, this is a secret" > mysecret.txt
Use your secret file in your compose stack as follows:
echo 'version: '\'3.1\''
services:
    test:
        image: '\'alpine\''
        command: '\'cat /run/secrets/my_secret \''
        secrets:
            - my_secret

secrets:
    my_secret:
        file: ./mysecret.txt
' > docker-compose.yml
Deploy your stack service:
docker stack deploy -c docker-compose.yml secret
Results in the below output:
Creating network secret_default
Creating secret secret_my_secret
Creating service secret_test
After your stack is deployed you can check your service output:
docker service logs -f secret_test
Results in the below output (below values after secret_test.1. may vary):
secret_test.1.lcygnppmzfdp@node1    | shhh, this is a secret
secret_test.1.mg1420w2i3x4@node1    | shhh, this is a secret
secret_test.1.8osraz8yxjrb@node1    | shhh, this is a secret
secret_test.1.byh5b9uik6db@node1    | shhh, this is a secret
. . .
Using existing secrets
Create a new secret using the docker CLI:
echo "some other secret" | docker secret create manual_secret -
Define your secret as external in your compose file so it’s not created while deploying the stack
echo 'version: '\'3.1\''
services:
    test:
        image: '\'alpine\''
        command: '\'cat /run/secrets/manual_secret \''
        secrets:
            - manual_secret

secrets:
    manual_secret:
        external: true
' > external-compose.yml
Deploy your stack as you did in the automatic section:
docker stack deploy -c external-compose.yml external_secret
Validate your secret is there by checking the service logs
docker service logs -f external_secret_test
Contributors:
@marcosnils Akshit Grover
3 - First Look at Docker Application Packages?
A First Look at Docker Application Packages (“docker-app”)
Consider a scenario where you have separate development, test, and production environments for your Web application. Under development environment, your team might be spending time in building up Web application(say, WordPress), developing WP Plugins and templates, debugging the issue etc. When you are in development you’ll probably want to check your code changes in real-time. The usual way to do this is mounting a volume with your source code in the container that has the runtime of your application. But for production this works differently. Before you host your web application in production environment, you might want to turn-off the debug mode and host it under the right port so as to test your application usability and accessibility. In production you have a cluster with multiple nodes, and in most of the case volume is local to the node where your container (or service) is running, then you cannot mount the source code without complex stuff that involve code synchronization, signals, etc. In nutshell, this might require multiple Docker compose files for each environment and as your number of service applications increases, it becomes more cumbersome to manage those pieces of Compose files. Hence, we need a tool which can ease the way Compose files can be shareable across different environment seamlessly.
To solve this problem, Docker, Inc recently announced a new tool called “docker-app”(Application Packages) which makes “Compose files more reusable and shareable”. This tool not only makes Compose file shareable but provide us with simplified approach to share multi-service application (not just Docker Image) directly on Dockerhub.
Tested Infrastructure
| Platform | Number of Instance | Reading Time |
|---|---|---|
| Play with Docker | 5 | 5 min |
Pre-requisite
- Create an account with DockerHub
- Open PWD Platform on your browser
- Click on Spanner Sign on the left side of the screen to bring up template of 3 Managers & 2 Worker Nodes
Verifying 5 Node Swarm Mode Cluster
$ docker node ls
ID                            HOSTNAME            STATUS              AVAILABILITY        MANAGER STATUS      ENGINE VERSION
juld0kwbajyn11gx3bon9bsct *   manager1            Ready               Active              Leader              18.03.1-ce
uu675q2209xotom4vys0el5jw     manager2            Ready               Active              Reachable           18.03.1-ce
05jewa2brfkvgzklpvlze01rr     manager3            Ready               Active              Reachable           18.03.1-ce
n3frm1rv4gn93his3511llm6r     worker1             Ready               Active                                  18.03.1-ce
50vsx5nvwx5rbkxob2ua1c6dr     worker2             Ready               Active                                  18.03.1-ce
Cloning the Repository
$ git clone https://github.com/ajeetraina/app
Cloning into 'app'...remote: Counting objects: 14147, done.
remote: Total 14147 (delta 0), reused 0 (delta 0), pack-reused 14147Receiving objects: 100% (14147/14147), 17.32 MiB | 18.43 MiB/s, done.
Resolving deltas: 100% (5152/5152), done.
Installing docker-app
wget https://github.com/docker/app/releases/download/v0.3.0/docker-app-linux.tar.gz
tar xf docker-app-linux.tar.gz
cp docker-app-linux /usr/local/bin/docker-app
OR
$ ./install.sh
Connecting to github.com (192.30.253.112:443)
Connecting to github-production-release-asset-2e65be.s3.amazonaws.com (52.216.227.152:443)
docker-app-linux.tar 100% |**************************************************************|  8780k  0:00:00 ETA
[manager1] (local) root@192.168.0.13 ~/app
$
Verify docker-app version
$ docker-app version
Version:      v0.3.0
Git commit:   fba6a09
Built:        Fri Jun 29 13:09:30 2018
OS/Arch:      linux/amd64
Experimental: off
Renderers:    none
The docker-app tool comes with various options as shown below:
$ docker-app
Build and deploy Docker applications.

Usage:
  docker-app [command]

Available Commands:
  deploy      Deploy or update an application
  helm        Generate a Helm chart
  help        Help about any command
  init        Start building a Docker application
  inspect     Shows metadata and settings for a given application
  ls          List applications.
  merge       Merge the application as a single file multi-document YAML
  push        Push the application to a registry
  render      Render the Compose file for the application
  save        Save the application as an image to the docker daemon(in preparation for push)
  split       Split a single-file application into multiple files
  version     Print version information

Flags:
      --debug   Enable debug mode
  -h, --help    help for docker-app

Use "docker-app [command] --help" for more information about a command.
[manager1] (local) root@192.168.0.48 ~/app
WordPress Application under dev & Prod environment
Under this demo, you will see that there is a folder called wordpress.dockerapp that contains three YAML documents:
- metadata
- the compose file
- settings for your application
You can create these files using the below command:
docker-app init --single-file wordpress
For more details, you can visit https://github.com/docker/app
Listing the Wordpress Application package related files/directories
$ ls
README.md            install-wp           with-secrets.yml
devel                prod                 wordpress.dockerapp
Wordpress Application Package for Dev environment
$ docker-app render wordpress -f devel/dev-settings.yml
version: "3.6"
services:
  mysql:
    deploy:
      mode: replicated
      replicas: 1
      endpoint_mode: dnsrr
    environment:
      MYSQL_DATABASE: wordpressdata
      MYSQL_PASSWORD: wordpress
      MYSQL_ROOT_PASSWORD: wordpress101
      MYSQL_USER: wordpress
    image: mysql:5.6
    networks:
      overlay: null
    volumes:
    - type: volume
      source: db_data
      target: /var/lib/mysql
  wordpress:
    depends_on:
    - mysql
    deploy:
      mode: replicated
      replicas: 1
      endpoint_mode: vip
    environment:
      WORDPRESS_DB_HOST: mysql
      WORDPRESS_DB_NAME: wordpressdata
      WORDPRESS_DB_PASSWORD: wordpress
      WORDPRESS_DB_USER: wordpress
      WORDPRESS_DEBUG: "true"
    image: wordpress
    networks:
      overlay: null
    ports:
    - mode: ingress
      target: 80
      published: 8082
      protocol: tcp
networks:
  overlay: {}
volumes:
  db_data:
    name: db_data
Wordpress Application Package for Prod
Under Prod environment, I have the following content under prod/prod-settings.yml as shown :
debug: false
wordpress:
port: 80
Post rendering, you should be able to see port:80 exposed as shown below in the snippet:
    image: wordpress
    networks:
      overlay: null
    ports:
    - mode: ingress
      target: 80
      published: 80
      protocol: tcp
networks:
  overlay: {}
volumes:
  db_data:
    name: db_data
Inspect the WordPress App
$ docker-app inspect wordpress
wordpress 1.0.0
Maintained by: ajeetraina <ajeetraina@gmail.com>

Welcome to Collabnix

Setting                       Default
-------                       -------
debug                         true
mysql.database                wordpressdata
mysql.image.version           5.6
mysql.rootpass                wordpress101
mysql.scale.endpoint_mode     dnsrr
mysql.scale.mode              replicated
mysql.scale.replicas          1
mysql.user.name               wordpress
mysql.user.password           wordpress
volumes.db_data.name          db_data
wordpress.port                8081
wordpress.scale.endpoint_mode vip
wordpress.scale.mode          replicated
wordpress.scale.replicas      1
[manager1] (local) root@192.168.0.13 ~/app/examples/wordpress
$
Deploying the WordPress App
$ docker-app deploy wordpress
Creating network wordpress_overlay
Creating service wordpress_mysql
Creating service wordpress_wordpress
Switching to Dev Environ
$ docker-app deploy wordpress -f devel/dev-settings.yml

Switching to Prod Environ
$ docker-app deploy wordpress -f prod/prod-settings.yml

$ [manager1] (local) root@192.168.0.48 ~/app/examples/wordpress
$ docker-app deploy -f devel/dev-settings.yml
Updating service wordpress_wordpress (id: l95b4s6xi7q5mg7vj26lhzslb)
Updating service wordpress_mysql (id: lhr4h2uaer861zz1b04pst5sh)
[manager1] (local) root@192.168.0.48 ~/app/examples/wordpress
$ docker-app deploy -f prod/prod-settings.yml
Updating service wordpress_wordpress (id: l95b4s6xi7q5mg7vj26lhzslb)
Updating service wordpress_mysql (id: lhr4h2uaer861zz1b04pst5sh)
[manager1] (local) root@192.168.0.48 ~/app/examples/wordpress
$
Pushing Application Package to Dockerhub
$ docker login
Login with your Docker ID to push and pull images from Docker Hub. If you don't have a Docker ID, head over to
 https://hub.docker.com to create one.
Username: ajeetraina
Password:
Login Succeeded
[manager1] (local) root@192.168.0.48 ~/app/examples/wordpress
$
Saving this Application Package as DOcker Image
$ [manager1] (local) root@192.168.0.48 ~/app/examples/wordpress
$ docker-app save wordpress
Saved application as image: wordpress.dockerapp:1.0.0
[manager1] (local) root@192.168.0.48 ~/app/examples/wordpress
$
Listing out the images
$ docker images
REPOSITORY            TAG                 IMAGE ID            CREATED             SIZE
wordpress.dockerapp   1.0.0               c1ec4d18c16c        47 seconds ago      1.62kB
mysql                 5.6                 97fdbdd65c6a        3 days ago          256MB
[manager1] (local) root@192.168.0.48 ~/app/examples/wordpress
$
Listing out the services
$ docker stack services wordpress
ID                  NAME                  MODE                REPLICAS            IMAGE               PORTS
l95b4s6xi7q5        wordpress_wordpress   replicated          1/1                 wordpress:latest    *:80->80
/tcp
lhr4h2uaer86        wordpress_mysql       replicated          1/1                 mysql:5.6
[manager1] (local) root@192.168.0.48 ~/docker101/play-with-docker/visualizer
Using docker-app ls command to list out the application packages
$ docker-app ls
REPOSITORY            TAG                 IMAGE ID            CREATED              SIZE
wordpress.dockerapp   1.0.1               299fb78857cb        About a minute ago   1.62kB
wordpress.dockerapp   1.0.0               c1ec4d18c16c        16 minutes ago       1.62kB
Pushing it to Dockerhub
$ docker-app push --namespace ajeetraina --tag 1.0.1
The push refers to repository [docker.io/ajeetraina/wordpress.dockerapp]
51cfe2cfc2a8: Pushed
1.0.1: digest: sha256:14145fc6e743f09f92177a372b4a4851796ab6b8dc8fe49a0882fc5b5c1be4f9 size: 524
Say, you built WordPress application package and pushed it to Dockerhub. Now one of your colleague pull it on his development system.
Pulling it from Dockerhub
$ docker pull ajeetraina/wordpress.dockerapp:1.0.1
1.0.1: Pulling from ajeetraina/wordpress.dockerapp
a59931d48895: Pull complete
Digest: sha256:14145fc6e743f09f92177a372b4a4851796ab6b8dc8fe49a0882fc5b5c1be4f9
Status: Downloaded newer image for ajeetraina/wordpress.dockerapp:1.0.1
[manager3] (local) root@192.168.0.24 ~/app
$ docker images
REPOSITORY                       TAG                 IMAGE ID            CREATED             SIZE
ajeetraina/wordpress.dockerapp   1.0.1               299fb78857cb        8 minutes ago       1.62kB
[manager3] (local) root@192.168.0.24 ~/app
$
Deploying the Application in Easy Way
$ docker images
REPOSITORY                       TAG                 IMAGE ID            CREATED             SIZE
ajeetraina/wordpress.dockerapp   1.0.1               299fb78857cb        9 minutes ago       1.62kB
[manager3] (local) root@192.168.0.24 ~/app
$ docker-app deploy ajeetraina/wordpress
Creating network wordpress_overlay
Creating service wordpress_mysql
Creating service wordpress_wordpress
[manager3] (local) root@192.168.0.24 ~/app
$
Using docker-app merge option
Docker Team has introduced docker-app merge option under the new 0.3.0 release.
[manager1] (local) root@192.168.0.48 ~/app/examples/wordpress
$ docker-app merge -o mywordpress
[manager1] (local) root@192.168.0.48 ~/app/examples/wordpress
$ ls
README.md            install-wp           prod                 wordpress.dockerapp
devel                mywordpress          with-secrets.yml
$ cat mywordpress
version: 1.0.1
name: wordpress
description: "Welcome to Collabnix"
maintainers:
  - name: ajeetraina
    email: ajeetraina@gmail.com
targets:
  swarm: true
  kubernetes: true

--
version: "3.6"

services:

  mysql:
    image: mysql:${mysql.image.version}
    environment:
      MYSQL_ROOT_PASSWORD: ${mysql.rootpass}
      MYSQL_DATABASE: ${mysql.database}
      MYSQL_USER: ${mysql.user.name}
      MYSQL_PASSWORD: ${mysql.user.password}
    volumes:
       - source: db_data
         target: /var/lib/mysql
         type: volume
    networks:
       - overlay
    deploy:
      mode: ${mysql.scale.mode}
      replicas: ${mysql.scale.replicas}
      endpoint_mode: ${mysql.scale.endpoint_mode}

  wordpress:
    image: wordpress
    environment:
      WORDPRESS_DB_USER: ${mysql.user.name}
      WORDPRESS_DB_PASSWORD: ${mysql.user.password}
      WORDPRESS_DB_NAME: ${mysql.database}
      WORDPRESS_DB_HOST: mysql
      WORDPRESS_DEBUG: ${debug}
    ports:
      - "${wordpress.port}:80"
    networks:
      - overlay
    deploy:
      mode: ${wordpress.scale.mode}
      replicas: ${wordpress.scale.replicas}
      endpoint_mode: ${wordpress.scale.endpoint_mode}
    depends_on:
      - mysql

volumes:
  db_data:
     name: ${volumes.db_data.name}

networks:
  overlay:

--
debug: true
mysql:
  image:
    version: 5.6
  rootpass: wordpress101
  database: wordpressdata
  user:
    name: wordpress
    password: wordpress
  scale:
    endpoint_mode: dnsrr
    mode: replicated
    replicas: 1
wordpress:
  scale:
    mode: replicated
    replicas: 1
    endpoint_mode: vip
  port: 8081
volumes:
  db_data:
    name: db_data
Contributor
4 - Introduction to Docker Swarm
What is Docker Swarm?

Docker Swarm is a container orchestration tool built and managed by Docker, Inc. It is the native clustering tool for Docker. Swarm uses the standard Docker API, i.e., containers can be launched using normal docker run commands and Swarm will take care of selecting an appropriate host to run the container on. This also means that other tools that use the Docker API—such as Compose and bespoke scripts—can use Swarm without any changes and take advantage of running on a cluster rather than a single host.

But why do we need Container orchestration System?
Imagine that you had to run hundreds of containers. You can easily see that if they are running in a distributed mode, there are multiple features that you will need from a management angle to make sure that the cluster is up and running, is healthy and more.
Some of these necessary features include:
● Health Checks on the Containers
● Launching a fixed set of Containers for a particular Docker image
● Scaling the number of Containers up and down depending on the load
● Performing rolling update of software across containers
● and more…
Docker Swarm has capabilities to help us implement all those great features - all through simple CLIs.
Does Docker Swarm require 3rd Party tool to be installed?
Docker Swarm Mode comes integrated with Docker Platform. Starting 1.12, Docker Swarm Mode is rightly integrated which means that you don’t need to install anything outside to run Docker Swarm. Just initialize it and you can get started.
Does Docker Swarm work with Docker Machine & Docker Compose?
Yes, it works very well with the Docker command line tools like docker and docker-machine, and provides the basic ability to deploy a Docker container to a collection of machines running the Docker Engine. Docker Swarm does differ in scope, however, from what we saw when reviewing Amazon ECS.
How does Swarm Cluster look like?

The basic architecture of Swarm is fairly straightforward: each host runs a Swarm agent and one host runs a Swarm manager (on small test clusters this host may also run an agent). The manager is responsible for the orchestration and scheduling of containers on the hosts. Swarm can be run in a high-availability mode where one of etcd, Consul or ZooKeeper is used to handle fail-over to a back-up manager. There are several different methods for how hosts are found and added to a cluster, which is known as discovery in Swarm. By default, token based discovery is used, where the addresses of hosts are kept in a list stored on the Docker Hub.
A swarm is a group of machines that are running Docker and joined into a cluster. After that has happened, we continue to run the Docker commands we’re used to, but now they are executed on a cluster by a swarm manager. The machines in a swarm can be physical or virtual. After joining a swarm, they are referred to as nodes.
Swarm managers are the only machines in a swarm that can execute your commands, or authorize other machines to join the swarm as workers. Workers are just there to provide capacity and do not have the authority to tell any other machine what it can and cannot do.
Up until now, you have been using Docker in a single-host mode on your local machine. But Docker also can be switched into swarm mode, and that’s what enables the use of swarms. Enabling swarm mode instantly makes the current machine a swarm manager. From then on, Docker runs the commands you execute on the swarm you’re managing, rather than just on the current machine.
Swarm managers can use several strategies to run containers, such as “emptiest node” – which fills the least utilized machines with containers. Or “global”, which ensures that each machine gets exactly one instance of the specified container.
A swarm is made up of multiple nodes, which can be either physical or virtual machines. The basic concept is simple enough: run docker swarm init to enable swarm mode and make our current machine a swarm manager, then run docker swarm join on other machines to have them join the swarm as workers.
Next » Difference between Docker Swarm, Docker Swarm Mode and Swarmkit
Getting Started with Docker Swarm
To get started with Docker Swarm, you can use “Play with Docker”, aka PWD. It’s free of cost and open for all. You get maximum of 5 instances of Linux system to play around with Docker.
-
Open Play with Docker labs on your browser
-
Click on Icon near to Instance to choose 3 Managers & 2 Worker Nodes
-
Wait for few seconds to bring up 5-Node Swarm Cluster
We recommend you start with one of our Beginners Guides, and then move to intermediate and expert level tutorials that cover most of the features of Docker. For a comprehensive approach to understanding Docker, I have categorized it as shown below:
A Bonus… Docker Swarm Visualizer
Swarm Visualizer is a fancy tool which visualized the Swarm Cluster setup. It displays containers running on each node in the form of visuals. If you are conducting Docker workshop, it’s a perfect way to show your audience how the containers are placed under each node. Go..try it out..
Clone the Repository
git clone https://github.com/dockersamples/docker-swarm-visualizer
cd docker-swarm-visualizer
docker-compose up -d

To run in a docker swarm:
$ docker service create \
  --name=viz \
  --publish=8080:8080/tcp \
  --constraint=node.role==manager \
  --mount=type=bind,src=/var/run/docker.sock,dst=/var/run/docker.sock \
  dockersamples/visualizer
Proceed » What is Docker Swarm
Understanding Difference between Docker Swarm(Classic), Swarm Mode & SwarmKit
Docker Swarm is an older (2014) Docker native orchestration tool. It is standalone from the Docker engine and serves to connect Docker engines together to form a cluster. It's then possible to connect to the Swarm and run containers on the cluster. Swarm has a few features:
- Allows us to specify a discovery service
- Some control over where containers are placed (using filters / constraints / distribution strategies, etc…)
- Exposes the same API as the Docker engine itself, allowing 3rd-party tools to interact seamlessly
Swarmkit is a new (2016) tool developed by the Docker team which provides functionality for running a cluster and distributing tasks to the machines in the cluster. Here are the main features:
- Distributed: SwarmKit uses the Raft Consensus Algorithm in order to coordinate and does not rely on a single point of failure to perform decisions.
- Secure: Node communication and membership within a Swarm are secure out of the box. SwarmKit uses mutual TLS for node authentication, role authorization and transport encryption, automating both certificate issuance and rotation.
- Simple: SwarmKit is operationally simple and minimizes infrastructure dependencies. It does not need an external database to operate.
Docker Swarm Mode (Version 1.12 >) uses Swarmkit libraries & functionality in order to make container orchestration over multiple hosts (a cluster) very simple & secure to operate. There is a new set of features (the main one being docker swarm) which are now built into Docker itself to allow us to initiate a new Swarm and deploy tasks to that cluster.
Docker Swarm is not being deprecated, and is still a viable method for Docker multi-host orchestration, but Docker Swarm Mode (which uses the Swarmkit libraries under the hood) is the recommended way to begin a new Docker project where orchestration over multiple hosts is required.
One of the big features in Docker 1.12 release is Swarm mode. Docker had Swarm available for Container orchestration from 1.6 release. Docker released Swarmkit as an opensource project for orchestrating distributed systems few weeks before Docker 1.12(RC) release.
"Swarm" refers to traditional Swarm functionality, "Swarm Mode" refers to new Swarm mode added in 1.12, "Swarmkit" refers to the plumbing open source orchestration project.
Swarm, Swarm Mode and Swarmkit
Following table compares Swarm and Swarm Mode :
| Swarm | Swarm Mode |
|---|---|
| Separate from Docker Engine and can run as Container | Integrated inside Docker engine |
| Needs external KV store like Consul | No need of separate external KV store |
| Service model not available | Service model is available. This provides features like scaling, rolling update, service discovery, load balancing and routing mesh |
| Communication not secure | Both control and data plane is secure |
| Integrated with machine and compose | Not yet integrated with machine and compose as of release 1.12. Will be integrated in the upcoming releases |
Following table compares Swarmkit and Swarm Mode:
| Swarmkit | Swarm Mode |
|---|---|
| Plumbing opensource project | Swarmkit used within Swarm Mode and tightly integrated with Docker Engine |
| Swarmkit needs to built and run separately | Docker 1.12 comes integrated with Swarm Mode |
| No service discovery, load balancing and routing mesh | Service discovery, load balancing and routing mesh available |
| Use swarmctl CLI | Use regular Docker CLI |
Swarmkit has primitives to handle orchestration features like node management, discovery, security and scheduling.
How Docker Swarm Mode works?
Let us first understand what is Swarm Mode and what are its key concepts.
In 1.12, Docker introduced Swarm Mode. Swarm Mode enables the ability to deploy containers across multiple Docker hosts, using overlay networks for service discovery with a built-in load balancer for scaling the services.
Swarm Mode is managed as part of the Docker CLI, making it a seamless experience to the Docker ecosystem.
Key Concepts
Docker Swarm Mode introduces three new concepts which we’ll explore in this scenario.
Node:
A Node is an instance of the Docker Engine connected to the Swarm. Nodes are either managers or workers. Managers schedules which containers to run where. Workers execute the tasks. By default, Managers are also workers.
Services:
A service is a high-level concept relating to a collection of tasks to be executed by workers. An example of a service is an HTTP Server running as a Docker Container on three nodes.
Load Balancing:
Docker includes a load balancer to process requests across all containers in the service.
Step 1 - Initialise Swarm Mode
Turn single host Docker host into a Multi-host Docker Swarm Mode. Becomes Manager By default, Docker works as an isolated single-node. All containers are only deployed onto the engine. Swarm Mode turns it into a multi-host cluster-aware engine.
The first node to initialise the Swarm Mode becomes the manager. As new nodes join the cluster, they can adjust their roles between managers or workers. You should run 3-5 managers in a production environment to ensure high availability.
Create Swarm Mode Cluster
Swarm Mode is built into the Docker CLI. You can find an overview the possibility commands via docker swarm –help
The most important one is how to initialise Swarm Mode. Initialisation is done via init.
docker swarm init
After running the command, the Docker Engine knows how to work with a cluster and becomes the manager. The results of an initialisation is a token used to add additional nodes in a secure fashion. Keep this token safe and secure for future use when scaling your cluster.
In the next step, we will add more nodes and deploy containers across these hosts.
Step 2 - Join Cluster
With Swarm Mode enabled, it is possible to add additional nodes and issues commands across all of them. If nodes happen to disappear, for example, because of a crash, the containers which were running on those hosts will be automatically rescheduled onto other available nodes. The rescheduling ensures you do not lose capacity and provides high-availability.
On each additional node, you wish to add to the cluster, use the Docker CLI to join the existing group. Joining is done by pointing the other host to a current manager of the cluster. In this case, the first host.
Docker now uses an additional port, 2377, for managing the Swarm. The port should be blocked from public access and only accessed by trusted users and nodes. We recommend using VPNs or private networks to secure access.
Task
The first task is to obtain the token required to add a worker to the cluster. For demonstration purposes, we’ll ask the manager what the token is via swarm join-token. In production, this token should be stored securely and only accessible by trusted individuals.
token=$(docker -H 172.17.0.57:2345 swarm join-token -q worker) && echo $token
On the second host, join the cluster by requesting access via the manager. The token is provided as an additional parameter.
docker swarm join 172.17.0.57:2377 --token $token
By default, the manager will automatically accept new nodes being added to the cluster. You can view all nodes in the cluster using docker node ls
Lab01 - Create Overlay Network
Swarm Mode also introduces an improved networking model. In previous versions, Docker required the use of an external key-value store, such as Consul, to ensure consistency across the network. The need for consensus and KV has now been incorporated internally into Docker and no longer depends on external services.
The improved networking approach follows the same syntax as previously. The overlay network is used to enable containers on different hosts to communicate. Under the covers, this is a Virtual Extensible LAN (VXLAN), designed for large scale cloud based deployments.
Task
The following command will create a new overlay network called skynet. All containers registered to this network can communicate with each other, regardless of which node they are deployed onto.
docker network create -d overlay collabnet
Lab02 - Deploy Service
By default, Docker uses a spread replication model for deciding which containers should run on which hosts. The spread approach ensures that containers are deployed across the cluster evenly. This means that if one of the nodes is removed from the cluster, the instances would be already running on the other nodes. There workload on the removed node would be rescheduled across the remaining available nodes.
A new concept of Services is used to run containers across the cluster. This is a higher-level concept than containers. A service allows you to define how applications should be deployed at scale. By updating the service, Docker updates the container required in a managed way.
Task
In this case, we are deploying the Docker Image katacoda/docker-http-server. We are defining a friendly name of a service called http and that it should be attached to the newly created skynet network.
For ensuring replication and availability, we are running two instances, of replicas, of the container across our cluster.
Finally, we load balance these two containers together on port 80. Sending an HTTP request to any of the nodes in the cluster will process the request by one of the containers within the cluster. The node which accepted the request might not be the node where the container responds. Instead, Docker load-balances requests across all available containers.
docker service create --name http --network collabnet --replicas 2 -p 80:80 ajeetraina/hellowhale
You can view the services running on the cluster using the CLI command docker service ls
As containers are started you will see them using the ps command. You should see one instance of the container on each host.
List containers on the first host -
docker ps
List containers on the second host -
docker ps
If we issue an HTTP request to the public port, it will be processed by the two containers
curl your_machine_ip:80
Lab03 - Inspecting State
The Service concept allows you to inspect the health and state of your cluster and the running applications.
Task
You can view the list of all the tasks associated with a service across the cluster. In this case, each task is a container,
docker service ps http
You can view the details and configuration of a service via
docker service inspect --pretty http
On each node, you can ask what tasks it is currently running. Self refers to the manager node Leader:
docker node ps self
Using the ID of a node you can query individual hosts
docker node ps $(docker node ls -q | head -n1)
In the next step, we will scale the service to run more instances of the container.
Lab04 - Scale Service
A Service allows us to scale how many instances of a task is running across the cluster. As it understands how to launch containers and which containers are running, it can easily start, or remove, containers as required. At the moment the scaling is manual. However, the API could be hooked up to an external system such as a metrics dashboard.
Task
At present, we have two load-balanced containers running, which are processing our requests curl docker
The command below will scale our http service to be running across five containers.
docker service scale http=5
 docker service scale http=5
http scaled to 5
overall progress: 5 out of 5 tasks
1/5: running   [==================================================>]
2/5: running   [==================================================>]
3/5: running   [==================================================>]
4/5: running   [==================================================>]
5/5: running   [==================================================>]
verify: Waiting 4 seconds to verify that tasks are stable...
verify: Service converged
[manager1] (local) root@192.168.0.4 ~
$
[manager1] (local) root@192.168.0.4 ~
On each host, you will see additional nodes being started docker ps
The load balancer will automatically be updated. Requests will now be processed across the new containers. Try issuing more commands via
curl your_machine_ip:80
Try scaling the service down to see the result.
docker service scale http=2
Next » Lab05 - Deploy Applications Components as Docker Services
Lab #05 - Deploy the application components as Docker services
Our sleep application is becoming very popular on the internet (due to hitting Reddit and HN). People just love it. So, you are going to have to scale your application to meet peak demand. You will have to do this across multiple hosts for high availability too. We will use the concept of Services to scale our application easily and manage many containers as a single entity.
Services were a new concept in Docker 1.12. They work with swarms and are intended for long-running containers.
Let’s deploy sleep as a Service across our Docker Swarm.
$ docker service create --name sleep-app ubuntu sleep infinity
k70j90k9cp5n2bxsq72tjdmxs
overall progress: 1 out of 1 tasks
1/1: running
verify: Service converged
Verify that the service create has been received by the Swarm manager.
$ docker service ls
ID                  NAME                MODE                REPLICAS            IMAGE
     PORTS
k70j90k9cp5n        sleep-app           replicated          1/1                 ubuntu:latest
The state of the service may change a couple times until it is running. The image is being downloaded from Docker Store to the other engines in the Swarm. Once the image is downloaded the container goes into a running state on one of the three nodes.
At this point it may not seem that we have done anything very differently than just running a docker run. We have again deployed a single container on a single host. The difference here is that the container has been scheduled on a swarm cluster.
Well done. You have deployed the sleep-app to your new Swarm using Docker services.
Scaling the Application
Demand is crazy! Everybody loves your sleep app! It’s time to scale out.
One of the great things about services is that you can scale them up and down to meet demand. In this step you’ll scale the service up and then back down.
You will perform the following procedure from node1.
Scale the number of containers in the sleep-app service to 7 with the docker service update –replicas 7 sleep-app command. Replicas is the term we use to describe identical containers providing the same service.
$ docker service update --replicas 7 sleep-app
sleep-app
overall progress: 7 out of 7 tasks
1/7: running
2/7: running
3/7: running
4/7: running
5/7: running
6/7: running
7/7: running
verify: Service converged
$ docker service ls
ID                  NAME                MODE                REPLICAS            IMAGE     PORTS
k70j90k9cp5n        sleep-app           replicated          7/7                 ubuntu:latest
The Swarm manager schedules so that there are 7 sleep-app containers in the cluster. These will be scheduled evenly across the Swarm members.
We are going to use the docker service ps sleep-app command. If you do this quick enough after using the –replicas option you can see the containers come up in real time.
$ docker service ps sleep-app
ID                  NAME                IMAGE               NODE                DESIRED STATE     CURRENT STATE                ERROR               PORTS
bv6ofc6x6moq        sleep-app.1         ubuntu:latest       manager1            Running     Running 6 minutes ago
5gj1ql7sjt14        sleep-app.2         ubuntu:latest       manager2            Running     Running about a minute ago
p01z0tchepwa        sleep-app.3         ubuntu:latest       worker2             Running     Running about a minute ago
x3kwnjcwxnb0        sleep-app.4         ubuntu:latest       worker2             Running     Running about a minute ago
c98vxyeefmru        sleep-app.5         ubuntu:latest       manager1            Running     Running about a minute ago
kwmey288bkhp        sleep-app.6         ubuntu:latest       manager3            Running     Running about a minute ago
vu78hp6bhauq        sleep-app.7         ubuntu:latest       worker1             Running     Running about a minute ago
Notice that there are now 7 containers listed. It may take a few seconds for the new containers in the service to all show as RUNNING. The NODE column tells us on which node a container is running.
Scale the service back down to just four containers with the docker service update –replicas 4 sleep-app command.
$ docker service update --replicas 4 sleep-app
sleep-app
overall progress: 4 out of 4 tasks
1/4: running
2/4: running
3/4: running
4/4: running
verify: Service converged
[manager1] (local) root@192.168.0.9 ~/dockerlabs/intermediate/swarm
$ docker service ps sleep-app
ID                  NAME                IMAGE               NODE                DESIRED STATE     CURRENT STATE           ERROR               PORTS
bv6ofc6x6moq        sleep-app.1         ubuntu:latest       manager1            Running     Running 7 minutes ago
5gj1ql7sjt14        sleep-app.2         ubuntu:latest       manager2            Running     Running 2 minutes ago
p01z0tchepwa        sleep-app.3         ubuntu:latest       worker2             Running     Running 2 minutes ago
kwmey288bkhp        sleep-app.6         ubuntu:latest       manager3            Running     Running 2 minutes ago
You have successfully scaled a swarm service up and down.
Next » Lab06 - Drain a Node and Reschedule the Containers
Lab06 - Drain a node and reschedule the containers
Your sleep-app has been doing amazing after hitting Reddit and HN. It’s now number 1 on the App Store! You have scaled up during the holidays and down during the slow season. Now you are doing maintenance on one of your servers so you will need to gracefully take a server out of the swarm without interrupting service to your customers.
Take a look at the status of your nodes again by running docker node ls on node1.
$ docker node ls
ID                            HOSTNAME            STATUS              AVAILABILITY        MANAGER STATUS      ENGINE VERSION
swfk8vsyfe4z2zbtianz5gh2p *   manager1            Ready               Active              Leader              18.09.3
sgyr3vxu1n99vyce9al67alwt     manager2            Ready               Active              Reachable           18.09.3
ud3ghz1zlrmn3fbv9j930ldja     manager3            Ready               Active              Reachable           18.09.3
v57fk367d1lw4e1ufis3jwa2h     worker1             Ready               Active               18.09.3
uinkvr56fq7zb711ycbifhf4f     worker2             Ready               Active               18.09.3
You will be taking worker2 out of service for maintenance.
Let’s see the containers that you have running on worker2.
We are going to take the ID for worker2 and run docker node update –availability drain worker2. We are using the worker2 host ID as input into our drain command. Replace yournodeid with the id of worker2.
$ docker node update --availability drain worker2
worker2
$ docker node ls
ID                            HOSTNAME            STATUS              AVAILABILITY        MANAGER STATUS      ENGINE VERSION
swfk8vsyfe4z2zbtianz5gh2p *   manager1            Ready               Active              Leader              18.09.3
sgyr3vxu1n99vyce9al67alwt     manager2            Ready               Active              Reachable           18.09.3
ud3ghz1zlrmn3fbv9j930ldja     manager3            Ready               Active              Reachable           18.09.3
v57fk367d1lw4e1ufis3jwa2h     worker1             Ready               Active               18.09.3
uinkvr56fq7zb711ycbifhf4f     worker2             Ready               Drain
Node worker2 is now in the Drain state.
Switch back to node2 and see what is running there by running docker ps.
$ docker ps
CONTAINER ID        IMAGE               COMMAND             CREATED             STATUS     PORTS               NAMES
worker2 does not have any containers running on it.
Lastly, check the service again on node1 to make sure that the container were rescheduled. You should see all four containers running on the remaining two nodes.
$ docker service ps sleep-app
ID                  NAME                IMAGE               NODE                DESIRED STATE     CURRENT STATE            ERROR               PORTS
bv6ofc6x6moq        sleep-app.1         ubuntu:latest       manager1            Running     Running 18 minutes ago
5gj1ql7sjt14        sleep-app.2         ubuntu:latest       manager2            Running     Running 12 minutes ago
5aqy7jv9ojmn        sleep-app.3         ubuntu:latest       worker1             Running     Running 3 minutes ago
p01z0tchepwa         \_ sleep-app.3     ubuntu:latest       worker2             Shutdown     Shutdown 3 minutes ago
kwmey288bkhp        sleep-app.6         ubuntu:latest       manager3            Running     Running 12 minutes ago
[manager1] (local) root@192.168.0.9 ~/dockerlabs/intermediate/swarm
$ docker node inspect --pretty worker2
ID:                     uinkvr56fq7zb711ycbifhf4f
Hostname:               worker2
Joined at:              2019-03-08 15:12:03.102015148 +0000 utc
Status:
 State:                 Ready
 Availability:          Drain
 Address:               192.168.0.10
Platform:
 Operating System:      linux
 Architecture:          x86_64
Resources:
 CPUs:                  8
 Memory:                31.4GiB
Plugins:
 Log:           awslogs, fluentd, gcplogs, gelf, journald, json-file, local, logentries, splunk
, syslog
 Network:               bridge, host, ipvlan, macvlan, null, overlay
 Volume:                local
Engine Version:         18.09.3
TLS Info:
 TrustRoot:
-----BEGIN CERTIFICATE-----
MIIBajCCARCgAwIBAgIUcfR/4dysEv9qsbuPTFuIn00WbmowCgYIKoZIzj0EAwIw
EzERMA8GA1UEAxMIc3dhcm0tY2EwHhcNMTkwMzA4MTUwNzAwWhcNMzkwMzAzMTUw
NzAwWjATMREwDwYDVQQDEwhzd2FybS1jYTBZMBMGByqGSM49AgEGCCqGSM49AwEH
A0IABPo7tm+Vxk+CIw9AJEGTlyW/JPotQuVqrbvi34fuK6Ak4cWYU6T1WSiJMHI0
nEGS/1zFIWQzJY0WQbT8eMaqX4ijQjBAMA4GA1UdDwEB/wQEAwIBBjAPBgNVHRMB
Af8EBTADAQH/MB0GA1UdDgQWBBQ6OEYmo8HUfpFnSxJDHWkjf/wWmTAKBggqhkjO
PQQDAgNIADBFAiBy39e7JLpHBH0bONWU8rQZPmY2dtkfHjPOUQNLFBdlkAIhAIpD
Lb6ZrhbEJDcIhlnozKRcPSJi7RWy4/16THIUJdpM
-----END CERTIFICATE-----

 Issuer Subject:        MBMxETAPBgNVBAMTCHN3YXJtLWNh
 Issuer Public Key:     MFkwEwYHKoZIzj0CAQYIKoZIzj0DAQcDQgAE+ju2b5XGT4IjD0AkQZOXJb8k+i1C5Wqtu+Lfh+4roCThxZhTpPVZKIkwcjScQZL/XMUhZDMljRZBtPx4xqpfiA==
Run docker node update –availability active
$ docker node update --availability active worker2
worker2
[manager1] (local) root@192.168.0.9 ~/dockerlabs/intermediate/swarm
$ docker node inspect --pretty worker2
ID:                     uinkvr56fq7zb711ycbifhf4f
Hostname:               worker2
Joined at:              2019-03-08 15:12:03.102015148 +0000 utc
Status:
State:                 Ready
Availability:          Active
Address:               192.168.0.10
Platform:
Operating System:      linux
Architecture:          x86_64
Resources:
CPUs:                  8
Memory:                31.4GiB
Plugins:
Log:           awslogs, fluentd, gcplogs, gelf, journald, json-file, local, logentries, splunk, syslog
Network:               bridge, host, ipvlan, macvlan, null, overlay
Volume:                local
Engine Version:         18.09.3
TLS Info:
TrustRoot:
-----BEGIN CERTIFICATE-----
MIIBajCCARCgAwIBAgIUcfR/4dysEv9qsbuPTFuIn00WbmowCgYIKoZIzj0EAwIw
EzERMA8GA1UEAxMIc3dhcm0tY2EwHhcNMTkwMzA4MTUwNzAwWhcNMzkwMzAzMTUw
NzAwWjATMREwDwYDVQQDEwhzd2FybS1jYTBZMBMGByqGSM49AgEGCCqGSM49AwEH
A0IABPo7tm+Vxk+CIw9AJEGTlyW/JPotQuVqrbvi34fuK6Ak4cWYU6T1WSiJMHI0
nEGS/1zFIWQzJY0WQbT8eMaqX4ijQjBAMA4GA1UdDwEB/wQEAwIBBjAPBgNVHRMB
Af8EBTADAQH/MB0GA1UdDgQWBBQ6OEYmo8HUfpFnSxJDHWkjf/wWmTAKBggqhkjO
PQQDAgNIADBFAiBy39e7JLpHBH0bONWU8rQZPmY2dtkfHjPOUQNLFBdlkAIhAIpD
Lb6ZrhbEJDcIhlnozKRcPSJi7RWy4/16THIUJdpM
-----END CERTIFICATE-----

Issuer Subject:        MBMxETAPBgNVBAMTCHN3YXJtLWNh
Issuer Public Key:     MFkwEwYHKoZIzj0CAQYIKoZIzj0DAQcDQgAE+ju2b5XGT4IjD0AkQZOXJb8k+i1C5Wqtu+Lfh+4roCThxZhTpPVZKIkwcjScQZL/XMUhZDMljRZBtPx4xqpfiA==
Lab07 - Cleaning Up
Execute the docker service rm sleep-app command on manager1 to remove the service called sleep-app.
$ docker service rm sleep-app
sleep-app
[manager1] (local) root@192.168.0.9 ~/dockerlabs/intermediate/swarm
$ docker service ls
ID                  NAME                MODE                REPLICAS            IMAGE     PORTS
Execute the docker ps command on node1 to get a list of running containers.
docker ps
CONTAINER ID        IMAGE               COMMAND             CREATED             STATUS              PORTS               NAMES
044bea1c2277        ubuntu              "sleep infinity"    17 minutes ago      17 minutes ag                           distracted_mayer
You can use the docker kill
docker kill yourcontainerid
Finally, let’s remove node1, node2, and node3 from the Swarm. We can use the docker swarm leave –force command to do that.
Lets run docker swarm leave –force on all the nodes to leave swarm cluster.
docker swarm leave --force
Congratulations! You’ve completed this lab. You now know how to build a swarm, deploy applications as collections of services, and scale individual services up and down.
Running Cron Jobs container on Docker Swarm Cluster
A Docker Swarm consists of multiple Docker hosts which run in swarm mode and act as managers (to manage membership and delegation) and workers (which run swarm services). When you create a service, you define its optimal state (number of replicas, network and storage resources available to it, ports the service exposes to the outside world, and more). Docker works to maintain that desired state. For instance, if a worker node becomes unavailable, Docker schedules that node’s tasks on other nodes. A task is a running container which is part of a swarm service and managed by a swarm manager, as opposed to a standalone container.
Let us talk a bit more about Services…
A Swarm service is a 1st class citizen and is the definition of the tasks to execute on the manager or worker nodes. It is the central structure of the swarm system and the primary root of user interaction with the swarm. When one create a service, you specify which container image to use and which commands to execute inside running containers.Swarm mode allows users to specify a group of homogenous containers which are meant to be kept running with the docker service CLI. Its ever running process.This abstraction which is undoubtedly powerful, may not be the right fit for containers which are intended to eventually terminate or only run periodically. Hence, one might need to run some containers for specific period of time and terminate it acccordingly.
Let us consider few example:
- You are a System Administrator who wishes to allow users to submit long-running compiler jobs on a Swarm cluster
- A website which needs to process all user uploaded images into thumbnails of various sizes
- An operator who wishes to periodically run docker rmi $(docker images –filter dangling=true -q) on each machine
Today Docker Swarm doesn’t come with this feature by default. But there are various workaround to make it work. Under this tutorial, we will show you how to run on-off cron-job on 5-Node Swarm Mode Cluster.
Tested Infrastructure
| Platform | Number of Instance | Reading Time |
|---|---|---|
| Play with Docker | 5 | 5 min |
Pre-requisite
- Create an account with DockerHub
- Open PWD Platform on your browser
- Click on Spanner on the left side of the screen to bring up 5-Node Swarm Mode Cluster
Verifying 5-Node Swarm Mode Cluster
$ docker node ls
ID                            HOSTNAME            STATUS              AVAILABILITY        MANAGER STATUS
 ENGINE VERSION
y2ewcgx27qs4qmny9840zj92p *   manager1            Ready               Active              Leader
 18.06.1-ce
qog23yabu33mpucu9st4ibvp5     manager2            Ready               Active              Reachable
 18.06.1-ce
tq0ed0p2gk5n46ak4i1yek9yc     manager3            Ready               Active              Reachable
 18.06.1-ce
tmbcma9d3zm8jcx965ucqu2mf     worker1             Ready               Active
 18.06.1-ce
dhht9gr8lhbeilrbz195ffhrn     worker2             Ready               Active
 18.06.1-ce
Cloning the Repository
git clone https://github.com/crazy-max/swarm-cronjob
cd swarm-cronjob/.res/example
Bring up Swarm Cronjob
docker stack deploy -c swarm_cronjob.yml swarm_cronjob
Listing Docker Services
$ docker service ls
ID                  NAME                MODE                REPLICAS            IMAGE
  PORTS

qsmd3x69jds1        myswarm_app         replicated          1/1                 crazymax/swarm-cronjob:latest
Visualizing the Swarm Cluster running Cronjob container
git clone https://github.com/collabnix/dockerlabs
cd dockerlabs/intermediate/swarm/visualizer/
docker-compose up -d

Example #1: Running Date container every 5 seconds

Edit date.yml file to change cronjob from * to */5 to run every 5 seconds as shown:
$ cd .res/example/
$ cat date.yml
version: "3.2"
services:  test:    image: busybox    command: date    deploy:
      labels:
        - "swarm.cronjob.enable=true"
        - "swarm.cronjob.schedule=*/5 * * * *"
        - "swarm.cronjob.skip-running=false"
      replicas: 0
      restart_policy:
        condition: none
[manager1] (local) roo
Bringing up App Stack
docker stack deploy -c date.yml date

Locking docker swarm
Docker introduced native swarm support in Docker v1.12
Docker swarm uses raft consensus algorithm to maintain consensus between the nodes of a swarm cluster. Docker engine maintains raft logs which in turn holds the data of cluster configuration, status of nodes and other sensitive data.
Docker v1.13 introduced the concept of secrets, With secrets a developer could encrypt the sensitive data and give access of decrypted data to particular swarm services using swarm stack configuration.
In v1.13, Docker also encrypts the raft logs at rest and stores the encryption key in /var/lib/docker/swarm/certificates directory in each swarm manager of the cluster. If a malicious user has access to any of the manager nodes, He can easily get the encrption key, decrypt the logs and get hands on sensitive data available in the raft logs (Secrets are also stored in the raft logs).
To bypass this possibilty of disaster and protect the encryption key, Docker introduced swarm autolock feature which allows us to take the ownership of the keys.
Note:
If you enable autolock feature, Whenever your manager node restarts you have to manually supply the key in order for the manager node to decrypt the logs.
Enabling autolock feature
There are various ways enable autolock feature.
While initializing the swarm
docker swarm init --autolock

Store the swarm unlock key in a safe place.
If swarm is already initialized
docker swarm update --autolock=true

Disabling autolock feature
If you want to disable autolock feature and the swarm is already initilized, Use the command mentioned below.
docker swarm update --autolock=false

Retrieving unlock key
If you lost the unlock key and you still have quorum of managers in the cluster, You can retrieve the unlock key by using the following command on the manager.
docker swarm unlock-key

Note: Unlock key can only be retrieved on a unlocked manager.
Unlocking a swarm
If a swarm is locked (When a manager node restarts) one has to manaually unlock the swarm using the unlock key.
docker swarm unlock

Certain scenarios
-
If a manager node is restarted it will be locked by default and has to be unlocked using the swarm unlock key.
-
If a manager node is restarted and you don’t have the unlock key but quorom of managers is maintined in the cluster. Then unlock key can be retrieved using the command mentioned above on any of the unlocked managers.
-
If a manager node is restarted and you don’t have the unlock key and quorum is also lost. Then there is no option bu for the manager is leave the swarm and join bas a new manager.
Contributor
5 - Multistage build
Building Dockerfiles in Multistage Build
Before Multistage Build
Keeping the image size small is one of the most difficult aspects of creating images.Every Dockerfile command adds a layer to the image, therefore before adding the next layer, remember to remove any artifacts you don’t need.Traditionally, writing an extremely effective Dockerfile required using shell tricks and other logic to keep the layers as compact as possible and to make sure that each layer only included the items it required from the previous layer and nothing else.
In reality, it was rather typical to use one Dockerfile for development (which included everything required to build your application) and a slimmed-down one for production (which only included your application and precisely what was required to run it).The “builder pattern” has been applied to this.It is not ideal to keep two Dockerfiles up to date.
The example that follows uses a simple React application that is first developed and then has its static content served by a Nginx virtual server.The two Dockerfiles that were utilized to produce the optimized image are listed below.You’ll also see a shell script that illustrates the Docker CLI instructions that must be executed to achieve this result.
Here’s an example of a Dockerfile.build, Dockerfile.main and Dockerfile which adhere to the builder pattern above:
Dockerfile.build
FROM node:alpine3.15
WORKDIR /app
COPY package*.json ./
RUN npm install
COPY . .
RUN npm run build
Dockerfile.main
FROM nginx
EXPOSE 3000
COPY ./nginx/default.conf /etc/nginx/conf.d/default.conf
COPY /app/build /usr/share/nginx/html
Build.sh
#!/bin/sh
echo Building myimage/react:build

docker build -t myimage:build . -f Dockerfile.build

docker create --name extract myimage:build

docker cp extract:/app/build ./app

docker rm -f extract

echo Building myimage/react:latest

docker build --no-cache -t myimage/react:latest . -f Dockerfile.main
How to Use Multistage Builds in Docker
In Docker Engine 17.05, multi-stage build syntax was included. You use numerous FROM statements in your Dockerfile while performing multi-stage builds.Each FROM command can start a new stage of the build and may use a different base.Artifacts can be copied selectively from one stage to another, allowing you to remove anything unwanted from the final image.Let’s modify the Dockerfile from the preceding section to use multi-stage builds to demonstrate how this works.
Dockerfile
FROM node:alpine3.15 as build
WORKDIR /app
COPY package*.json ./
RUN npm install
COPY . .
RUN npm run build

FROM nginx
EXPOSE 3000
COPY ./nginx/default.conf /etc/nginx/conf.d/default.conf
COPY --from=build /app/build /usr/share/nginx/html
Here only one Dockerfile is required.Additionally, you don’t require a separate build script.Simply run docker build .
There are two FROM commands in this Dockerfile, and each one represents a different build step.In this phase, the application is created and stored in the directory that the WORKDIR command specifies.The Nginx image is first pulled from Docker Hub to begin the second stage.The revised virtual server configuration is then copied to replace the stock Nginx configuration.then, the image created by the prior stage is utilised to copy only the production-related application code using the COPY -from command.
The stages are not named by default; instead, you refer to them by their integer number, which starts at 0 for the first FROM command.However, you can give your stages names by following the FROM instruction with an AS <NAME>.Here we used build as a name.By naming the stages and using the names in the COPY command, this example enhances the prior one.This means that the COPY remains intact even if the instructions in your Dockerfile are later rearranged.
Repurpose an earlier stage as a new stage.
The FROM command allows you to continue where a previous stage ended by referring to it.For instance:
FROM alpine:latest AS builder
...
...

FROM builder AS build1
...
...

FROM builder AS build2
...
...
Use an external image as a “stage”
When using multi-stage builds, you are not limited to copying from stages you created earlier in your Dockerfile. You can use the COPY --from instruction to copy from a separate image, either using the local image name, a tag available locally or on a Docker registry, or a tag ID. The Docker client pulls the image if necessary and copies the artifact from there. The syntax is:
COPY --from=sampleapp:latest home/user/app/config.json app/config.json
Demonstrating Multi-Stage Builds
For demonstration, Let us consider a nodejs project and build a binary out of it. When you execute this binary, it will call a NASA api which returns some interesting facts about today’s date.
Before: docker images

Currently we have two images which I pulled from dockerhub:
alpine (~4Mb)- Lightest version of linux osalpine-node (~70Mb)- alpine + Node/Npm and other dependency.
File structure

-
Dockerfile:- On stage 0 (alias:
builder), we have aalpine-nodeOS which hasnodeandnpmbuilt in it. Its size is~70Mb. This stage will create binary (named asnasa: Line 6) in the currentWORKDIRi.eapp/. - On stage 1, we have
alpineOS. After that, we install some necessary dependencies. InLine 14, we copiednasabinary from previous stage (builder) to current stage. So, we just copied binary and leaving all heavyalpine-nodeOS and other dependencies likenpm(node package manager) etc as binary already have required dependecies (like nodejs) built in it.
- On stage 0 (alias:
-
app/: It’s just a simple node application. It does ahttpscall and fetches data using nasa api. It hasindex.jsandpackage.json. I have usedpkgto build the node binary.
After: docker images

multistage:1.0.0 (56b102754f6d) is the final required image which we built. Its size is ~45Mb. Almost 1/4th of the intermediate image(13bac50ebc1a) built on stage 0. And almost half of alpine-node image.
So, this was a simple example to showcase multi-stage builds feature. For images having multi step (like 10-15 FROM statement), you will find this feature very useful.
6 - What happens when Containers are Launched?
What happens when Containers are Launched?
Here is basically what happens when a container is launched:
-
A container is created from a container image. Images are tarballs with a JSON configuration file attached. Images are often nested: for example this Libresonic image is built on top of a Tomcat image that depends (eventually) on a base Debian image. This allows for content deduplication because that Debian image (or any intermediate step) may be the basis for other containers. A container image is typically created with a command like docker build.
-
If necessary, the runtime downloads the image from somewhere, usually some “container registry” that exposes the metadata and the files for download over a simple HTTP-based protocol. It used to be only Docker Hub, but now everyone has their own registry: for example, Red Hat has one for its OpenShift project, Microsoft has one for Azure, and GitLab has one for its continuous integration platform. A registry is the server that docker pull or push talks with, for example.
-
The runtime extracts that layered image onto a copy-on-write (CoW) filesystem. This is usually done using an overlay filesystem, where all the container layers overlay each other to create a merged filesystem. This step is not generally directly accessible from the command line but happens behind the scenes when the runtime creates a container.
-
Finally, the runtime actually executes the container, which means telling the kernel to assign resource limits, create isolation layers (for processes, networking, and filesystems), and so on, using a cocktail of mechanisms like control groups (cgroups), namespaces, capabilities, seccomp, AppArmor, SELinux, and whatnot. For Docker, docker run is what creates and runs the container, but underneath it actually calls the runc command.
Those concepts were first elaborated in Docker’s Standard Container manifesto which was eventually removed from Docker, but other standardization efforts followed. The Open Container Initiative (OCI) now specifies most of the above under a few specifications:
- the Image Specification (often referred to as “OCI 1.0 images”) which defines the content of container images
- the Runtime Specification (often referred to as CRI 1.0 or Container Runtime Interface) describes the “configuration, execution environment, and lifecycle of a container”
- the Container Network Interface (CNI) specifies how to configure network interfaces inside containers, though it was standardized under the Cloud Native Computing Foundation (CNCF) umbrella, not the OCI
Implementation of those standards varies among the different projects. For example, Docker is generally compatible with the standards except for the image format. Docker has its own image format that predates standardization and it has promised to convert to the new specification soon. Implementation of the runtime interface also differs as not everything Docker does is standardized, as we shall see.
The Docker and rkt story
Since Docker was the first to popularize containers, it seems fair to start there. Originally, Docker used LXC but its isolation layers were incomplete, so Docker wrote libcontainer, which eventually became runc. Container popularity exploded and Docker became the de facto standard to deploy containers. When it came out in 2014, Kubernetes naturally used Docker, as Docker was the only runtime available at the time. But Docker is an ambitious company and kept on developing new features on its own. Docker Compose, for example, reached 1.0 at the same time as Kubernetes and there is some overlap between the two projects. While there are ways to make the two tools interoperate using tools such as Kompose, Docker is often seen as a big project doing too many things. This situation led CoreOS to release a simpler, standalone runtime in the form of rkt, that was explained this way:
Docker now is building tools for launching cloud servers, systems for clustering, and a wide range of functions: building images, running images, uploading, downloading, and eventually even overlay networking, all compiled into one monolithic binary running primarily as root on your server. The standard container manifesto was removed. We should stop talking about Docker containers, and start talking about the Docker Platform. It is not becoming the simple composable building block we had envisioned.
One of the innovations of rkt was to standardize image formats through the appc specification, something we covered back in 2015. CoreOS doesn’t yet have a fully standard implementation of the runtime interfaces: at the time of writing, rkt’s Kubernetes compatibility layer (rktlet), doesn’t pass all of Kubernetes integration tests and is still under development. Indeed, according to Brandon Philips, CTO of CoreOS, in an email exchange:
rkt has initial support for OCI image-spec, but it is incomplete in places. OCI support is less important at the moment as the support for OCI is still emerging in container registries and is notably absent from Kubernetes. OCI runtime-spec is not used, consumed, nor handled by rkt. This is because rkt execution is based on pod semantics, while runtime-spec only covers single container execution.
However, according to Dan Walsh, head of the container team at Red Hat, in an email interview, CoreOS’s efforts were vital to the standardization of the container space within the Kubernetes ecosystem: “Without CoreOS we probably would not have CNI, and CRI and would be still fighting about OCI. The CoreOS effort is under-appreciated in the market.” Indeed, according to Philips, the “CNI project and specifications originated from rkt, and were later spun off and moved to CNCF. CNI is still widely used by rkt today, both internally and for user-provided configuration.” At this point, however, CoreOS seems to be gearing up toward building its Kubernetes platform (Tectonic) and image distribution service (Quay) rather than competing in the runtime layer.
CRI-O: the minimal runtime
Seeing those new standards, some Red Hat folks figured they could make a simpler runtime that would only do what Kubernetes needed. That “skunkworks” project was eventually called CRI-O and implements a minimal CRI interface. During a talk at KubeCon Austin 2017, Walsh explained that “CRI-O is designed to be simpler than other solutions, following the Unix philosophy of doing one thing and doing it well, with reusable components.”
Started in late 2016 by Red Hat for its OpenShift platform, the project also benefits from support by Intel and SUSE, according to Mrunal Patel, lead CRI-O developer at Red Hat who hosted the talk. CRI-O is compatible with the CRI (runtime) specification and the OCI and Docker image formats. It can also verify image GPG signatures. It uses the CNI package for networking and supports CNI plugins, which OpenShift uses for its software-defined networking layer. It supports multiple CoW filesystems, like the commonly used overlay and aufs, but also the less common Btrfs.
One of CRI-O’s most notable features, however is that it supports mixed workloads between “trusted” and “untrusted” containers. For example, CRI-O can use Clear Containers for stronger isolation promises, which is useful in multi-tenant configurations or to run untrusted code. It is currently unclear how that functionality will trickle up into Kubernetes, which currently considers all backends to be the same.
CRI-O has an interesting architecture (see the diagram below from the talk slides [PDF]). It reuses basic components like runc to start containers, and software libraries like containers/image and containers/storage, created for the skopeo project, to pull container images and create container filesystems. A separate library called oci-runtime-tool prepares the container configuration. CRI-O introduces a new daemon to handle containers called conmon. According to Patel, the program was “written in C for stability and performance” and takes care of monitoring, logging, TTY allocation, and miscellaneous hazards like out-of-memory conditions.
CRI-O architecture
The conmon daemon is needed here to do all of the things that systemd doesn’t (want to) do. But even though CRI-O doesn’t use systemd directly to manage containers, it assigns containers to systemd-compatible cgroups, so that regular systemd tools like systemctl have visibility into the container resources. Since conmon (and not the CRI daemon) is the parent process of the container, it also allows parts of CRI-O to be restarted without stopping containers, which promises smoother upgrades. This is a problem for Docker deployments right now, where a Docker upgrade requires restarting all of the containers. This is usually not much trouble for Kubernetes clusters, however, because it is easy to roll out upgrades progressively by moving containers around.
CRI-O is the first implementation of the OCI standards suite that passes all Kubernetes integration tests (apart from Docker itself). Patel demonstrated those capabilities by showing a Kubernetes cluster backed by CRI-O, in what seemed to be a routine demonstration of cluster functionalities. Dan Walsh explained CRI-O’s approach in a blog post that explains how CRI-O interacts with Kubernetes:
Our number 1 goal for CRI-O, unlike other container runtimes, is to never break Kubernetes. Providing a stable and rock-solid container runtime for Kubernetes is CRI-O’s only mission in life.
According to Patel, performance is comparable to a normal Docker-based deployment, but the team is working on optimizing performance to go beyond that. Debian and RPM packages are available and deployment tools like minikube, or kubeadm also support switching to the CRI-O runtime. On existing clusters, switching runtimes is straightforward: just a single environment variable changes the runtime socket, which is what Kubernetes uses to communicate with the runtime.
CRI-O 1.0 was released in October 2017 with support for Kubernetes 1.7. Since then, CRI-O 1.8 and 1.9 were released to follow the Kubernetes 1.8 and 1.9 releases (and sync version numbers). Patel considers CRI-O to be production-ready and it is already available in beta in OpenShift 3.7, released in November 2017. Red Hat will mark it as stable in the upcoming OpenShift 3.9 release and is looking at using it by default with OpenShift 3.10, while keeping Docker as a fallback. Next steps include integrating the new Kata Containers virtual-machine-based runtime, kube-spawn support, and more storage backends like NFS or GlusterFS. The team also discussed how it could support casync or libtorrent to optimize synchronization of images between nodes.
containerd: Docker’s runtime gets an API While Red Hat was working on its implementation of OCI, Docker was also working on the standard, which led to the creation of another runtime, called containerd. The new daemon is a refactoring of internal Docker components to combine the OCI-specific bits like execution, storage, and network interface management. It was already featured in the 1.12 Docker release, but wasn’t completed until the containerd 1.0 release announced at KubeCon, which will be part of the upcoming Docker 17.12 (Docker has moved to version numbers based on year and month). And while we call containerd a “runtime”, it doesn’t directly implement the CRI interface, which is covered by another daemon called cri-containerd. So containerd needs more daemons than CRI-O for Kubernetes (five, versus three for CRI-O). Also, at the time of writing, the cri-containerd component is marked as beta but containerd itself is already used in numerous production environments through Docker, of course.
During the Node special interest group (SIG) meeting at KubeCon, Stephen Day described [Speaker Deck] containerd as “designed as a tight core of decoupled components”. Unlike CRI-O, however, containerd supports workloads outside the Kubernetes ecosystem through a Go API. The API is not considered stable yet, although containerd defines a clear release process for making changes to the API and command-line tools. Like CRI-O, containerd is feature complete and passes all Kubernetes tests, but it does not interoperate with systemd’s cgroups.
Next step for the project is to develop more tests and improve performance like memory usage and latency. Containerd developers are also working hard on improving stability. They want to provide Debian and RPM packages for easier installation, and integrate it with minikube and kops as well. There are also plans to integrate Kata Containers more smoothly: runc can already be replaced by Kata for basic integration but cri-containerd integration is not implemented yet.
Interoperability and defaults All of those options are causing a certain amount of confusion in the community. At KubeCon, which runtime to use was a recurring question to speakers. Kubernetes will likely change from Docker to a different runtime, because it doesn’t need all the features Docker provides, and there are concerns that the switch could cause compatibility issues because the new runtimes do not implement exactly the same interface as Docker. Log files, for example, are different in the CRI standard. Some programs also monitor the Docker socket directly, which has some non-standard behaviors that the new runtimes may implement differently, or not at all. All of this could cause some breakage when switching to a different runtime.
The question of which runtime Kubernetes will switch to (if it changes) is also open, which leads to some competition between the runtimes. There was a slight controversy related to that question at KubeCon because CRI-O wasn’t mentioned during the CNCF keynote, something Vincent Batts, a senior engineer at Red Hat, mentioned on Twitter:
It is bonkers that CRI implementations containerd and rktlet are covered in KubeCon keynote, but zero mention of CRI-O, which is a Kubernetes project that’s been 1.0 and actually used in production.
When I prompted him for details about this at KubeCon, Batts explained that:
Healthy competition is good, the problem is unhealthy competition. The CNCF should be better stewards of the projects under their umbrella and shouldn’t fold under pressure to promote certain projects over others.
Batts explained further that Red Hat “may be at a tipping point where some apps could start being deployed as containers instead of RPMs” citing “security concerns (namely with [security] advisory tracking, which is lacking in containers as a packaging format) as the main blocker for such transitions”. With Project Atomic, Red Hat seems to be pivoting toward containers, so the stakes are high for the Linux distribution.
When I talked to CNCF’s COO Chris Aniszczyk at KubeCon, he explained that the CNCF “current policy is to prioritize the marketing of top-level projects”:
Projects like CRIO and Helm are part of Kubernetes in some fashion and therefore part of CNCF, we just don’t market them as heavily as our top level projects which have passed the CNCF TOC [Technical Oversight Committee] approval bar.
Aniszczyk added that “we want to help, we’ve heard the feedback and plan to address things in 2018”, suggesting that one solution could be that CRI-O applies to graduate to a top-level project in CNCF.
During a container runtimes press meeting, Philips explained that the community would decide, through consensus, which runtime Kubernetes would run by default. He compared runtimes to web browsers and suggested that OCI specifications for containers be compared to the HTML5 and Javascript standards: those are evolving standards that get pushed by the different implementations. He argued that this competition is healthy and means more innovation.
A lot of the people involved in writing those new runtimes were originally Docker contributors: Patel was the initial maintainer of the original OCI implementation that led to runc, while Philips was also a core Docker contributor before starting the rkt project. Those people actively collaborate, along with Docker developers, on standardizing those interfaces and all want to see Kubernetes stabilize and improve. The goal, according to Patrick Chazenon from Docker Inc., is to “make container runtimes boring and stable to have people innovate on top of it”. The developers present at the press meeting were happy and proud of what they have accomplished: they have managed to create a single, interoperable specification for containers, and that specification is expanding.
Consolidation and standardization will continue in 2018 The current big topic in container standardization is not runtimes as much as image distribution (i.e. container registries), which is likely to standardize, again, in a specification built around Docker’s distribution system. There is also work needed to follow the Linux kernel changes, for example cgroups v2.
The reality is that each runtime has its own advantages: containerd has an API so it can be used to build customized platforms, while CRI-O is a simpler runtime specifically targeting Kubernetes. Docker and rkt are on another level, providing more than simply the runtime: they also provide ways of building containers or pushing to registries, for example.
Right now, most public cloud infrastructure still uses Docker as a runtime. In fact, even CoreOS uses Docker instead of rkt in its Tectonic platform. According to Philips, this is because “there is a substantial integration ecosystem around Docker Engine that our customers rely on and it is the most well-tested option across all existing Kubernetes products.” Philips says that CoreOS may consider supporting alternate runtimes for Tectonic, “if alternative container runtimes provide significant improvements to Kubernetes users”:
At this point containerd and CRI-O are both very young projects due to the significant amount of new code each project developed this year. Further, they need to reach the maturity of third-party integrations across the ecosystem from logging, monitoring, security, and much more.
Philips further explained CoreOS’s position in this blog post:
So far the primary benefits of the CRI for the Kubernetes community have been better code organization and improved code coverage in the Kubelet itself, resulting in a code base that’s both higher quality and more thoroughly tested than ever before. For nearly all deployments, however, we expect the Kubernetes community will continue to use Docker Engine in the near term.
During the discussion in the press meeting, Patel likewise said that “we don’t want Kubernetes users to know what the runtime is”. Indeed, as long as it works, users shouldn’t care. Besides, OpenShift, Tectonic, and other platforms abstract runtime decisions away and pick their own best default matching their users' requirements. The question of which runtime Kubernetes chooses by default is therefore not really a concern for those developers, who prefer working on building consensus on standard specifications. In a world of conflict, seeing those developers working together cordially was definitely a breath of fresh air.
Reference: https://lwn.net/Articles/741897/