Advanced Docker networking
Advanced network configuration
introduces some of Docker’s advanced network configurations and options.
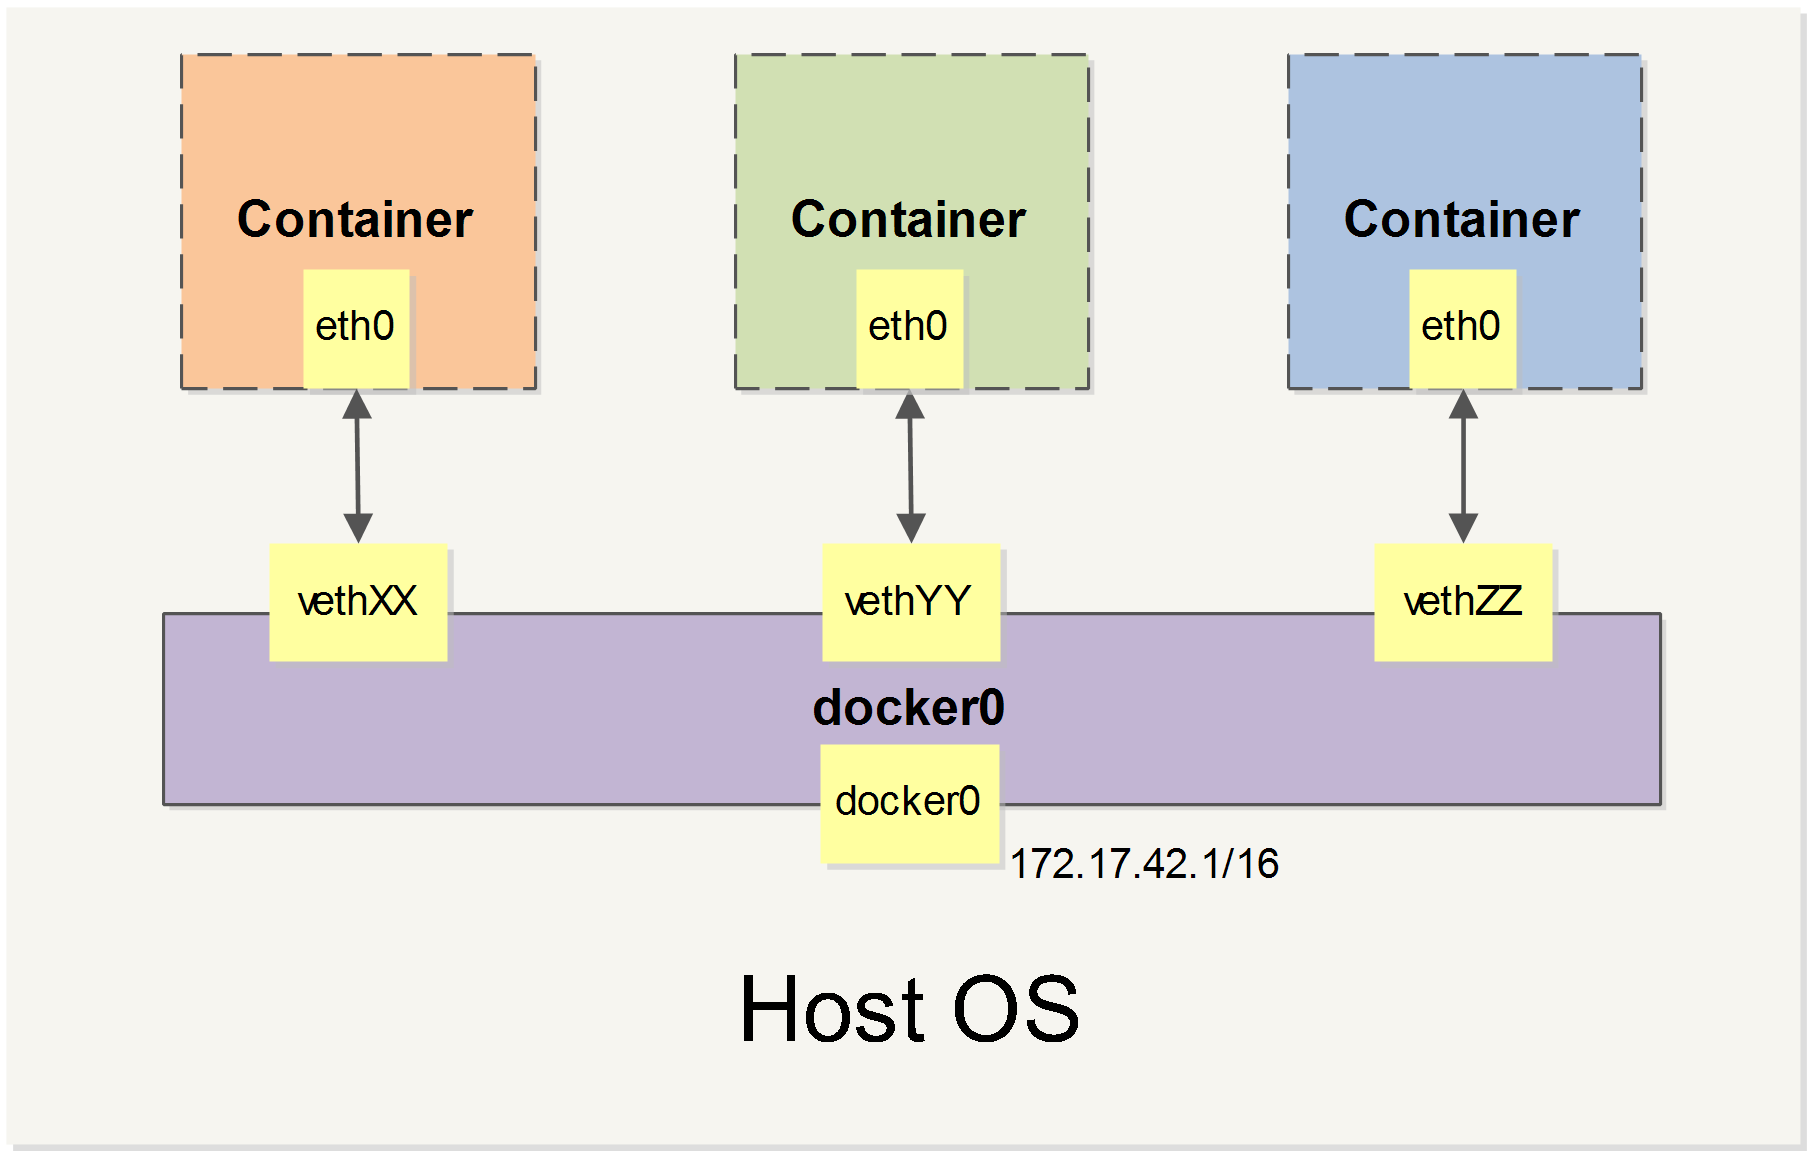
When Docker starts, it automatically creates a docker0 virtual bridge on the host. It is actually a bridge of Linux, which can be understood as a software switch. It will be forwarded between the network ports that are mounted to it.
At the same time, Docker randomly assigns an address in a private unoccupied private network segment (defined in RFC1918 ) to the docker0 interface. For example, the typical 172.17.42.1 mask of 255.255.0.0 . The network port in the container started after this will also automatically assign an address of the same network segment ( 172.17.0.0/16 ).
When creating a Docker container, a pair of veth pair interfaces are created (when the packet is sent to one interface, the other interface can also receive the same packet). The pair is terminated in the container, eth0 ; the other end is local and mounted to the docker0 bridge, with the name starting with veth (for example, vethAQI2QT ). In this way, the host can communicate with the container and the containers can communicate with each other. Docker created a virtual shared network between the host and all containers.
we will cover all of Docker’s network custom configurations in some scenarios. And adjust, complement, or even replace Docker’s default network configuration with Linux commands.
Configuring DNS
How to customize the host name and DNS of the configuration container? The secret is that Docker uses virtual files to mount three related configuration files for the container.
Use the mount command in the container to see the mount information:
$ mount /dev/disk/by-uuid/1fec...ebdf on /etc/hostname type ext4 ... /dev/disk/by-uuid/1fec...ebdf on /etc/hosts type ext4 ... tmpfs on /etc/resolv.conf type tmpfs ...
- This mechanism allows the DNS configuration of all Docker containers to be updated immediately after the host host’s DNS information is updated via the
/etc/resolv.conffile.
Configure DNS for all containers, or add the following to the /etc/docker/daemon.json file to set it up.
{ "dns" : [ "114.114.114.114" , "8.8.8.8" ] }
This way the container DNS is automatically configured to 114.114.114.114 and 8.8.8.8 each time it is started. Use the following command to prove that it has taken effect.
$ docker run -it --rm ubuntu:18.04 cat etc/resolv.conf nameserver 114.114.114.114 nameserver 8.8.8.8
If the user wants to manually specify the configuration of the container, you can add the following parameters when starting the container with the docker run command:
-h HOSTNAME or --hostname=HOSTNAME sets the hostname of the container, which will be written to /etc/hostname and/etc/hostscontainer. But it is not docker container ls , neither in the docker container ls nor in the other container’s /etc/hosts .
--dns=IP_ADDRESS Add the DNS server to the /etc/resolv.conf of the container and let the container use this server to resolve all hostnames that are not in /etc/hosts .
--dns-search=DOMAIN sets the search domain of the container. When the search domain is set to .example.com , when searching for a host named host, DNS not only searches for host but also searches for host.example.com .
Note: If the last two parameters are not specified when the container starts, Docker will default to configuring the container with /etc/resolv.conf on the host.
Disable networking for a container
Tested Infrastructure
| Platform | Number of Instance | Reading Time |
|---|---|---|
| Mac OS | 1 | 5 min |
Pre-requisite
- A linux system (here we have used macbook)
- Docker installed
If we want to disable the networking stack on a container, we can use the “–network none” flag when starting the container. Within the container, only the loopback device is created.
Steps to implement this
- Create a container
$ docker run --rm -dit --network none --name no-net-alpine alpine:latest ash
Unable to find image 'alpine:latest' locally
latest: Pulling from library/alpine
4fe2ade4980c: Pull complete
Digest: sha256:621c2f39f8133acb8e64023a94dbdf0d5ca81896102b9e57c0dc184cadaf5528
Status: Downloaded newer image for alpine:latest
b961be5a20f2795125b85818ea2522ebb173beb36ec43fe10ed78cbd9a1a5d9e
- Check the container’s network stack, by executing “ip link show” networking commands within the container. Notice that no eth0 was created.
$ docker exec no-net-alpine ip link show
1: lo: <LOOPBACK,UP,LOWER_UP> mtu 65536 qdisc noqueue state UNKNOWN qlen 1
    link/loopback 00:00:00:00:00:00 brd 00:00:00:00:00:00
2: tunl0@NONE: <NOARP> mtu 1480 qdisc noop state DOWN qlen 1
    link/ipip 0.0.0.0 brd 0.0.0.0
3: ip6tnl0@NONE: <NOARP> mtu 1452 qdisc noop state DOWN qlen 1
    link/tunnel6 00:00:00:00:00:00:00:00:00:00:00:00:00:00:00:00 brd 00:00:00:00:00:00:00:00:00:00:00:00:00:00:00:00
- You can check that no routing table available in this container
$ docker exec no-net-alpine ip route
$
- Stop the container
$ docker stop no-net-alpine
no-net-alpine
- Container will be automatically removed while stop, because it was created with the –rm flag.
$ docker container rm no-net-alpine
Error: No such container: no-net-alpine
Without “–network none” option
If we do not use “–network none” then we can see below differences.
$ docker run --rm -dit  --name no-net-alpine alpine:latest ash
8a90992643c7b75e8d4daaf6d55fd9961c264f8f1af49d3e9ed420b657706ef9

$ docker exec no-net-alpine ip link show
1: lo: <LOOPBACK,UP,LOWER_UP> mtu 65536 qdisc noqueue state UNKNOWN qlen 1
    link/loopback 00:00:00:00:00:00 brd 00:00:00:00:00:00
2: tunl0@NONE: <NOARP> mtu 1480 qdisc noop state DOWN qlen 1
    link/ipip 0.0.0.0 brd 0.0.0.0
3: ip6tnl0@NONE: <NOARP> mtu 1452 qdisc noop state DOWN qlen 1
    link/tunnel6 00:00:00:00:00:00:00:00:00:00:00:00:00:00:00:00 brd 00:00:00:00:00:00:00:00:00:00:00:00:00:00:00:00
10: eth0@if11: <BROADCAST,MULTICAST,UP,LOWER_UP,M-DOWN> mtu 1500 qdisc noqueue state UP
    link/ether 02:42:ac:11:00:02 brd ff:ff:ff:ff:ff:ff
You could see eth0 related info in networking command output.
Exposing a Container Port on the Host
Tested Infrastructure
| Platform | Number of Instance | Reading Time |
|---|---|---|
| Mac OS | 1 | 5 min |
Pre-requisite
- A linux system (here we have used macbook)
- Docker installed
To expose the container port on the host we use -p or –publish option. [-p host_port:container_port ]
$ docker run -dit --name my-apache-app -p 8080:80 -v "$PWD":/usr/local/apache2/htdocs/ httpd:2.4
7e14fd11385969433f3273c3af0c74f9b0d0afd5f8aa7492b9705712df421f14
Once the port exposed to host , try to reach the port via explorer or with curl commands. You should get proper output from the container
$ curl localhost:8080
<!DOCTYPE HTML PUBLIC "-//W3C//DTD HTML 3.2 Final//EN">
<html>
 <head>
  <title>Index of /</title>
 </head>
 <body>
<h1>Index of /</h1>
<ul></ul>
</body></html>
Finding IP address of Container
Tested Infrastructure
| Platform | Number of Instance | Reading Time |
|---|---|---|
| Mac OS | 1 | 5 min |
Pre-requisite
- A linux system (here we have used macbook)
- Docker installed
If you want to get the IP address of the container running on your system “docker inspect” with –format option will be helpful. Create a container and pass the container name or id to the “docker inspect” with –format or -f option.
$ docker run --rm -dit  --name no-net-alpine alpine:latest ash
8a90992643c7b75e8d4daaf6d55fd9961c264f8f1af49d3e9ed420b657706ef9

$ docker inspect -f '{{range .NetworkSettings.Networks}}{{.IPAddress}}{{end}}' no-net-alpine
172.17.0.2
Verifying host-level settings that impact Docker networking
Docker relies on the host being capable of performing certain functions to make Docker networking work. Namely, your Linux host must be configured to allow IP forwarding. In addition, since the release of Docker 1.7, you may now choose to use hairpin Network Address Translation (NAT) rather than the default Docker user land proxy. In this recipe, we’ll review the requirement for the host to have IP forwarding enabled. We’ll also talk about NAT hairpin and discuss the host-level requirements for that option as well. In both cases, we’ll show Docker’s default behavior with regard to its settings as well as how you can alter them.
Tested Infrastructure
| Platform | Number of Instance | Reading Time |
|---|---|---|
| Ubuntu 18.04 | 1 | 5 min |
Pre-requisite
- Create an account with DockerHub
- Open PWD Platform on your browser
- Click on Add New Instance on the left side of the screen to bring up Alpine OS instance on the right side
Most Linux distributions default the IP forward value to disabled or 0. Fortunately for us, in a default configuration, Docker takes care of updating this setting to the correct value when the Docker service starts. For instance, let’s take a look at a freshly rebooted host that doesn’t have the Docker service enabled at boot time. If we check the value of the setting before starting Docker, we can see that it’s disabled. Starting the Docker engine automatically enables the setting for us:
user@docker1:~$ more /proc/sys/net/ipv4/ip_forward
0
user@docker1:~$ sudo systemctl start docker
user@docker1:~$ sysctl net.ipv4.ip_forward
net.ipv4.ip_forward = 1
Linking Containers in Docker
Tested Infrastructure
| Platform | Number of Instance | Reading Time |
|---|---|---|
| Mac OS | 1 | 5 min |
Pre-requisite
- A linux system (here we have used macbook)
- Docker installed
In order to connect together multiple docker containers or services running inside docker container, ‘–link’ flag can be used in order to securely connect and provide a channel to transfer information from one container to another. A simple application of using a Wordpress container linked to MySQL container, can explain this well
- Pull the latest MySql container
$ docker pull mysql:latest
latest: Pulling from library/mysql
a5a6f2f73cd8: Already exists
936836019e67: Pull complete
283fa4c95fb4: Pull complete
1f212fb371f9: Pull complete
e2ae0d063e89: Pull complete
5ed0ae805b65: Pull complete
0283dc49ef4e: Pull complete
a7e1170b4fdb: Pull complete
88918a9e4742: Pull complete
241282fa67c2: Pull complete
b0fecf619210: Pull complete
bebf9f901dcc: Pull complete
Digest: sha256:b7f7479f0a2e7a3f4ce008329572f3497075dc000d8b89bac3134b0fb0288de8
Status: Downloaded newer image for mysql:latest
- Run MySql Container in detach mode (MySQL 8 changed the password authentication method. We’re looking for the mysql_native_password plugin, hence “–default-authentication-plugin=mysql_native_password” option require)
$ docker run --name mysql01 -e MYSQL_ROOT_PASSWORD=Password1234 -d mysql --default-authentication-plugin=mysql_native_password
fdabd410a66e4b65ec959677c932ccad79542ee9081d86ad2cbd0e2fe0265f1d
- Pull Wordpress docker container
$ docker pull wordpress:latest
latest: Pulling from library/wordpress
a5a6f2f73cd8: Already exists
633e0d1cd2a3: Pull complete
fcdfdf7118ba: Pull complete
4e7dc76b1769: Pull complete
c425447c8835: Pull complete
75780b7b9977: Pull complete
33ed51bc30e8: Pull complete
7c4215700bc4: Pull complete
d4f613c1e621: Pull complete
de5465a3fde0: Pull complete
6d373ffaf200: Pull complete
991bff14f001: Pull complete
d0a8c1ecf326: Pull complete
aa3627a535bb: Pull complete
a36be75bb622: Pull complete
98ebddb8e6ca: Pull complete
ed6e19b74de1: Pull complete
18b9cc4a2286: Pull complete
dfe625c958ac: Pull complete
Digest: sha256:f431a0681072aff336acf7a3736a85266fe7b46de116f29a2ea767ff55ad8f54
Status: Downloaded newer image for wordpress:latest
- Run the wordpress container linking it to MySQL Container (will run the database container with name “mysql-wordpress” and will set root password for MySQL container)
$ docker run --name wordpress01 --link mysql01 -p 8080:80 -e WORDPRESS_DB_HOST=mysql01:3306 -e WORDPRESS_DB_USER=root -e WORDPRESS_DB_PASSWORD=Password1234 -e WORDPRESS_DB_NAME=wordpress -e WORDPRESS_TABLE_PREFIX=wp_ -d wordpress
83b1f3215b01e7640246eb945977052bbf64f500a5b7fa18bd5a27841b01289b
- Check the status of the Containers
$ docker ps
CONTAINER ID        IMAGE               COMMAND                  CREATED              STATUS              PORTS                  NAMES
83b1f3215b01        wordpress           "docker-entrypoint.s…"   33 seconds ago       Up 32 seconds       0.0.0.0:8080->80/tcp   wordpress01
fdabd410a66e        mysql               "docker-entrypoint.s…"   About a minute ago   Up About a minute   3306/tcp, 33060/tcp    mysql01
- As, we have linked both the container now wordpress container can be accessed from browser using the address http://localhost:8080 and setup of wordpress can be done easily.

Docker Quick Networking Guide
Below is a list of commands related to the Docker network.
Some of these command options are only configurable when the Docker service is started and will not take effect immediately.
-b BRIDGEor--bridge=BRIDGEspecifies the bridge to which the container is mounted--bip=CIDRcustom masker0 mask-H SOCKET...or--host=SOCKET...Channel for the Docker server to receive commands--icc=true|falseWhether communication between containers is supported--ip-forward=true|falsePlease see the communication between the containers below--iptables=true|falseyou allow Docker to add iptables rules?--mtu=BYTES MTUin the –mtu=BYTES container network
The following two command options can be specified either when starting the service or when starting the container. Specifying the Docker service when it is started will become the default value, and the default value of the setting can be overwritten when the docker run is executed later.
--dns=IP_ADDRESS...Use the specified DNS server--dns-search=DOMAIN...Specify the DNS search domain
Finally, these options are only used when the docker run executed because it is specific to the container’s properties.
-h HOSTNAMEor--hostname=HOSTNAMEconfiguration container hostname--link=CONTAINER_NAME:ALIASadds a connection to another container--net=bridge|none|container:NAME_or_ID|hostconfigures the bridge mode of the container-p SPEC or --publish=SPECmaps the container port to the host host-P or --publish-all=true|falsemaps all ports of the container to the host
Contributor - Sangam Biradar
Feedback
Was this page helpful?
Glad to hear it! Please tell us how we can improve.
Sorry to hear that. Please tell us how we can improve.